Contents
- 2.1. Starting Programs
- 2.2. Using Dolphin File Manager
- 2.3. Moving Text between Applications
- 2.4. Finding Data on your Computer or in the File System
- 2.5. Accessing Removable Media and External Devices
- 2.6. Using Virtual Desktops
- 2.7. Managing Internet Connections
- 2.8. Exploring the Internet
- 2.9. E-Mail and Scheduling
- 2.10. Instant Messaging
- 2.11. Managing Passwords
- 2.12. Opening or Creating Documents with OpenOffice.org
- 2.13. Viewing PDF Files and Other Documents
- 2.14. Taking Screen Shots
- 2.15. Displaying, Decompressing, and Creating Archives
- 2.16. Creating CDs or DVDs
- 2.17. Viewing and Managing Digital Images
- 2.18. Managing Your Music Collection
- 2.19. Troubleshooting
- 2.20. For More Information
The following sections give you a short introduction to the key functionalities and applications. Learn how to cope with basic and daily tasks and how small KDE utilities like a password manager or a clipboard tool can ease your life.
You can start programs either from the main menu or from the command line, using the dialog or a shell. Additionally, you can start programs from the desktop or the panel by left-clicking the program icon once.
![[Tip]](admon/tip.png) | Selecting and Starting Objects |
|---|---|
Clicking an object once in openSUSE usually starts an action directly: a program starts, a preview of the file is displayed, or the folder is opened. To former users of Windows, this behavior may be rather unusual. If you just want to select one or several objects without any other action, press Ctrl then click the object. Conversely, alter your mouse settings in the KDE Personal Settings as described in Procedure 3.11, “Adjusting the Mouse Settings”. | |
To open the main menu, click the main menu icon in the panel or press Alt+F1. The main menu consists of the following elements: a search function at the top and several tabs at the bottom, providing quick access to the key functions of the menu.
 |
The following tabs are available:
Shows a default selection of key programs for quick access.
Shows all applications installed on your system. The function-oriented menu structure makes it easy to find the right application for your purposes even if you do not know the application name yet. To navigate through the structure, click an entry and use the arrow icons at the right or the left to switch back and forth. To switch back to the top-level hierarchy from anywhere in the structure, just click the tab's name or icon.
Gives quick access to some places often needed, such as important system folders (
homedirectory, network folders) and media devices. Also allows you to quickly access system information, and to change your system configuration with YaST, if necessary.Lists the most recently opened programs and files. To reopen a program or file, just click the entry. To remove all recently used programs or files from the list, right-click below the relevant heading and select or .
Shows several options for leaving the session, such as logging out, locking the screen (access can only be regained with a password), shutting down or restarting the computer. For more information, see Section 1.3, “Leaving Your System”.
Additionally, the menu displays your login name and the hostname of your computer. This information is useful when you are logged in as a different user or to a remote computer—it always shows you which system you are currently working on.
KRunner is a helper application which lets you quickly start programs. It also offers a search function for finding applications or locations. Refer to Section 2.1.3, “Searching for Programs” for more information.
Press Alt+F2 to open the input field. Type a command, for example, dolphin, and press Enter to start the application. The command to start the application is often (but not always) the application name written in lowercase.
 |
You can also use KRunner to show current processes running on your system. To do so, start KRunner and click the icon. The dialog that appears also allows you to kill processes (for example, to terminate a “runaway” application).
KRunner's abilities can be extended by a huge number of plug-ins that provide additional functionality. For example, if the plug-in is activated, you can use the web Web shortcuts defined in Konqueror also in KRunner: send search requests directly to a search engine like Google* without opening the browser and visiting the Web sites before. For more information, refer to Section “Using Web Shortcuts” (Chapter 13, Konqueror: Browsing the Web, ↑Application Guide).
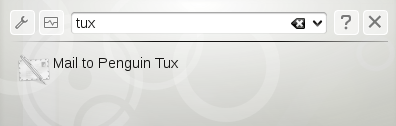
Click the wrench symbol to explore the full range of KRunner's abilities: If the plug-in is activated, just enter the name of one of your contacts and then press Enter to open KMail and to start typing your mail.
 |
If the relevant plug-in is activated, you can also use KRunner as a calculator or to convert units.
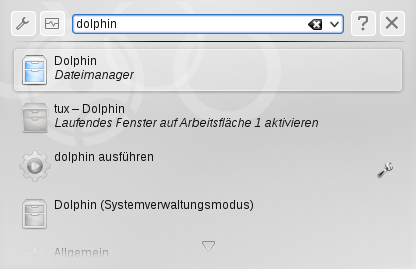
Both the main menu and KRunner offer a search function that lets you quickly start programs, even if you do not know the exact application name or command yet. To search for an application, start typing a command or part of the application name in the main menu field of the menu or the input field in the dialog. Each character you enter further narrows your search.
From the list below the input field, choose the application or object matching your query.
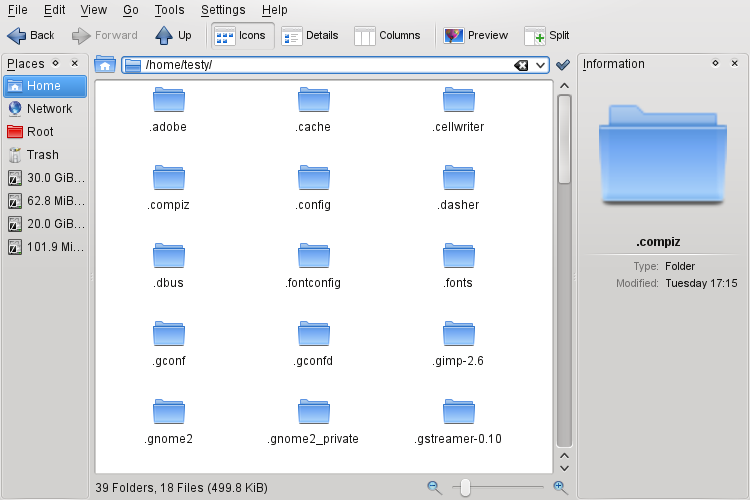
With KDE 4, Dolphin has replaced Konqueror as the default file manager, while Konqueror still is still shipped and mainly functions as Web browser. For more information about Konqueror as Web browser, see Chapter Konqueror: Browsing the Web (↑Application Guide). To start Dolphin, click the card box icon in the panel or press Alt+F2 and enter dolphin.
The Dolphin main window consists of the following elements:
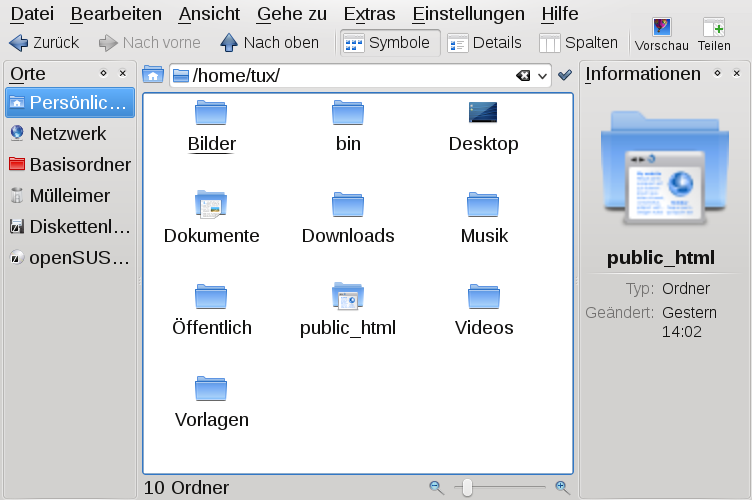 |
Menu Bar: The menu bar holds menu items for actions like copying, moving, and deleting files, changing views, starting additional tools, defining your settings, and getting help.
Toolbar: The toolbar provides quick access to frequently used functions that can also be accessed via the menu. If you hover the mouse pointer over an icon, a short description is displayed.
Location Bar: The location bar displays the path to the current directory. It is available in two versions. One shows the path to the current directory with icons for every parent folder in a “bread crumb” view. Click any icon in the bread crumb view to change to that directory. The second version of the location bar shows the path to the current directory as a string of text you can edit.
Panels:
By default, Dolphin shows only the panel on
the left and the on the right.
allows quick access to some often used places
like your home directory, the /root directory of
the file system, the trash bin, or removable media. There are several
other panels you can add to the main window.
Display Field (Working Space): The display field shows the contents of the selected directory or file. By default, Dolphin displays the contents of your home directory on start-up. Clicking a folder or file in Dolphin directly starts an action: Dolphin loads the file into an application for further processing, or opens the folder.
Status Bar: Shows information about the currently selected object.
To perform actions like copying, moving, creating or deleting files, you need appropriate permissions to the folders and files involved in your action.
Procedure 2.1. Copying, Moving, or Delete Files or Folders
In order to select one or multiple files and folders in Dolphin, move your mouse pointer over the file or folder but do not click. A green cross appears on the upper-left edge. To select the file or folder now, click the green cross icon. Conversely, press Ctrl and click the file or files. To deselect again, click the red minus icon that appears if the object is currently selected.
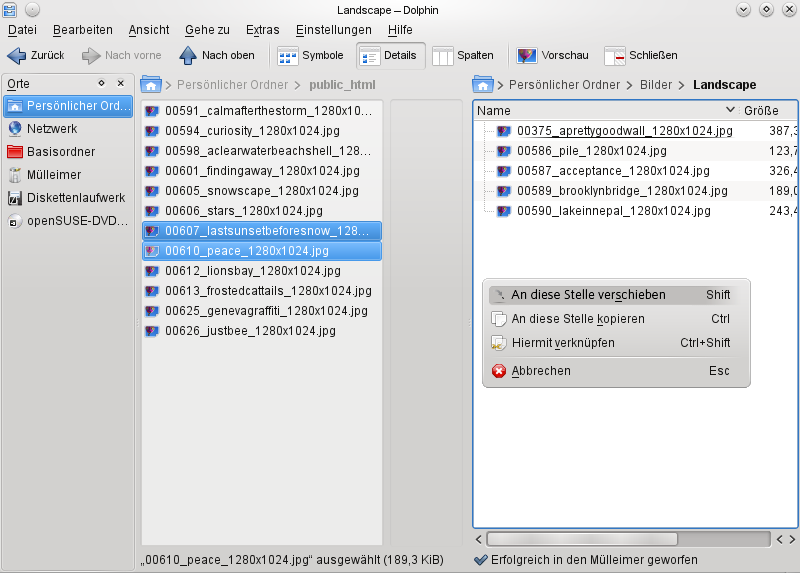
Right-click and select or from the context menu.
Navigate to the destination folder in which to insert the object.
To create a new folder at the current location, select ++ or press F10. Enter a folder name in the new window and press Enter.
To insert the object you copied or cut in Step 2, right-click the destination folder in the main display field and select . The object is copied or moved there.
To delete a file or folder, right-click the object in the main display field and select from the context menu. The object is moved to the trash bin. From there, you can restore it if necessary or delete the object irretrievably.
To quickly filter for certain filenames in the current directory, press Ctrl+I or select + to add the input field to the bottom of the Dolphin main window. Type any part of the filename you are searching for to see all files in the current directory containing the search string. For more detailed and advanced searches, press Ctrl+F to use KFind. For more information, refer to Section 2.4, “Finding Data on your Computer or in the File System”.
Dolphin offers many options to adjust the view and the overall settings according to your needs.
Procedure 2.2. Changing the View
To toggle between the bread crumb view and the editable version of the location bar, press Ctrl+L or click at the far right end of the location bar. Enter a path to a directory by typing it in. After typing an address, press Enter.

To delete the contents of the location bar click the black
Xsymbol on the left. To switch back to the bread crumb view, press Ctrl+L.To change the view of the currently displayed folder, either click , , or in the toolbar. Dolphin remembers the selected view for each folder. Conversely, press Ctrl+1, Ctrl+2, or Ctrl+3 to switch between the view modes. Click or press F3 to view the contents of the current folder in two separate columns. Now you can navigate to a different directory in each column and easily drag or drop objects or compare the contents of directories.
To make Dolphin also show hidden files, select + or press Alt++.
To view more details about the files (like access permissions or ownership), select + and enable the relevant options.
To add further directories to the panel, drag a folder from the working space to the panel and drop it there. Right-click and use the context menu to hide, edit or remove entries from .
If you want to add more panels to the main window, select + and select additional panels such as , , or .
The panel shows the properties and a preview of the currently selected file. It also lets you add comments to the file.
The panel shows a tree view of the whole file system and lets you navigate through all subdirectories of
/root.The panel attaches a command line to the bottom of the main Dolphin window. Whenever you click a directory in the display field, the panel also changes to that directory, so you can easily switch to the command line for certain tasks you prefer to execute in a shell.
You can even detach the panels from the main Dolphin window by clicking the left icon at the top of each panel. Click the panel's title bar and drag it to another place on the desktop. To reintegrate the panel into the Dolphin window again, click the left symbol at the top of the panel again.
Procedure 2.3. Changing Dolphin's Overall Behavior
If you want to change Dolphin's overall behavior or view, select + and explore the options offered in the Dolphin configuration dialog.
To use the same view mode for all folders, click the category in the left sidebar. On the tab, activate . If you want to adjust the options for the individual view modes, click in the left sidebar and set the options according to your wishes. Click to save the changes.
If you want Dolphin to show a different default directory on start-up, or if you want to permanently use the editable location bar instead of the bread crumb view, change the relevant options in the category.
Click to save the changes and to close the Dolphin configuration dialog.
To copy text to the clipboard and insert it again, former MS Windows users automatically try the keyboard shortcut Ctrl+C and Ctrl+V, which often works in Linux as well. Copying and inserting texts is even easier in Linux: to copy a text to the clipboard, just select the text with the mouse then move the mouse cursor to the position to which to insert the text. Click the middle (or wheel) button on the mouse to insert the text (on a two-button mouse, press both mouse buttons simultaneously).
With some applications, if text is already selected in the application where you want to insert the text, this method does not work because the text in the clipboard is overwritten by the other selected text. For such cases, the KDE application Klipper is very useful. Klipper “remembers” the last entries you have moved to the clipboard. By default, Klipper is started when KDE is loaded and appears as a clipboard icon in the panel. To view the clipboard contents, click the Klipper icon or press Ctrl+Alt+V. The most recent entry is listed on top and is marked as active with a black check mark. If extensive text was copied to Klipper, only the first line of the text is displayed.
To copy an older text fragment from Klipper to an application, select it by clicking it, move the mouse pointer to the target application, then middle-click. For further information about Klipper, see the Klipper online help.
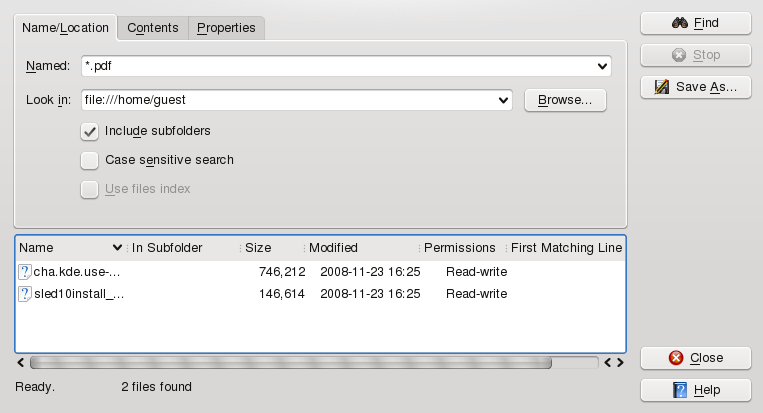
With KFind, you can locate files on your computer or in the file system using a variety of search criteria, such as file content, dates, owner, or file size. Start it from the main menu with +. Conversely, press Alt+F2 and enter kfind.
To perform a search for certain filenames, proceed as follows:
Start KFind from the main menu or command line.
Click the tab to perform a basic search.
Specify the name of the file to find in . You can use the following wild cards:
- Asterisk
The asterisk (*) stands for any number of missing characters (even zero). For example, searching for marc* can find the files marc, marc.png, and marc_must_not_read_this.kwd. Searching for can find marketplace.kwd and marc_must_not_read_this.kwd.
- Question Mark
The question mark (?) stands for exactly one character. For example, searching for mar? can find marc, but marc? cannot find anything if your files are named marc and marc.png. You can put as many question marks in the search term as you want. It finds exactly that number of characters.
You can combine those two wild card symbols in any search term.
Specify the folder to search in or click to find the folder you want. Select to also search all subfolders starting from your specified folder.
Press Enter or click .
For a more detailed search, you can also specify further options, such as text that the file to find must contain:
Start KFind from the main menu or the command line.
Click the tab.
Specify the name of the file to find in .
Specify the folder in which to search in or click to find the folder.
Click the tab.
In , specify the type of file to find.
In , enter the word or phrase that the file you are searching for must contain.
If you want to specify further options, click the tab and choose the options you want.
Click to perform the search.
For detailed information about the search options available, refer to the KFind online help.
If you insert removable media (such as CDs or DVDs) into your computer's drive, or connect external devices such as USB sticks, external hard disks, media players or digital cameras, these are usually automatically detected. In KDE 4, a panel widget alerts you to any recently plugged or inserted devices.
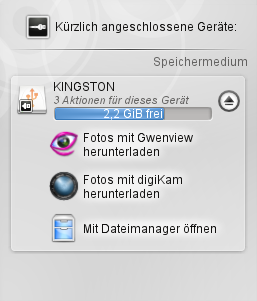
Click on the entry to show the device's contents with Dolphin.
If the device is not automatically displayed in the device notifier, try to access it manually with Dolphin.
Start the Dolphin file manager and switch to the editable version of the location bar as described in Procedure 2.2, “Changing the View”. Enter /media to access any type of drive mounted there. If the medium has been detected, it is also listed in the panel. Click the relevant entry to show the contents. Digital cameras can also be accessed by entering the URL camera:/ into Dolphin's location bar. In case your camera is not automatically detected, configure it first with the KDE 4 Personal Settings or with digiKam as described in Section “Configuring Your Camera” (Chapter 17, Managing Your Digital Image Collection with DigiKam, ↑Application Guide). Navigate through the camera's directory structure until the files are shown. Use the usual Dolphin file management features to copy the files as desired.
Another way to access detected media devices is to click the icon on your desktop. The detected devices are listed in the section.
![[Note]](admon/note.png) | Removing Media Safely |
|---|---|
If you want to remove or disconnect a device from your computer, make sure that the data on it is currently not being accessed by any application or user. Otherwise, you risk a loss of data. To safely remove the device, proceed as follows:
| |
The desktop environment allows you to organize your programs and tasks on several virtual desktops between which you can switch the pager in the panel (see Section 1.2, “Exploring the Desktop Components”). If you often run a lot of programs simultaneously, this minimizes the number of windows to arrange on your screen. You might, for example, use one desktop for e-mailing and keeping your calendar and another for word processing or graphics applications.
Procedure 2.4. Moving an Application to Another Virtual Desktop
You can display a running application on one or all virtual desktops or move it to other desktops.
Open the application.
Right-click the title bar of the application.
Click .
Select the desktop on which to place the application.
To switch between desktops, click the desired desktop in the pager in the panel.
Some users might need more desktops than provided by default. Learn how to add additional desktops in Procedure 3.5, “Adding Additional Virtual Desktops”.
To surf the Internet or send and receive e-mail messages or use Instant Messengers, you must have configured an Internet connection with YaST or NetworkManager. For more details, see Abschnitt „Konfigurieren von Netzwerkverbindungen mit YaST“ (Kapitel 21, Grundlegendes zu Netzwerken, ↑Referenz) and Kapitel Verwenden von NetworkManager (↑Start).
Once an Internet connection is established, either use Firefox or Konqueror for browsing. Konqueror is KDE's Web browser but openSUSE also includes Firefox. To start Konqueror or Firefox, press Alt+F2 and enter konqueror or firefox.
With features like tabbed browsing, pop-up window blocking, and download and image management, both browsers combine the latest Web technologies. Their easy access to different search engines helps you to find the information you need.
For more information about Firefox, see Chapter Browsing with Firefox (↑Application Guide). Learn more about Konqueror as a Web browser in Chapter Konqueror: Browsing the Web (↑Application Guide).
For reading and managing your mails and appointments, you can use Kontact as your personal information management tool (PIM). Kontact combines KDE applications like KMail, KOrganizer, and KAddressBook into a single interface. This gives you easy access to your e-mail, calendar, address book, and other PIM functionality. KMail can also manage multiple e-mail accounts, such as your private and business e-mails. To start Kontact, press Alt+F2 and enter kontact.
Before you can send or receive mails, you must configure an e-mail account. When starting KMail for the first time, a configuration wizard appears that assists you in setting up your account. For detailed information about configuring and using Kontact, see Chapter Kontact: E-Mailing and Calendaring (↑Application Guide).
Kopete is an online messenger application that allows multiple partners connected to the Internet to chat with each other. Kopete currently supports a number of common messenger protocols. To be able to use instant messaging (IM), you must register with a provider offering IM services and configure a Kopete account.
To start Kopete, press Alt+F2 and enter kopete. Learn more about Kopete in Chapter Kopete: Instant Messaging (↑Application Guide).
When you enter a password in a KDE application for the first time (in KMail or Konqueror, for example), you are asked if you want to store the password in an encrypted wallet. If you click , KWallet wizard starts by default. KWallet is a password management tool that can collect all passwords and store them in an encrypted file. For more information on how to configure and use KWallet, refer to Chapter 8, Managing Passwords with KWallet Manager.
Whereas KWallet is designed to centrally manage passwords for several KDE applications, Firefox also offers the ability to store data when you enter a username and a password on a Web site. If you accept by clicking , the password will be stored on your hard disk in an encrypted format. The next time you access this site, Firefox will automatically fill in the login data.
To review or manage your passwords in Firefox, click +++.
The office suite OpenOffice.org offers a complete set of office tools, including word processor, spreadsheet, presentation, vector drawing, and database components. Because OpenOffice.org is available for a number of operating systems, you can use the same data across different computing platforms. You can also open and edit files in Microsoft Office formats then save them back to this format, if needed.
Start OpenOffice.org from the main menu or click the Office icon on the desktop. You can also start individual components, like the word processor, by pressing Alt+F2 and entering oowriter.
For an introduction to OpenOffice.org, see Chapter The OpenOffice.org Office Suite (↑Application Guide) or view the help in an OpenOffice.org program.
Documents that need to be shared or printed across platforms can be saved as PDF (Portable Document Format) files, for example, in the OpenOffice.org suite. View them with Okular, the default KDE document viewer.
Start Okular from the main menu or press Alt+F2 and enter okular.
To open a document, select + and choose the desired file from the file system. Navigate through the documents by using the navigation icons at the top or bottom of the window. If your PDF document provides bookmarks, you can access them in the left panel of the viewer.
Okular also allows you to review a document by highlighting certain text parts or adding annotations. For more information about working with Okular, see Chapter 4, Viewing PDF Files and Other Documents with Okular.
You can also view PDF files with Adobe Acrobat Reader. If Acrobat Reader
is not installed by default, install the
acroread package with YaST. To start Acrobat
reader, press Alt+F2 and enter acroread or start the program
from the main menu. Click +, locate the desired PDF file and
click to view the file.
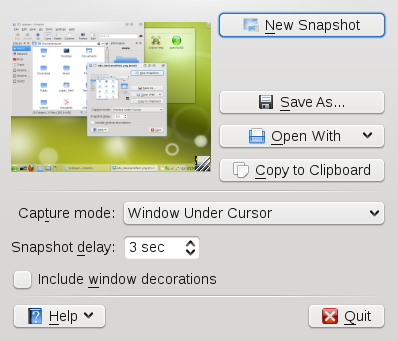
With KSnapshot, you can create snapshots of your screen or individual application windows. Start the program from the main menu or by pressing Alt+F2 and entering ksnapshot. On start-up, KSnapshot takes a snapshot of the screen and displays it as preview. You can choose to save the current snapshot, to open it with an graphics application or to copy it to the clipboard. Before creating a new snapshot, check if the options in the lower part of the window match your needs. For example, to automatically capture a dialog window or a certain region (instead of the full screen), adjust the . If you need to take some other actions first (like selecting a certain object in the window), adjust the and choose if to or not. Then click to take a new snapshot which you then can save or edit further.
To save space on the hard disk, use a packer that compresses files and
directories to a fraction of their original size. The application Ark can
be used to manage such archives. It supports common formats, such as
zip, tar.gz,
tar.bz2, lha,
rar and LZMA/XZ.
Start Ark from the main menu or from the command line with ark.
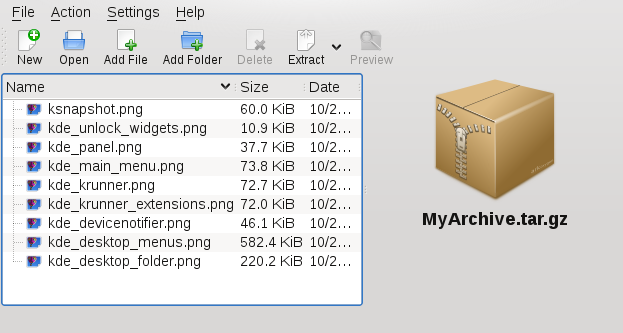
Once you have opened an archive, perform various actions. offers options such as , , , , , , and .
Procedure 2.5. Creating an Archive
To create a new archive, select +.
Enter the name of the new archive in the dialog that opens, and specify the format using .
After confirming with or by pressing Enter, the Ark window shows an empty archive.
To fill the archive, drag and drop files and directories from the file manager into this window or click or to add the objects you want to add to the archive.
To remove a file from the archive, select the file and click .
If all files to be archived are displayed in the window, just close Ark. Ark automatically compresses everything into the previously selected archive format and saves the archive.
Procedure 2.6. Viewing and Extracting Archives
To view the contents of an archive, start Ark and select + to open the file. Conversely, just drag the archive from an open file manager window to the Ark window.
To see a preview of individual files, select a file and click .
To extract all files from the archive, click .
If you want to extract individual files from the archive only, select one or more files (by keeping the Ctrl key pressed) and click . In the following dialog, you can still decide to save or the .
Enter the path to the , select if to and click to extract the files.
If you possess a CD or DVD writer, you can burn files to a CD or DVD with K3b. To start K3b, press Alt+F2 and enter k3b. Learn more about K3b in Chapter K3b: Burning CDs and DVDs (↑Application Guide).
You can view digital images in the file manager or with Gwenview. Start Gwenview by pressing Alt+F2 and entering gwenview. Gwenview can load and save all image formats supported by KDE. It shows them either as thumbnails, in full screen view, or in slide show mode. When browsing JPEG images with EXIF information, Gwenview automatically rotates them according to the EXIF Orientation tag.
For managing and editing your digital images, digiKam is the right choice. Download your images from the camera, edit and improve them, organize them in albums (or flag them with tags for easy retrieval, independent of folders or albums), and archive them on CD (or export them to a Web image gallery).
To start digiKam, press Alt+F2 and enter digikam. Find an introduction to digiKam in Chapter Managing Your Digital Image Collection with DigiKam (↑Application Guide).
KDE's Amarok music player allows you to play various audio formats, create playlists, and listen to streaming audio broadcasts of radio stations on the Internet. The file types supported depend on the engine used for Amarok. To start Amarok, press Alt+F2 and enter amarok. To define the folders where Amarok should look for your music files, from the main menu select ++ and set the options according to your wishes. For more information about Amarok, refer to Chapter Playing Music and Movies: Amarok, Kaffeine and More (↑Application Guide).
- Plasma Crashes
In case your desktop (or plasma crashes), use the following commands to kill and restart plasma:
kbuildsycoca4 kquitapp plasma-desktop kstart plasma-desktop- Plasma Configuration Files
If you ever need to manually modify the Plasma configuration files, find them in your system under
~/.kde4/share/config/plasmarcand~/.kde4/share/config/plasma-appletsrc. The first one stores global settings like the desktop theme, while the latter stores the settings for all the individual applets.
As well as the applications described here for getting started, KDE can run many other applications. Find detailed information on many important applications in the other parts of this manual.
To learn more about KDE and KDE applications, also refer to http://www.kde.org/ and http://www.kde-apps.org/.
Communicate and discuss topics with other KDE users and get help at http://forum.kde.org/index.php.
To learn more about the helper applications included in KDE, see also http://utils.kde.org/.
To report bugs or add feature requests, go to http://bugs.kde.org/.