Contents
You can change the way your KDE desktop looks and behaves to suit your needs. There are several ways to influence the look and feel of the KDE desktop depending on the scope of changes to make. For users, the following options are available:
To change the appearance or behavior of individual desktop objects only, you can usually access a configuration dialog by right-clicking the object.
To change the overall appearance and behavior of your KDE desktop, use the that in KDE 4 replaced the former KDE Control Center. Personal Settings offers access to numerous configuration modules and dialogs, some of which can also be accessed via the context menu of individual desktop objects.
The Personal Settings are the central place for users to change the overall appearance and behavior of many components of the KDE desktop. Start the Personal Settings from the main menu by selecting +.
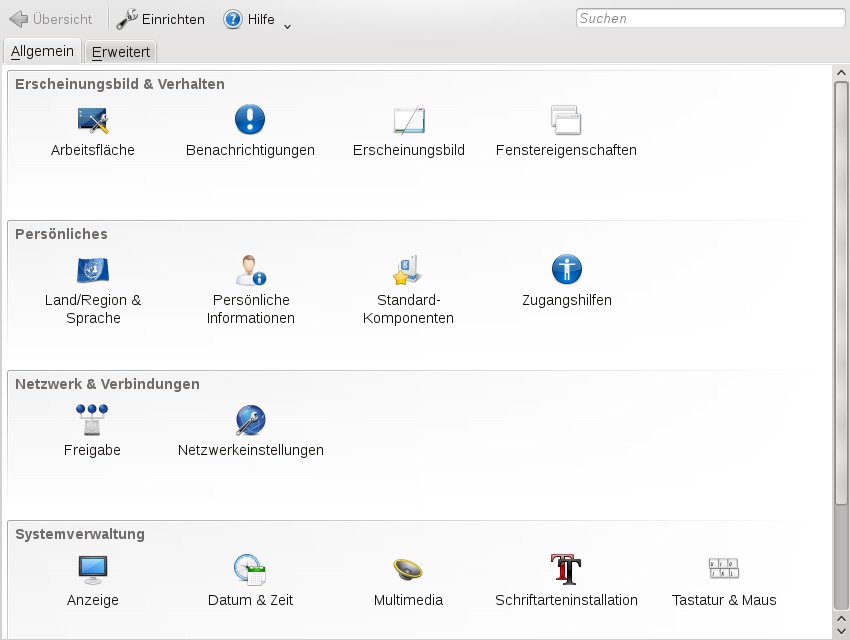
The and tabs
provide different categories of settings. To get an impression of the
numerous possibilities, just click a category icon and explore the
possibilities provided there. Performing tasks in some areas of the
personal settings requires system administrator (root)
permissions.
Change the settings as desired. No changes take effect until you click . To discard changes in the recent view that you have not yet applied, click . To reset all items in the recent view to the default values, click .
To get back to the start-up view (showing all categories) again, click . You can also enter a search string at the top of the window (for example, ) to find the category which holds options related to the search string. Each character you enter in the field further narrows the search.
For easier overview of all categories, you can also switch to a tree view by clicking and selecting another .
The following list introduces the major categories, and highlights the most important settings you can change there. Detailed information on the settings of each category is provided by the button on each page of the settings, or in the help center.
The tab holds the following categories:
Holds settings for the appearance of your KDE 4 desktop (such as themes, window decorations, and styles of desktop elements). Allows you to configure 3D desktops effects, increase or decrease the number of virtual (multiple) desktops, or configure screen saver options. Cursor behavior, window behavior and the splash screen that appears on KDE start-up can also be modified here.
Holds settings for changing the default paths to the subdirectories of your home directory. Allows you to change the default applications (like e-mail client, text editor, messenger, and Web browser) that are called whenever a KDE application needs to start applications of these types. Define country and language-specific options here, such as default spell checking options, currency, number and date format, and keyboard layouts for different languages. This category also offers accessibility options for handicapped users, such as sound and keyboard options and mouse gestures.
Allows you to set options for network management, local network browsing and proxy servers.
Allows you to configure date and time settings for your KDE desktop, to change size and orientation of your display, and to specify power management options for saving energy. Also holds settings for joysticks, keyboard and mouse. You can view and modify the predefined KDE shortcuts. You can also install personal or systemwide fonts here and configure your sound system.
The tab holds the following categories:
Use this category to configure options like encoding or to which database to connect for track listings of audio CDs, to configure your digital camera, or to change the settings for KWallet (the KDE password management tool). If needed, change the default file associations in order to identify a file type and start an appropriate application. Define how KDE handles sessions on login or shutdown and define which applications should be started automatically.
Holds options for the login manager, power management and Samba.
![[Tip]](admon/tip.png) | Starting Individual Modules |
|---|---|
You can also start individual modules of the Personal Settings from the shell or by adding a special applet to your panel.
To start modules from a shell, enter kcmshell4
Conversely, add the applet to your panel according to the description in Section 3.2.3, “Panel”. | |
In the following sections, find examples of how to configure some aspects of your KDE desktop that you might want to customize.
Your KDE desktop comes with a predefined set of desktop icons. By adding various objects such as folders, files, or widgets, you can create additional icons on your desktop and arrange them as you like.
Procedure 3.1. Adding Program Icons to the Desktop
To create a link to an application and place it on the desktop or the panel, proceed as follows:
Click the main menu button and browse to the desired application.
Right-click and select or from the context menu that appears. If these menu items are not available, your desktop elements are probably locked. Unlock them first as described in Section 1.2.1, “Locking and Unlocking Desktop Objects”.
To change the icon position on the desktop, left-click the icon and drag it to the desired place.
To delete an icon from your desktop, right-click the icon and select .
Procedure 3.2. Adding Widgets to the Desktop
Widgets are small applications that can be integrated into your desktop or your panel.
To add widgets to you desktop, right-click an empty patch on your desktop and select .
If these menu items are not available, your desktop elements are probably locked. Unlock them first as described in Section 1.2.1, “Locking and Unlocking Desktop Objects”.
In the dialog box that appears, you can limit the selection of widgets that is shown with the drop-down list at the top or by entering a search string into the input field.

Select a widget and click . The widget appears on your desktop or in your panel.
To position the widget on your desktop, left-click the widget and drag it to the desired place. To align all widgets to a grid, right-click an empty patch on the desktop and select or .
To remove a widget from your desktop, right-click the widget and select
the
entry. Conversely, hover your mouse pointer
over the widget and click the X symbol in the frame.
Procedure 3.3. Configuring Widgets
In order to configure widgets, the desktop elements need to be unlocked as described in Section 1.2.1, “Locking and Unlocking Desktop Objects”.
To configure a widget, hover your mouse pointer over the widget until a translucent panel appears on the left or right side of the widget, showing a number of symbols.
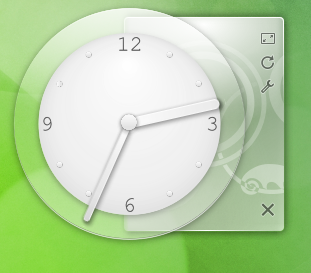
If the panel does not appear, your widgets are probably locked. Unlock them first as described in Section 1.2.1, “Locking and Unlocking Desktop Objects”
To change the widget size, left-click the resize symbol in the panel and keep the mouse button pressed while moving your cursor across the desktop to scale the widget size.
To rotate the widget in any direction, left-click the arrow symbol in the panel and keep the mouse button pressed while moving your cursor in a circle across the desktop. There is a sticky boundary in the horizontal and vertical positions where you can “clamp” the widget, if you like. You can also arrange it in any tilted position.
To change the contents, settings, or properties of a widget, left-click the wrench symbol in the panel. In the configuration dialog box that appears, set the options according to your wishes.
Use the X symbol in the panel if you want to close
the widget.
Procedure 3.4. Changing the Desktop Background
You can change the background colors of your desktop or select a picture to use as the background.
Right-click an empty patch of the desktop and select . A configuration dialog appears.
In the section, choose from the drop-down list if you want to use an , a or a as background.
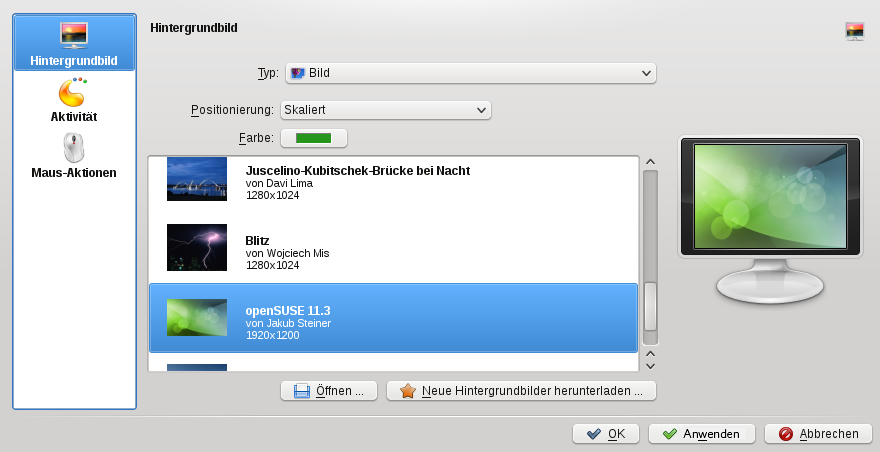
For an image wallpaper, choose a wallpaper from the list. Click to download and install new wallpapers. To use a custom picture, click the folder button beneath the list and select an image file from the file system. Define the of the image.
To have multiple images appear in mode, define the directory from which to select the pictures and set the interval after which to change the images.
Set the other options in the configuration dialog according to your wishes, and click to save your changes and leave the configuration dialog.
Procedure 3.5. Adding Additional Virtual Desktops
Some users might need more desktops than provided by default.
Right-click the desktop previewer in the panel and select . A configuration dialog appears where you can increase or decrease the number of virtual desktops. You can also change the default names of desktops.
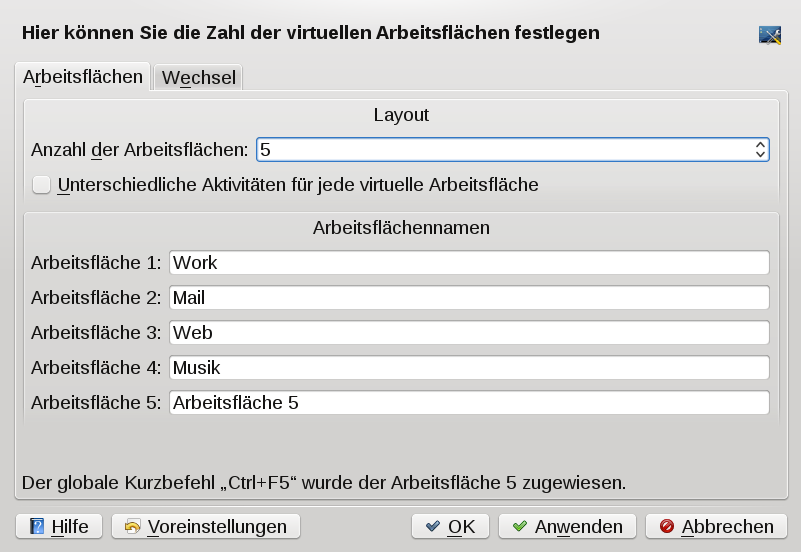
Click to apply the changes and close the configuration dialog.
For the names of the desktops to appear in the desktop previewer rather than the number, right-click the desktop previewer and select +.
Procedure 3.6. Using Different Options for Each Virtual Desktop
Though somewhat more complicated than with KDE 3.x, you can configure your virtual desktops in a way that allows you to use different wallpapers or widgets on each.
![[Note]](admon/note.png) | Combining Virtual Desktops with Plasma Activities |
|---|---|
Note that the implementation in this release of KDE is still in an experimental state. Some features may not work as expected. | |
To access the relevant configuration options, you need to show the cashew icon at the upper right corner first (in openSUSE it is not visible by default). To do so, right-click an empty patch on your desktop and select . In the dialog that appears, click below and select the entry from the list. Click to confirm the settings and to close the dialog. Now the cashew icon is visible at the upper right corner of your desktop.
Click the cashew icon at the upper right corner of your desktop and select .
In the Plasma configuration dialog, activate and click .
From now on, each of your virtual desktops will have separate plasma activities. This will allow you to have a different wallpaper on each virtual desktop, as well as a completely separate set of widgets.
Now switch to the virtual desktop you want to configure and set a custom background as described in Procedure 3.4, “Changing the Desktop Background” or add new widgets for the virtual desktop as described in Procedure 3.2, “Adding Widgets to the Desktop”.
To make all virtual desktops appear the same again and to remove the binding between virtual desktops and activities, zoom out of your current desktop again and deactivate in the Plasma configuration dialog.
Procedure 3.7. Configuring the Screen Saver
openSUSE® comes with predefined screen saver settings that you can adjust.
Start the Personal Settings from the main menu by selecting +.
On the tab, select .
In the dialog that opens, click .
In the list of screen savers, click a screen saver to see a preview in the right side of the dialog.
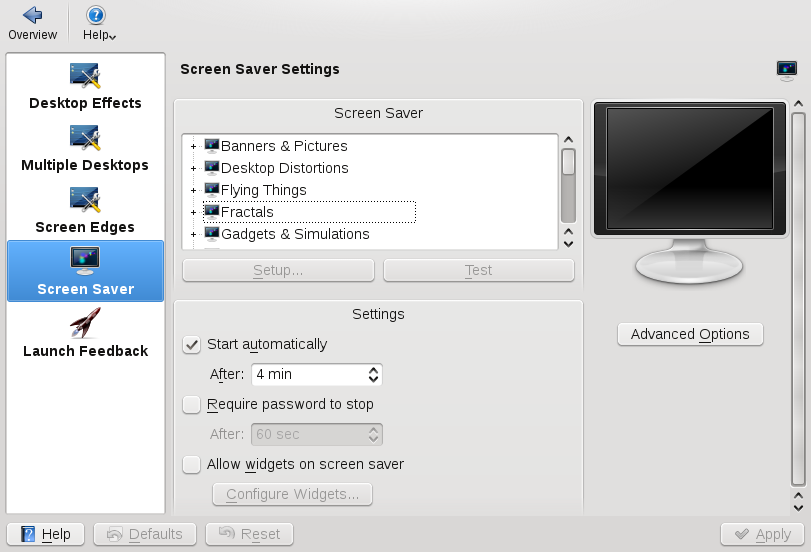
Click to adjust options like speed or shapes.
You can also choose to view a blank screen instead or to let KDE start a random screen saver. Find these options at the end of the screen saver list.
Under , determine after how long a time of inactivity the screen saver should start and whether a password is required to unlock the screen after the screen saver has started.
Click to apply the changes and close the configuration dialog.
You can customize the KDE panel according to your preferences. Applications and widgets can be added to the quick launch area or the system tray in the main panel or to additional panels. Panel elements and additional panels can be moved to different places or be completely removed at any time.
Procedure 3.8. Customizing the Panel
Right-click an empty patch in the panel and select to access any panel options. Conversely, click the cashew icon at the end of the panel. The panel changes view and shows its configurations options.

If the menu item and the icon are not available, your desktop objects are probably locked. To unlock, right-click and select first.
To move panel objects to a different place within the panel, hover the mouse cursor over the respective panel object (for example, program icon, pager, task manager, system tray). The mouse cursor turns into a crosslines-like form. Move the cursor to the desired position in the panel, then click again to fix the object in the new position.
To change the panel width, click and drag the small arrow icons at the far left and right end of the settings panel.
To change the panel height, click the button and move the mouse cursor to the desired end location.
To place the panel at different sides of the screen use the button. Drag and drop the panel to the preferred location.
If you need additional widgets on your panel, add them with the button as described in Step 2.
To remove program icons or widgets from the panel, right-click the unwanted object and select the menu item to remove the icon or widget.
The icons in the system tray usually belong to applications running in the background. Therefore you can only remove those icons if you close those applications (right-click the icon and select ).
To prevent the panel and widgets from being moved accidentally, use .
For additional configurations options like alignment and functions (like auto hide), click .
If all panel changes are according to your wishes, close the settings panel with the red close button on the right side.
Most of your hardware components (like mouse, keyboard and display) are configured automatically. In case you need to change any settings, KDE provides a set of options and tools, some of which are integrated into the Personal Settings (like options for mouse and keyboard behavior or the display options). For adjusting your display configuration on the fly, use KRandRTray, the graphical front-end for the RandR (Resize and Rotate) extension of the X server.
In the category of the Personal Settings, you can define options like what happens if you press and hold down a key (keyboard repeat), or what to do with the NumLock toggle key. You can also change keyboard shortcuts as described in Procedure 3.10, “Modifying KDE Keyboard Shortcuts” or alter your mouse settings (for example, for left-handed or right-handed use as described in Procedure 3.11, “Adjusting the Mouse Settings”). Apart from that, you can adjust or add keyboard layouts in the section of the Personal Settings.
Procedure 3.9. Adjusting and Adding Keyboard Layouts
To adjust or add keyboard layouts, open the Personal Settings and select +.
Activate at the top.
If you have a special , select the appropriate model from the list, otherwise just keep the default.
If you often need to enter texts in various languages, you may want to add different language layouts for your keyboard. To do so, select a layout in the list of and click the right arrow button to transfer it to the list of .
If you added several layouts, you can change the sorting order with the help of the up and down arrow buttons.
Use the tab to adjust the options for switching between the keyboard layouts. For example, you can define keyboard shortcuts for switching.
For more information, click .
Confirm your changes with .
If you added keyboard layout, you can change between different keyboard layouts by clicking the country flag in the panel or by using the relevant keyboard shortcut.
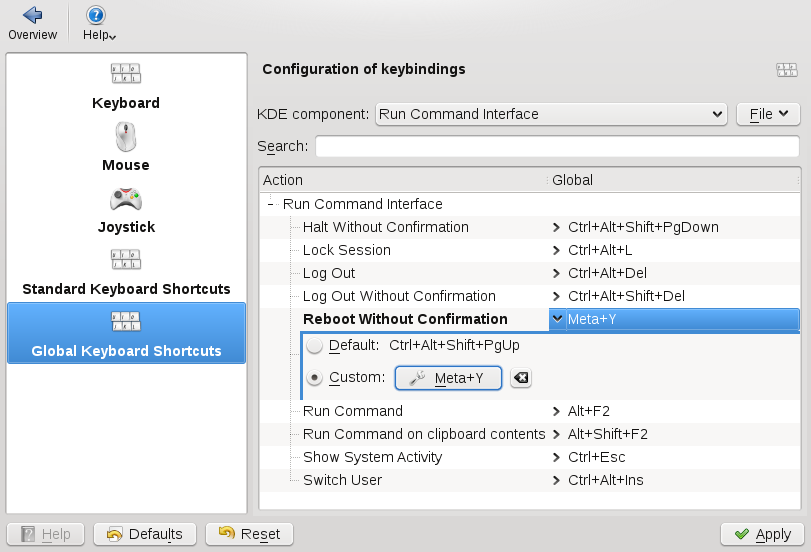
Procedure 3.10. Modifying KDE Keyboard Shortcuts
KDE comes with a set of predefined keyboard shortcuts. You can easily create more keyboard shortcuts or change existing shortcuts (for example, if they conflict with other application-specific shortcuts).
Open the Personal Settings and select .
Click either or . In the category, you can define shortcuts for a number of KDE components like Plasma or the window manager KWin.
For example, to change the shortcuts for switching between the virtual desktops, select the entry from the drop-down list. To change the shortcuts for locking the screen or logging out, select the entry.
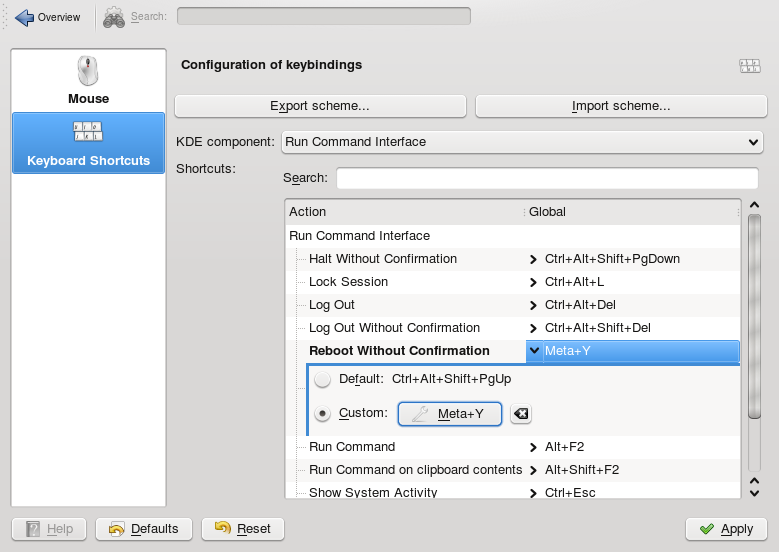
Browse through the list of shortcuts for the selected entry. To filter for certain keywords, enter a search string in the search field above.
To change or add a shortcut, select the relevant list entry and in the dialog that opens, select .
Click the wrench icon to switch to the input mode.
Press the desired key or key combination. If this shortcut cannot be accepted or in case of conflict with another existing shortcut, a notification shows. If your input was successful, the new or modified shortcut appears in the list.
If you want to switch back to the default keyboard shortcut for the selected action, just click the entry again and select .
To save the modified settings, click . To reset all shortcuts to the default values, click then .
Procedure 3.11. Adjusting the Mouse Settings
Open the Personal Settings and select .
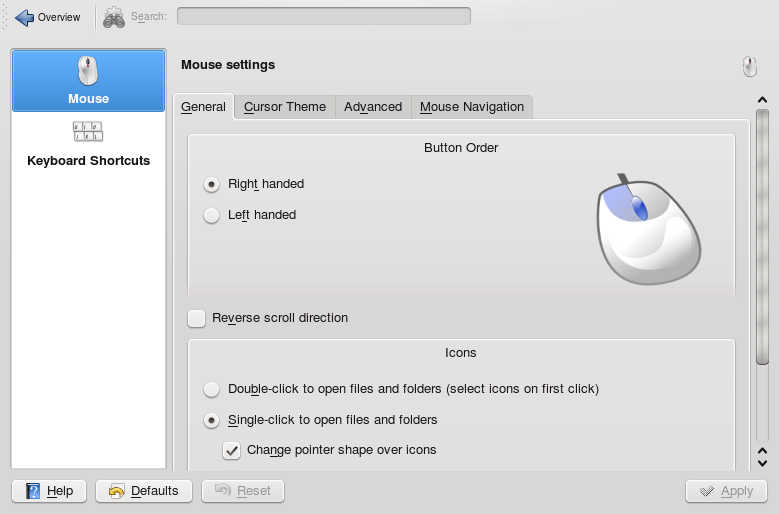
To switch between left-handed or right-handed use, select the corresponding options in the group.
To switch to double-clicks to open files and folders, select the corresponding option in the group.
To change the mouse pointer appearance, switch to the tab and select a different cursor theme.
To change the default values of double-click intervals or the distance that the pointer moves over the screen on movement of the mouse, adjust the settings on the tab.
Click to apply the changes and close the configuration dialog.
Monitors attached to your machine are detected automatically during installation (or, if you plug them in after the installation, they are detected during the next start of the X server). Configure them with the tools your desktop environment (KDE or GNOME) provides. To trigger detection of new monitors during a running session, either use the Fn-Fx keys or the RandR desktop tools, KRandRTray or gnome-display-properties.
If you want to set up multiple monitors for dual-head graphics cards, you can choose between different modes.
Currently, the following modes are generally supported:
- Clone Mode
In this mode, the same content is shown on two or more monitors. Clone mode is usually limited to the monitors connected to a single graphics card.
- Span View
In this mode, the monitors connected to a graphics card form a single large monitor. You can use 3D acceleration and you can move application windows between the screens. Any application that is maximized stretches across the complete desktop, not only across one monitor. For this mode, a similar resolution of both monitors is recommended for ease of use.
- Twin View
This mode is Nvidia-specific and is a hybrid of Span View and Xinerama: you can have 3D acceleration and one desktop stretching over both monitors, but you cannot rotate just one of them (only both or neither).
| Available Modes |
|---|---|
Which modes and options are available on your machine depend on your hardware (graphics cards and monitors) and the driver you use. | |
Procedure 3.12. Configuring One or Multiple Monitors
For configuring multiple monitors, you need a graphics card that is
supported by a driver that implements the RandR extension in version 1.2
or higher. To find out if you are using a valid driver, run the
xrandr command and check the output. If you only get
a single output that contains the string default,
your driver only supports RandR version 1.1. For illustration, see the
examples below.
Example 3.1. Example Output for a Driver Supporting RandR 1.1
$xrandr
Screen 0: minimum 2048 x 768, current 3360 x 1050, maximum 3360 x 1050
default connected 3360x1050+0+0 0mm x 0mm
   3360x1050      50.0*
   2048x768       51.0
Example 3.2. Example Output for a Driver Supporting RandR 1.2
$xrandr
Screen 0: minimum 320 x 200, current 1280 x 1024, maximum 3840 x 1200
DVI-I_1/digital disconnected (normal left inverted right x axis y axis)
DVI-I_1/analog connected 1280x1024+0+0 (normal left inverted right x axis y axis) 338mm x 270mm
   1024x768       60.0
   800x600        60.3
   640x480        59.9
DVI-D_2 disconnected (normal left inverted right x axis y axis)  1280x1024 (0x3e)  108.0MHz
   h: width  1280 start 1328 end 1440 total 1688 skew    0 clock   64.0KHz
   v: height 1024 start 1025 end 1028 total 1066           clock   60.0Hz
Open the Personal Settings and select .
Select to configure parameters like dual-head modes, screen size, and refresh rate.
Parameters like standby, suspend or power off for your monitor can be configured in the category.
To calibrate your monitor, click the category. For more information, click .
In the category, you can set some options for application windows (for example, if maximized windows need to be limited to just one monitor).
Confirm your settings with .
To adjust your display configuration on the fly, start KRandRTray from the main menu, or press Alt+F2 and enter krandrtray. After you have started the applet, the applet icon is usually added to your system tray. To change screen size or refresh rate, right-click the icon and select one of the entries. After selection, your screen resolution changes immediately and you are asked to confirm the new configuration or to revert to the old one. If you do not confirm the new configuration, the display switches back to the former resolution automatically after 15 seconds. If you left-click the icon, you are taken to the same configuration dialog you can also start from the Personal Settings.
The following background information might help you in case your hardware components are not detected correctly by default and you need to adjust some settings manually.
- Graphics Card and Display
The following processes are executed by the system to detect and configure your monitor: The X server is responsible for detecting the graphics card. The corresponding driver is selected according to a certain order defining the priorities, for example:
ATI: fglrx --> radeonhd --> radeon --> fbdev --> vesa
NVIDIA: nvidia --> nouveau --> nv --> fbdev --> vesa
VIA: chrome9 --> openchrome --> unichrome
Intel: intel --> fbdev --> vesa
If one of the drivers in the list does not exist or the hardware is not supported, the system tries the next driver. The driver then addresses the monitor in its native resolution. Dynamic changes can be made using desktop-specific tools like gnome-display-properties or KRandRTray.
- Mouse, Keyboard and Touchpad
For mouse and keyboard, the evdev driver is used; for notebook touchpads the synaptic driver. The settings are defined systemwide by HAL (hardware abstraction layer) and are stored under
/usr/share/hal/fdi/policy.
In case you need to adjust your (static) X Window System configuration
for hardware components, this can be done with a graphical front-end
(SaX2) or by editing the /etc/X11/xorg.conf
configuration file manually (for experts only). To start SaX2, press
Alt+F2 and
enter sax2 (root password needed).
For experienced users, there are also command line tools available: you can set the keyboard with setxkbmap or test and configure XInput devices with xinput.
Procedure 3.13. Changing Default Applications
There are certain default applications defined in KDE: For example, when you click an e-mail address, KMail starts.
To change this behavior and set your preferred Web browser or e-mail client as default, open the Personal Settings and click .
To change the Web browser:
In the list of components, select .
Select and click the browse button beneath.
A dialog opens, showing the main menu structure. Select the Web browser to set as default and click . The component chooser now shows the selected application in the display field.

To change the e-mail client:
In the list of components, select .
Select and click the browse button.
A dialog showing the main menu structure opens. Select the e-mail client to set as default and click . The component chooser now shows the selected application in the display field.
If desired, change other default applications for KDE, like the application for the terminal window or the instant messenger client.
When all options are set according to your wishes, click .
Procedure 3.14. Changing File Associations
Similar to setting the default Web browser or e-mail application, you can change file associations in KDE. File associations determine which application should be used to open a specific file type.
Open the Personal Settings, click the tab and select .
To search for an extension, enter the extension in . Only file types with a matching file pattern appear in the list. For example, to modify the application for *.png files, enter png in .
In the list, click the file type to open the setting dialog for this file type. You can change the icon, filename patterns, description, and the order of the applications.
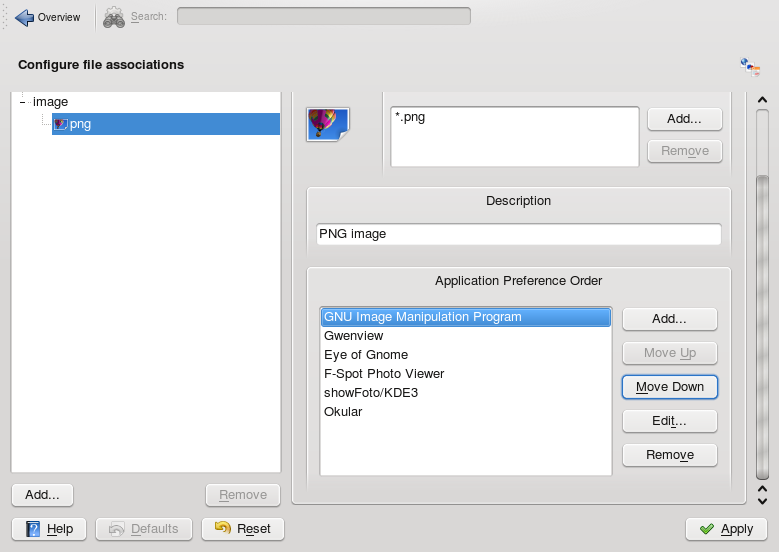
If your tool is not listed, click in then select the program for the file type.
To change the order of the list entries, click the program to move. Give it a higher or lower priority by clicking or . The application listed at the top is used by default when you click a file of this type.
When all options are set according to your wishes, click .
Procedure 3.15. Adjusting Regional Settings
To adjust settings such as time and date format, number format, or currency, select the desired country as the default country in KDE. If more than one system language is installed on your computer, you can also select the different languages in which KDE should show the graphical user interface and application interfaces.
To set your default country options, open the Personal Settings and select .
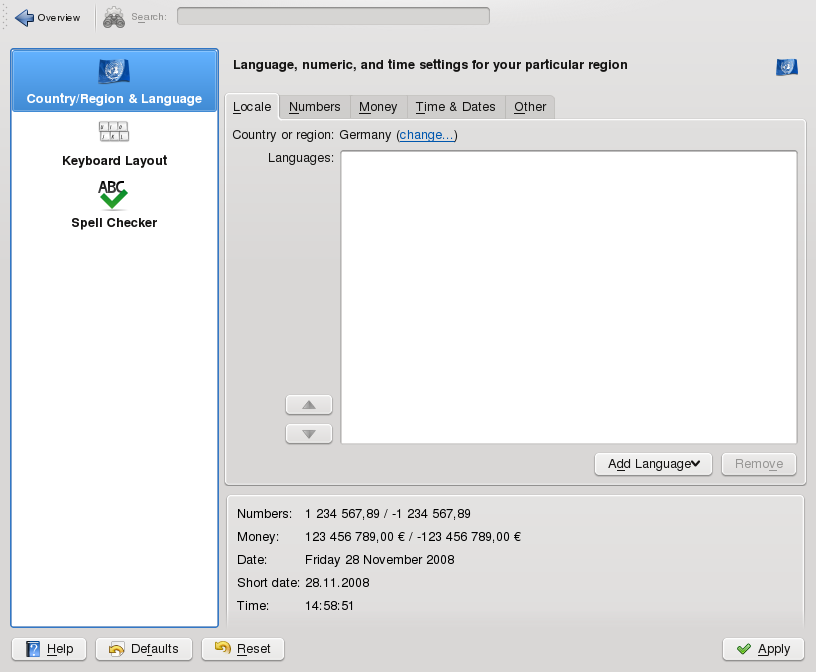
On the tab, click next to the entry. In the dialog that opens, select the region and country you want to set as default in KDE and click .
Number, date and time formats are automatically adjusted to the new country's default values that are shown in the display field at the bottom of the tab.
If you need to make further adjustments for those, click the relevant tabs and set the options according to your wishes.
If more than one language is installed on your system (as secondary languages with YaST) and you want to change the graphical interface of KDE to a different language, click on the tab. This opens a list of languages currently installed on your system.
Select the language for the graphical user interface. The new language is now shown at the top position in the list.
To confirm the changes, click . All newly started applications or desktop objects now appear in the new language.
To switch to another language, re-sort the languages in the list until the desired language is at the top position and apply your changes.
KDE runs a session manager that starts after your username and password are authenticated by the login process. It lets you save the status of a certain session and return to that status the next time you log in. For example, it can automatically start the applications that you were running in the most recent session or when you manually saved a session. It can save and restore the following settings:
Appearance and behavior settings (such as fonts, colors, and mouse settings).
Applications that you were running (such as a file manager or OpenOffice.org).
Saving and Restoring Applications You cannot save and restore applications that Session Manager does not manage. For example, if you start the vi editor from the command line in a terminal window, Session Manager cannot restore your editing session.
Procedure 3.16. Adjusting the Session Handling
To change the session handling options, open the Personal Settings and on the tab, click .
By default, Session Manager restores the applications that were running when you logged out from the previous session, enabling an automatic start of these applications.
To be able to save a certain session manually and restore this session each time you log in to KDE, select . This adds a new menu item, , to your main menu. After a session is saved, KDE automatically restores the saved session on each login.
To start with a “fresh” session each time you log in, select .
To change the default options that appear when logging out, adjust the relevant options in the and groups.
Click to confirm your changes.
Procedure 3.17. Starting Programs Automatically
Apart from the applications from the last session that are restored by the Session Manager, you can configure which applications should be always be started after login.
Open the Personal Settings and on the tab, click .
To add an application, click and from the menu structure, select the program you want to start automatically.
To add a shell script, click and click the icon in the next window to select the script from the file system. The program or script is added to the list and you can view and change the .
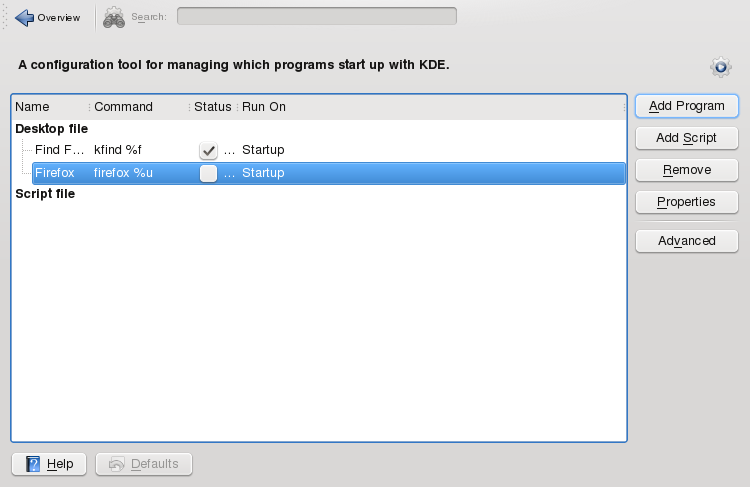
Click to confirm your changes. When logging in the next time, the applications and scripts start automatically.