You can change the way the GNOME desktop looks and behaves to suit your own personal tastes and needs. Some of the settings you might want to change include:
Keyboard and mouse configuration, as described in Section 3.2.2, “Modifying Keyboard Preferences” and Section 3.2.3, “Configuring the Mouse”
Desktop background, as described in Section 3.3.1, “Changing the Desktop Background”
Screen saver, as described in Section 3.3.4, “Configuring the Screen Saver”
Password, as described in Section 3.4.1, “Changing Your Password”
Sounds, as described in Section 3.2.6, “Setting Sound Preferences”
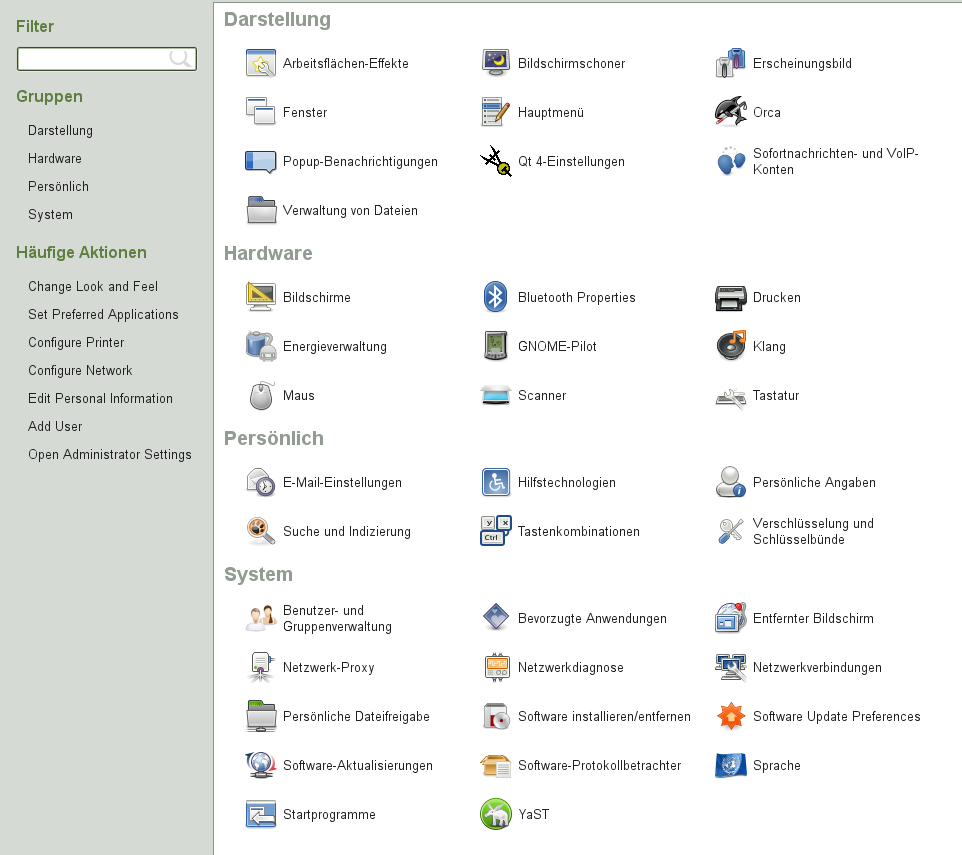
These settings and others can be changed in the Control Center.
While YaST is a desktop independent system-wide tool to configure most aspects of your openSUSE installation, such as hardware settings, network devices and services, software management or virtualization, the Control Center is a GNOME configuration tool and focuses more on the look and feel, personal settings and preferences of your GNOME desktop.
To access the Control Center, click +. The Control Center is divided into the following four categories:
Allows you to configure hardware components such as graphics cards, monitors, printers or keyboard layout, and to set up your sound device and desktop sound effects. For more information, see Section 3.2, “Hardware”.
Contains settings for the desktop background, the screen saver and the fonts appearing on the desktop. You can modify themes, window behavior and styles of desktop elements such as menus and scroll bars. You can also configure 3D desktop effects (Compiz). For more information see Section 3.3, “Look and Feel”.
Go here to change your login password or to configure keyboard shortcuts and keyboard accessibility settings. For more information see Section 3.4, “Personal”.
- System
Lets you configure system settings such as language, network connections, software sources and updates, your preferred applications, or power management. Define how GNOME handles sessions on login or shutdown and modify the Beagle search settings. For more information see Section 3.5, “System”.
In order to change some system-wide settings, Control Center will prompt
you for the root password and start YaST. This
is mostly the case for administrator settings (including most of the
hardware, the graphical user interface, Internet access, security
settings, user administration, software installation and system updates
and information). Follow the instructions in YaST to configure these
settings. For
information about using YaST, refer to the integrated YaST help texts
or refer to Start (↑Start).
This chapter focuses on individual settings you can change directly in the GNOME Control Center (without YaST interaction).
In the following sections you will find examples of how to configure some hardware aspects of your GNOME desktop, including keyboard or mouse preferences, handling of removable drives (and other media) or screen resolution.
The Bluetooth module lets you set the visibility of your machine over Bluetooth, the name of your machine used for Bluetooth communication and whether you want to show the Bluetooth applet in your panel. To configure Bluetooth connectivity, follow these steps:
Click +++ or right-click the Bluetooth icon in GNOME panel and select .
On the tab set the visibility of the Bluetooth applet icon in the of the GNOME panel. Right-click the applet icon to set connections with Bluetooth devices and file transfers.
On the tab use options under for switching the Bluetooth adapter on and off. The available options depend on the hardware used.
If the Bluetooth hardware is available and switched on, there is another available tab. Under set the visibility of the machine over a Bluetooth network. If the option is chosen use the slider to set the visibility period. The option specifies the name of the computer in the Bluetooth network.
The section lists all known Bluetooth devices. Use the button with the plus icon to configure a new device connection.
Click .
To configure file sharing over Bluetooth, follow these steps:
Click +++.
In the section configure the sharing of files in your
~/Publicdirectory. Use to activate or deactivate sharing of this directory. Specify whether remote devices can delete public files and whether they are required to bond with your computer.In the section specify whether to accept files sent over Bluetooth, from which devices and whether you want to be notified about received files.
Click .
To modify some keyboard settings (such as autorepeat preferences or typing break sessions) click +++.
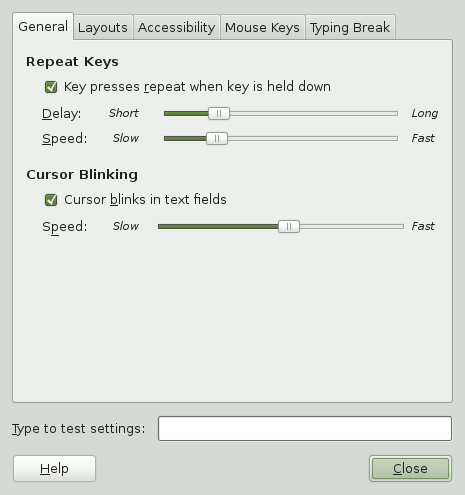
On the tab you can set some general keyboard preferences, such as enabling keyboard repeat with individual delay and speed options or enabling or disabling the blinking of the cursor and defining the speed. For more information about the individual options, click .
To select your keyboard model click the tab and select your model from the list.
To add a new language layout, click and choose a language layout to add to the list. You can select different layouts to suit different locales. Select one layout as .
On the tab you can set typing break preferences. For more information about the individual options click .
If all options are set according to your wishes, click .
For configuration of keyboard accessibility options refer to the Section 4.2.1.4, “Accessible Keyboard”.
To modify some mouse options click +++ to open the .
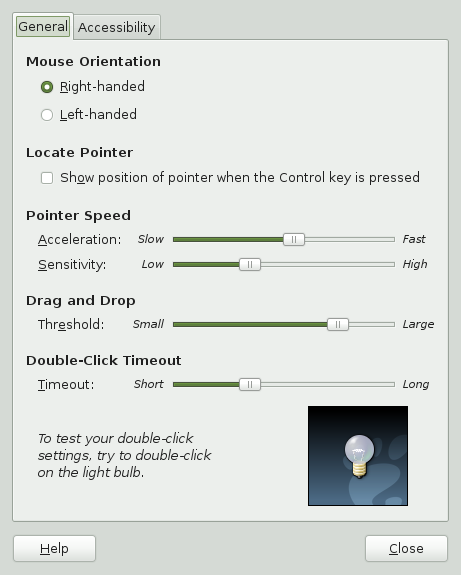
The tab is divided into several sections. Use the radio buttons in the section to specify if the mouse buttons are configured for left-hand or right-hand use.
Check the option in the section on the tab to enable a mouse pointer animation when you press and release Ctrl. This feature can help you locate the mouse pointer.
Use the sliders in the section on the tab to define the and of your mouse pointer.
Use the slider in the section on the tab to modify the distance that you must move an item with the pointer before the action is interpreted as a drag and drop action.
Use the slider in the section on the tab to define the maximum delay between the two clicks of a double-click. If the interval between two clicks is greater than the interval specified here, the action is interpreted as two separate clicks instead of a double-click. Use the light bulb icon to check double-click sensitivity: the light will light up briefly for a click, but stay lit for a double-click.
If all options are set according to your wishes, click .
For configuration of mouse accessibility options refer to Section 4.2.1, “Mouse Behavior”.
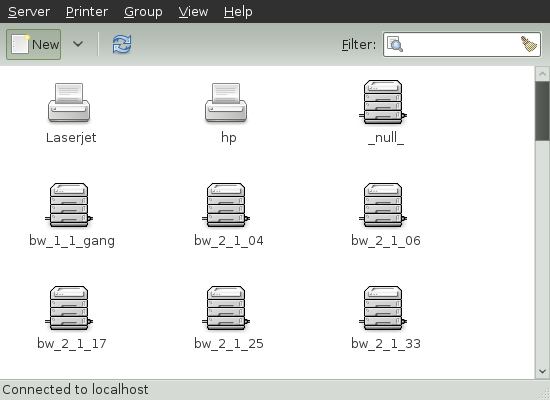
The Printing module lets you connect to any available local or remote CUPS server and configure printers.
To start the Printers module, click +++.
The CUPS server to which you are connected is shown in the status bar. To connect to a different CUPS server, click +, enter URL of the CUPS server and press . The printers available at the server are shown in the main window. Update the list of available printers with the button.
To add a new printer press in the toolbar and follow the configuration wizard.
To configure printer properties, set it as the default printer or view its print queue, right-click the printer's icon and select appropriate option from the menu.
For detailed information refer to Chapter 7, Managing Printers.
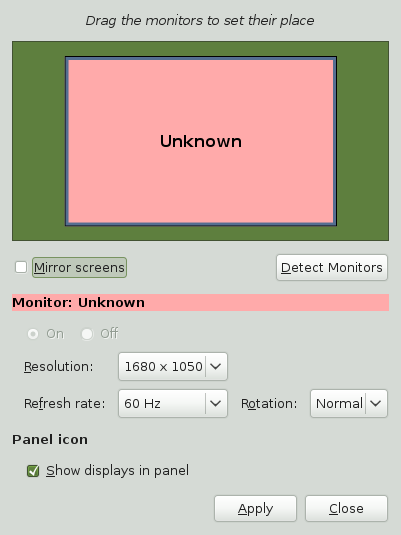
To specify the resolution, refresh rate and orientation for your screen or to configure multiple screens, click +++ and modify the options.
Press to detect all monitors connected to your computer.
To set options for any monitor, click on the monitor's icon in the blue preview area and set its , , and (orientation) using the drop-down lists underneath.
If you use multiple monitors, you can set their respective positions by dragging their icons in the blue preview area to the appropriate location. Alternatively, you can configure your monitors to show the same image by checking .
To show an applet icon in your system tray which enables you to rotate your screens, check .
For more information about screen rotation support refer to Abschnitt „Drehen der Ansicht“ (Kapitel 33, Verwenden von Tablet PCs, ↑Referenz).
The tool lets you manage sound devices. You can also specify which sounds to play when particular events occur.
Click +++ to open the tool.
Use the tab to configure the device to use for various types of sounds.
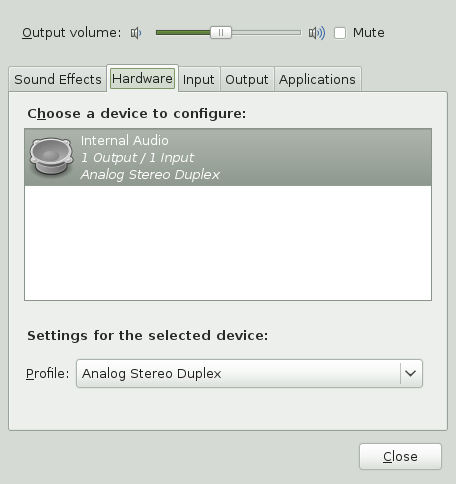
Select one device present in the system from the list of available sound devices. Below the list, choose the sound device setting you prefer from the drop-down list. Here you can turn the device off, use only its input or output, or use both input and output of the sound device.
Use the tab to set the input device volume or to mute the input temporarily. You can also select default device for audio input in the list.
Use the tab to set the device for sound output from the list of devices. Below the list, you can set detailed settings for the selected output sound device, like sound balance.
Use the tab to configure sound event functions.
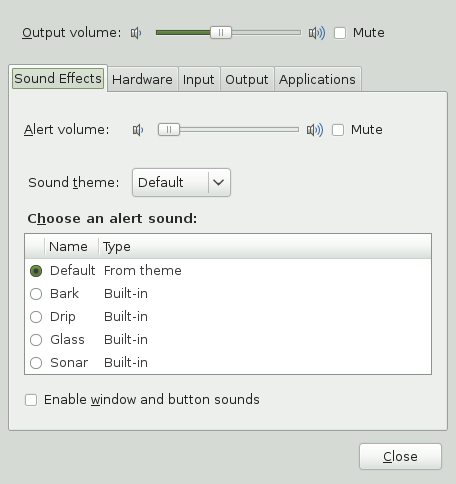
Check to play sounds when particular events occur in the desktop. -
Select the to use or select to switch sound themes off.
Check the alert sound you prefer from the list, and set the .
In the following sections find examples of how to configure some look and feel aspects of your GNOME desktop, like the desktop background and screens saver, 3D desktop effects, themes, window behavior or menus.
The desktop background is the image or color that is applied to your desktop. You can customize the desktop background in the following ways:
Select an image for the desktop background. The image is superimposed on the desktop background color. The desktop background color is visible if you select a transparent image or if the image does not cover the entire desktop.
Select a color for the desktop background. You can select a solid color or create a gradient effect with two colors. A gradient effect is a visual effect where one color blends gradually into another color.
To change the desktop preferences:
Click ++++.
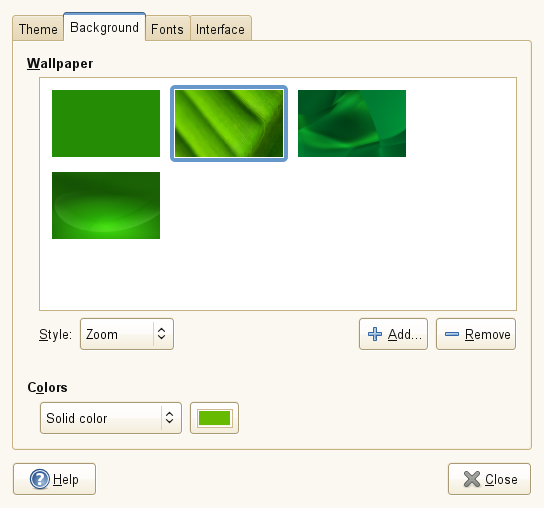
To change the picture on the background select one of the from the list and select the in which to arrange the image on the desktop. Your desktop immediately updates to show the new settings
To use a custom picture, click and select an image file from the file system.
If you do not want a picture on the background, select from the list and specify a color scheme using the options in the drop-down list and the color selector buttons. Your desktop immediately changes to show the new settings
When you are satisfied with your choices, click .
To select the fonts to use in your applications, windows, terminals and desktop, click ++++.
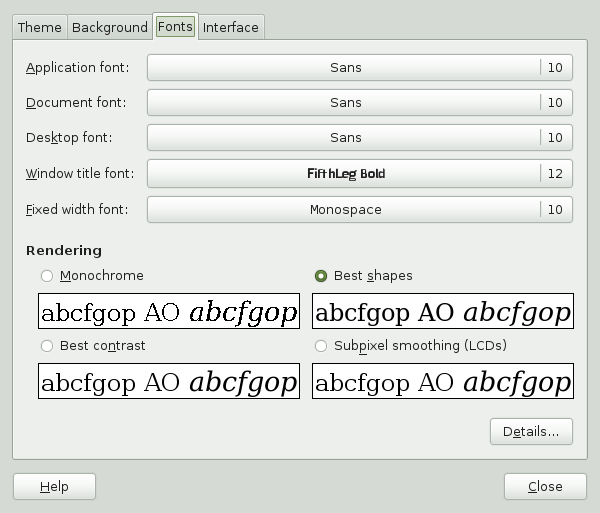
The upper part of the dialog shows the fonts selected for applications, documents, the desktop, window titles and a fixed-width font for terminals. Click one of the buttons to open a selection dialog where you can set the font family, style and size. For more information on the individual options, click .
In the section, you can change the way fonts are rendered on the screen. There are four basic options: (monochrome rendering without any smoothing), (rendering optimized for precise character shapes), (rendering optimized for high contrast) and (taking advantage of LCD subpixel structure). Advanced options for display resolution, smoothing, hinting and subpixel order are available after clicking on .
You can configure the appearance and behavior of menus and toolbars. Click ++++.
If you want icons to appear in menus, select . Not all menu items have icons.
If you want to be able to define new keyboard shortcuts for menu items, select . When this option is enabled, you can change an application shortcut key by placing the mouse pointer over the menu item you want to change and pressing the new key combination. To remove a shortcut key combination, place the mouse pointer over the menu item, then press <— or Del.
![[Important]](admon/important.png) | New Keyboard Combinations Can Change Defaults |
|---|---|
If you assign a new keyboard combination that was previously assigned to something else, you are not warned. The previous assignment is removed and replaced by the new one. There is no automatic way to restore the default keyboard shortcut for a command. You must manually reassign the keyboard shortcut. This feature does not maintain shortcuts that are normally assigned to all applications, such as Ctrl+C for copy. This might lead to inconsistencies in your GNOME applications. | |
Select one of the following options to specify how toolbar button labels display in your GNOME-compliant applications:
Displays icon labels below the icons for each button.
Displays icons on the toolbar, with text beside the most important icons.
Displays icons only, without any text labels.
Displays text labels on each button, without icons.
A preview of the selected option appears in the dialog.
A screen saver is a program that blanks the screen or displays graphics when the computer is not used for a specified amount of time. Screen savers originally protected monitors from having images burned into them. Now they are used primarily for entertainment or security reasons.
To configure a screen saver click +++.
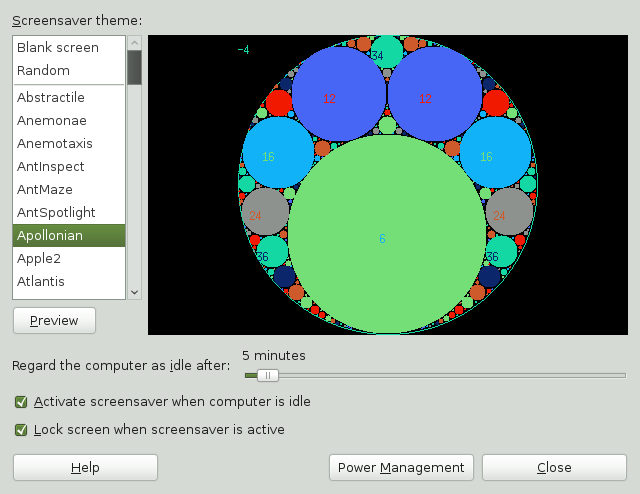
From the list on the left select the screen saver theme you like. You can also select for a random selection of a screen savers or just a . A preview of the currently selected screen saver appears on the right or, by pressing the button, you can test the selected screen saver in a fullscreen mode.
Use the slider to specify the amount of time that the computer is to be idle before the screen saver is activated. If you want the screen saver to be activated after the specified time the checkbox should be checked. If you also want the screen to lock automatically when the screen saver is activated the checkbox should be checked.
You can also access general power management options from here by clicking .
A theme is a group of coordinated settings that specifies the visual appearance of a part of the desktop. You can choose themes to change the appearance of the desktop. Use the tab of the tool to select from a list of preinstalled themes. The list of available themes includes several themes for users with accessibility requirements.
To choose a theme, click ++++.
Basic appearance and color settings for the desktop and applications are
controlled using themes. You can choose from a variety of preinstalled
themes. Selecting a style from the list overview applies it
automatically. opens another dialog where
you can customize the style of single desktop elements like window
content, window borders, and icons. Making changes and leaving the
dialog by clicking causes the theme to switch
to . Click to
save your modified theme under a custom name. The Internet and other
sources provide many additional themes for GNOME as
.tar.gz files. Install these with
.
The dialog has the following tabs and options:
- Controls
The controls setting for a theme determines the visual appearance of windows, panels and applets. It also determines the visual appearance of the GNOME-compliant interface items that appear on windows, panels and applets (such as menus, icons and buttons). Some of the control settings that are available are designed for special accessibility needs. You can select a control setting in the tab of the dialog.
- Colors
The colors of the text in windows, input boxes, selected items and tooltips (as well as color of the text background) can be configured in the tab of the dialog.
- Window Border
The window border setting for a theme determines the appearance of the borders around windows (window decorations). You can select the window border settings in the tab of the dialog.
- Icons
The icon setting for a theme determines the appearance of the icons on panels and the desktop background. You can select the icon settings in the tab of the dialog.
- Pointer
The style and size of the mouse pointer can be configured in the tab of the dialog.
Procedure 3.1. Creating a Custom Theme
The themes that are listed in the tool are different combinations of control settings, window frame options and icon options. You can create a custom theme that employs different combinations of options. To create a custom theme:
Click ++++.
Select a theme from the list of themes and click .
Select the controls option you want to use in the custom theme from the list in the tabbed page.
Click the tab, then select colors you want to use for windows, input boxes, text and other parts of the interface. Some control themes do not support setting custom colors.
Click the tab and select the window frame option that you want to use in the custom theme.
Click the tab and select the icons option that you want to use in the custom theme.
Click the tab and select the mouse pointer option that you want to use in the custom theme.
Click +.
A dialog is displayed.
Type a name and a short description for the custom theme in the dialog, then click . The custom theme now appears in your list of available themes.
Use the tool to customize window behavior for the desktop. You can determine how a window reacts to contact with the mouse pointer or to double-clicks on its title bar and you can define which key to hold for moving an application window.
To customize window behavior click +++.
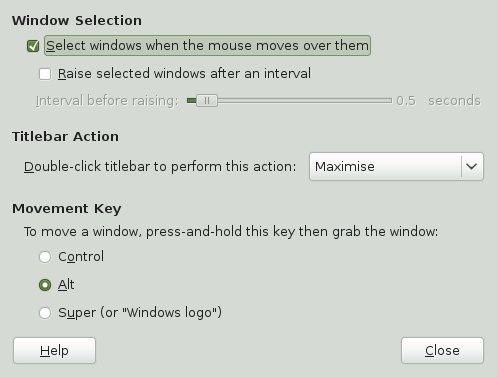
When several application windows populate the desktop, the active window by default is the one last clicked. Change this behavior by activating . If desired, activate and adjust the latency with the slider. This raises the window a short time after the window receives focus.
Under , it is possible to specify an action that is performed when the window's title bar is double-clicked. Select the desired action from the drop-down list. Possible actions include minimizing the window, maximizing it in one or both directions or rolling it up, leaving only the title bar visible. The default behavior is for the title bar to maximize in both directions.
Using the radio buttons, select a modifier key to press for moving a window (Ctrl, Alt or the Windows key).
The file management preference include settings for the GNOME file manager Nautilus as well as the settings for handling of removable media. You can access the preferences in the Control Center by clicking +++ or directly from Nautilus by clicking +.
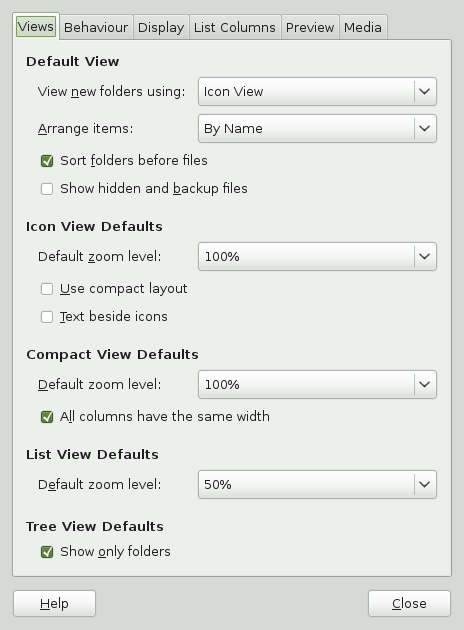
On the tab define options for various Nautilus views. For example, select if Nautilus should show hidden files and backup files.
On the tab define several options such as to open files or folders in Nautilus upon single or double mouse-click, or to include a menu item in Nautilus which deletes files or folders directly from your file system instead of moving them to the trash.
On the tab configure the date format and the way icon captions appear in Nautilus.
Switch to the tab to configure the columns that appear in Nautilus, as well as the order in which they appear.
Click the tab to specify for which files to show previews in Nautilus and if folders should show the number of items they contain.
Click the tab to specify actions that should be performed automatically whenever media such as audio CDs, video DVDs, blank disks, media players, digital cameras and other devices are connected. In general, you do not need to change these settings unless you want to change the behavior of a device when connected. If you attach a device for the first time and it behaves in an unexpected or undesired way, change the settings for the particular device.
For more information on the available options click .
Click when you are ready to apply changes.
openSUSE ships with a graphical lockdown editor
(pessulus package) that lets you disable
(lockdown) certain desktop functions. This is useful if you want to
restrict the actions that users can perform on a computer. For example,
you might want to prevent command line operations on a computer that is
for public use at a trade show.
If the pessulus package is already installed,
start the Lockdown Editor from the main menu with +++ or press Alt+F2 and enter pessulus.
When the Lockdown Editor starts, it tries to connect to the GConf
mandatory configuration source
(xml:merged:$prefix/etc/gconf/gconf.xml.mandatory).
If you run pessulus as root, you have access to
this configuration source and a lock icon is displayed next to the
checkbox for each setting. Click the lock to specify if the setting is
mandatory. If the setting is mandatory, regular users will not be able
to change or override the setting. If you do not have access to the
mandatory configuration source, the lock icon does not appear. In this
case, all disabled settings are stored in the user's default
configuration source and can be modified later using other tools such as
gconf-editor or gconftool-2. For
more information about GConf and mandatory configuration sources see
“Using GConf” in the
GNOME Desktop System Administration
Guide
.
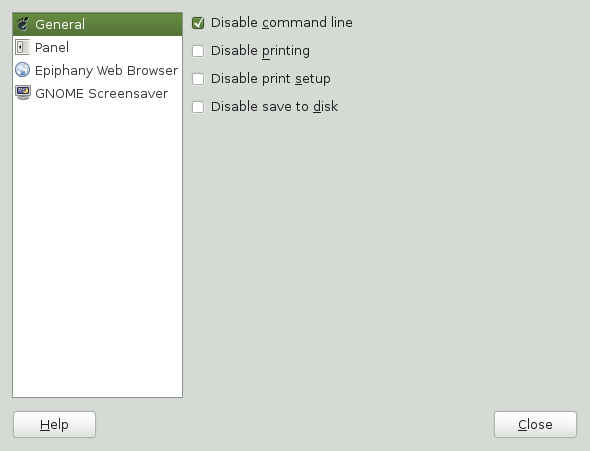
Click a category on the left to view the settings for this category that can be disabled.
To disable access to the command line, saving to disk and printing (or prevent the user from modifying print settings) set the relevant options in the category.
Use the options in the category to lock down the panel, disable the panel applets you specify and disable the force quit, lock screen and log out options.
Use the options in the category to control access to features in Epiphany.
Use the options in the category to lock the screen (when the screen saver goes active), enable or disable the logout (after a delay option in the unlock dialog box) and to enable or disable the switch user option in the unlock dialog box.
For more information on the available options of each category, click .
If all options are set according to your wishes, click to apply the changes.
Use the tool to customize the traditional GNOME main menu. The traditional GNOME menu is not enabled by default, but you can add it to your GNOME panel by right-clicking it and choosing +++. To customize the traditional GNOME main menu, use +++.
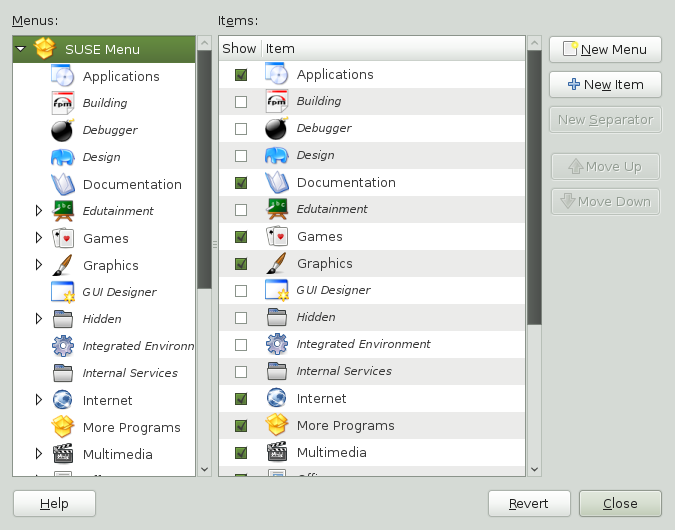
The current main menu submenus are displayed on the left of the main window, the items belonging to the selected submenu are shown on the right. Groups in a submenu are nested below that submenu. To find an item, click the arrow next to a submenu in the list, select the group containing that item and locate the item in the list.
![[Note]](admon/note.png) | Implications of Main Menu Changes |
|---|---|
Changes you make to the main menu are not overwritten during a subsequent system update. Changes are applied after the latest menu view is generated. | |
Procedure 3.3. Editing the Main Menu
You can change the order in which items appear in the main menu, rename menu items, show (or hide) menu items, delete items from the menu or add new menu items. For example, you might want to place your frequently used applications at the top of the menu or at the top of their groups to make them easier to find. Adding new items to the main menu is helpful when you install an application, but it is also useful if you have other applications that do not currently appear on the menu. You can also add a directory, a link or another type of item to the menu.
To move a menu item click the menu item in the list on the right and drag it to a new location in the menu. You can move the item to a new location in the same menu or drop it on an item in the list (to move it to a new menu or group). Use the and buttons to change an item's location in the menu.
To rename an existing menu item right-click the item in the list, select and enter a new name.
To hide an item (so it does not appear in the menu) deactivate the checkbox next to the item in the list. An activated checkbox indicates that the item is currently shown in the menu. When an item is hidden it still remains in the list and can be shown at any time you decide you want it to (re)appear in the menu.
To delete an item from the list right-click the item and click . If you want to show a deleted item in the menu again you must add it like you would a new application.
To add a new item, proceed as follows:
In the list click the arrow next to the menu containing the group where you want to add the application, then select the group. The contents of that group appear in the list.
Click and select the of menu item to add. For example, to add an application select .
Click and select the item to add.
Enter a for the new menu item.
If you want a short description to appear in the main menu during a hover state enter the description in the field.
If you want to assign an icon to the new item, click the image frame on the left, then select an icon for the item. If you do not select an icon, the item appears in the menu without an icon.
If you want to restore the default menu layout click .
If all options are set according to your wishes click to apply your changes.
The first time you use the application to edit the menu, changes do not take effect until your next login. Subsequent changes appear immediately.
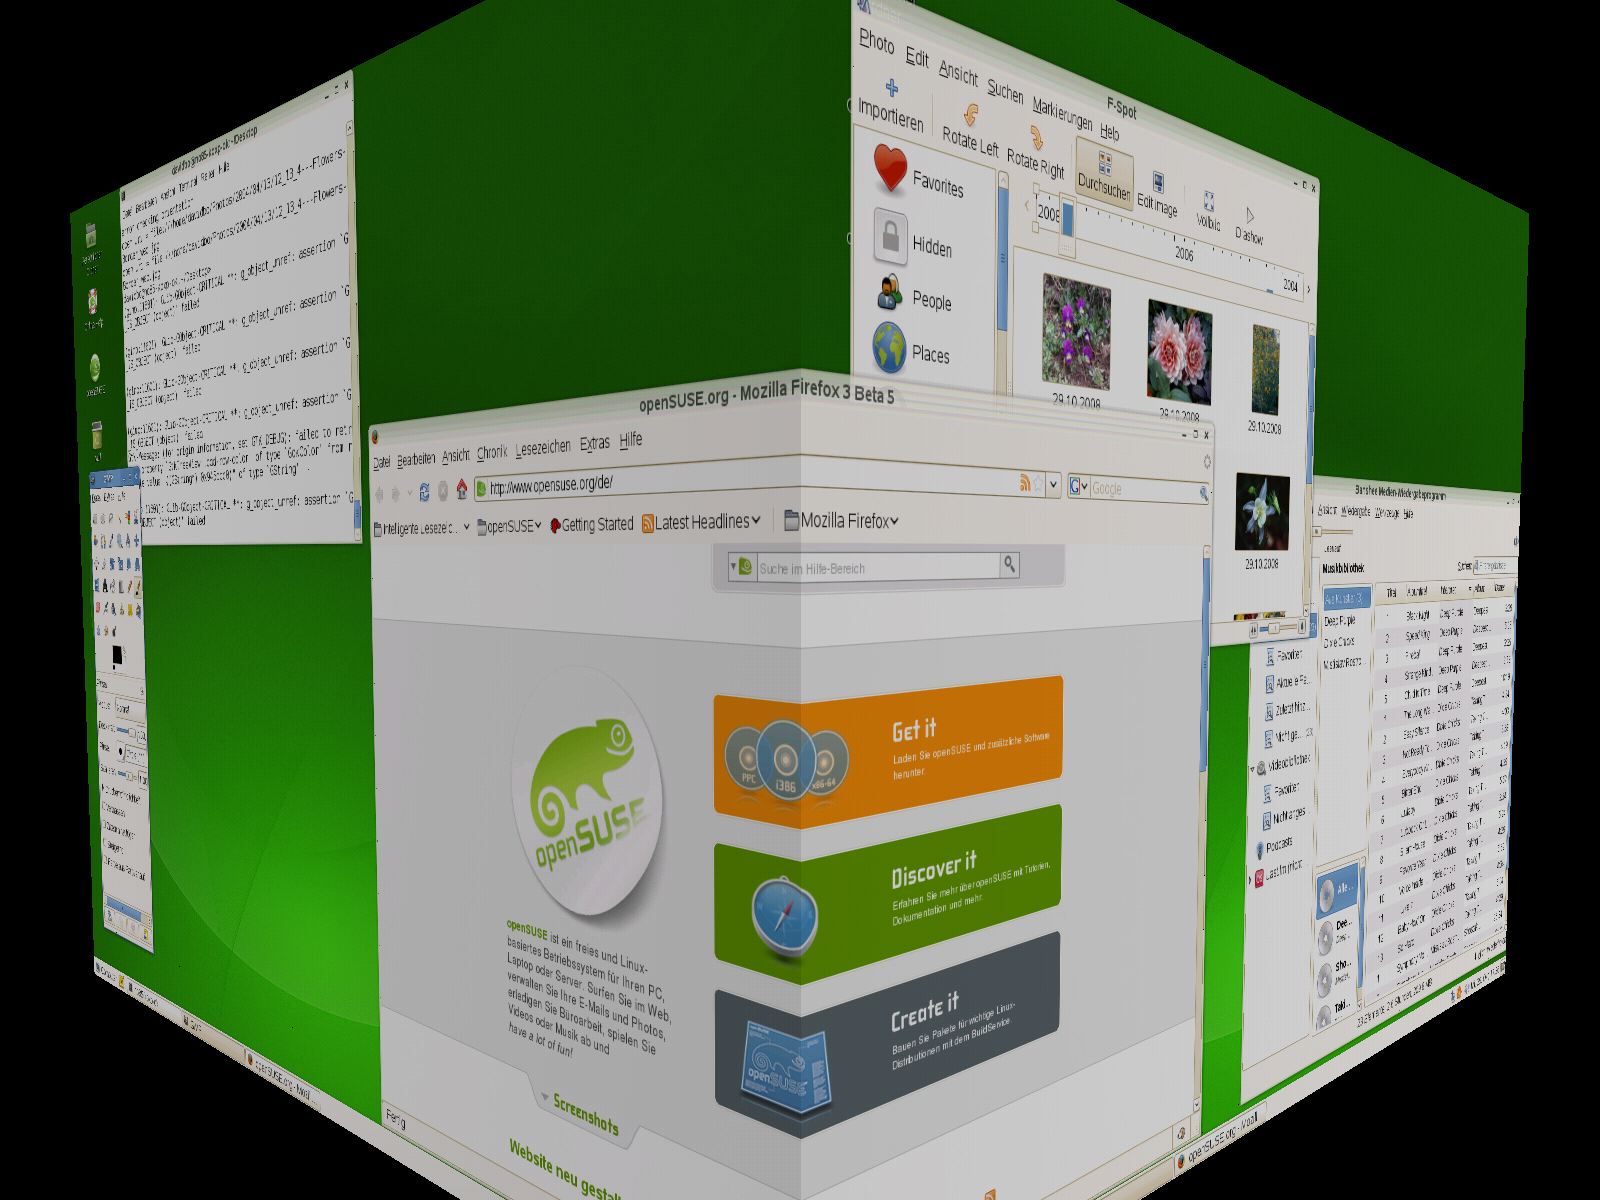
Compiz is a compositing window manager for the X Window System that uses 3D graphics hardware to create fast compositing desktop effects for window management. Effects are implemented as loadable plugins. Compiz lets you turn your desktop into a rotating 3D cube, tile windows so they do not overlap and switch tasks while viewing live thumbnails. You can enable translucent or transparent windows, zoom in and out of the desktop screen, and use other window effects such as shadows, fading and transformations. You can also configure windows to snap to other windows and screen edges when they are moved.
To enable desktop effects you need a graphics adapter capable of providing 3D support and the graphics driver that Linux uses to operate the graphics adapter. This driver must be able to handle OpenGL (or 3D) requests from the Linux kernel. If your configuration is compatible with desktop effects it will be enabled by default. If your configuration does not support desktop effects you will be warned upon activation.
To enable or disable desktop effects follow these steps:
Click +.
Click in the group.
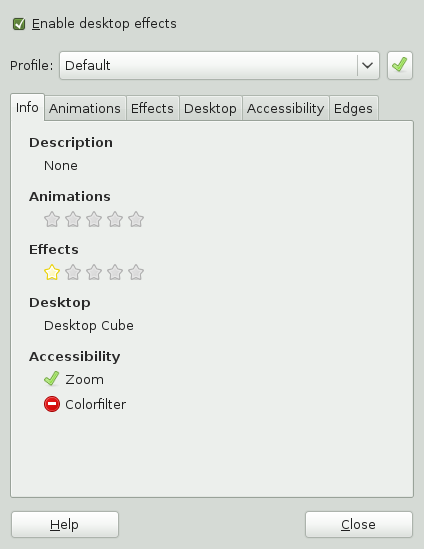
If your system is configured for desktop effects check . To keep desktop effects enabled press in the dialog that opens. Otherwise, the desktop effects will be deactivated automatically in ten seconds.
To disable desktop effects uncheck the option.
The default set of desktop effects is now enabled. You can change the enabled effects and their settings on the several tabs of the dialog or just select a from the dropdown list. To activate the selected profile press the green button.
A simplified configuration tool for desktop effects is included in the section of GNOME Control Center. Open tool from the main menu by clicking +++.
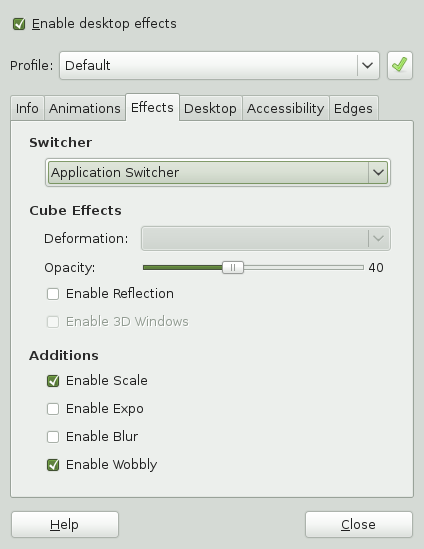
Use the tab to get general information about the current desktop effect settings.
Use the options on the tab to specify what happens when you open, close, focus or minimize windows.
Use the options on the tab to specify what type of to use. This is the desktop effect activated when switching between windows using the Alt+→| combination. This is where you can set various desktop effects like opacity of the desktop cube or wobbling windows.
Use the options on the tab to configure the representation of virtual desktops you want to use (three dimensional or planar ) and to set how many virtual desktops you want to use.
Use the options on the tab to configure screen and area zoom.
Use the tab to configure functions associated with active screen edges.
For more information on the individual options, click .
If all options are set according to your wishes, click to apply the changes.
| Advanced Configuration Tool |
|---|---|
An advanced configuration tool can be started from the menu by clicking , or form a terminal emulator with command ccsm. This offers a greater selection of configuration options than the simplified tool in GNOME Control Center. | |
You can also use gconf-editor to change desktop effects settings.
Click +++ or press Alt+F2 and enter gconf-editor.
Navigate to the
apps/compiz/generalandapps/compiz/pluginsregistry folders and make the desired changes.Click + to close the .
The following table contains a list of the default keystrokes and mouse movements you can use to perform desktop effects. To change any of these shortcuts, see use the advanced configuration tool (). The shortcuts for zoom function can be configured in the tool available from GNOME Control Center.
Table 3.1. Desktop Effects Shortcuts
|
Effect |
Shortcut |
|---|---|
|
Panoramic view of all desktops (if the desktop cube effect is enabled) |
Ctrl+Alt+↓ (use the Left and Right arrows to scroll) |
|
Rotate desktop cube (if the desktop cube effect is enabled) or switch desktops (if the desktop wall effect is enabled) |
Ctrl+Alt+← or → (↑ or ↓ keys can be used in case of desktop wall effect with multiple rows) |
|
Rotate desktop cube manually (if the desktop cube effect is enabled) |
Ctrl+Alt+left-click the desktop and drag the mouse pointer |
|
Rotate desktop cube (if the desktop cube effect is enabled) or switch desktops (if the desktop wall effect is enabled) while keeping the current active window with you |
Ctrl+Alt+Shift+← or → |
|
Switch windows (thumbnail view) |
Alt+→| |
|
Wobbly window (if the wobbly effect is enabled) |
Left-click the window and drag |
|
Zoom in manually (if the screen zoom is enabled) |
Super key (Windows key) and scroll wheel up |
|
Zoom out manually (if the screen zoom is enabled) |
Super key (Windows key) and scroll wheel down |
|
Zoom in area under mouse pointer (if the area zoom is enabled) |
Shift, super key (Windows key) and scroll wheel up |
|
Zoom out area under mouse pointer (if the area zoom is enabled) |
Shift, Super key (Windows key) and scroll wheel down |
The following sections introduce examples of how to configure some personal aspects of your GNOME desktop, like your password or keyboard shortcuts. For configuration of assistive technologies refer to Chapter 4, Assistive Technologies.
For security reasons, it is a good idea to change your login password from time to time. To change your password:
Click +++.
In the upper right corner, click .
Type your old (current) password.
Type your new password.
Confirm your new password by typing it again, then click .
A keyboard shortcut is a key or combination of keys that provide an alternative to standard ways of performing an action. You can customize the keyboard shortcuts for a number of actions.
To open the Keyboard Shortcuts tool click +++.
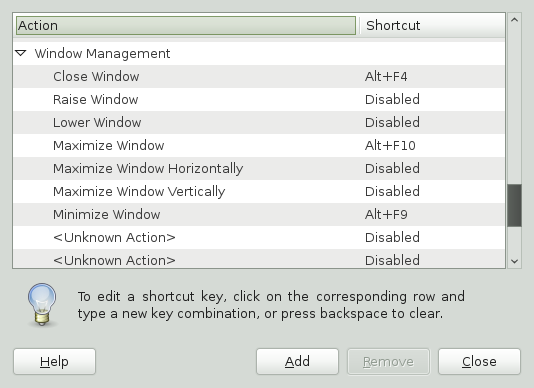
To change the shortcut keys for an action, select the action and then press the keys you want to associate with the action. To disable the shortcut keys for an action, click the shortcut for the action, then press <—.
In the following sections you will find examples of how to configure some system aspects of your GNOME desktop like language settings, power management, preferred applications, session (and session sharing) preferences, Beagle search options and audio preferences.
openSUSE can be configured to use any of a number of languages. The language setting determines the language of dialogs and menus and can also determine the keyboard and clock layout.
You can set the following language settings:
Primary language
Whether the keyboard language setting should correlate to the primary language
Whether the time zone should correlate to the primary language
Secondary languages
To configure your language settings:
Click +++.
Enter the
rootpassword.If you do not know the root password contact your system administrator. You cannot continue without the root password.
Specify the primary language, whether you want to adapt the keyboard layout or time zone to the primary language, and any secondary languages you need to support on the computer.
Click .
The language configuration settings are written to several configuration files. This process can take a few minutes. The new settings take effect immediately after they are written to the configuration files.
The Network Proxy Configuration tool lets you configure how your system connects to the Internet. You can configure the desktop to connect to a proxy server and specify the details of the server. A proxy server is a server that intercepts requests to another server and fulfills the request itself, if it can. You can specify the Domain Name Service (DNS) name or the Internet Protocol (IP) address of the proxy server. A DNS name is a unique alphabetic identifier for a computer on a network. An IP address is a unique numeric identifier for a computer on a network.
Click +++.
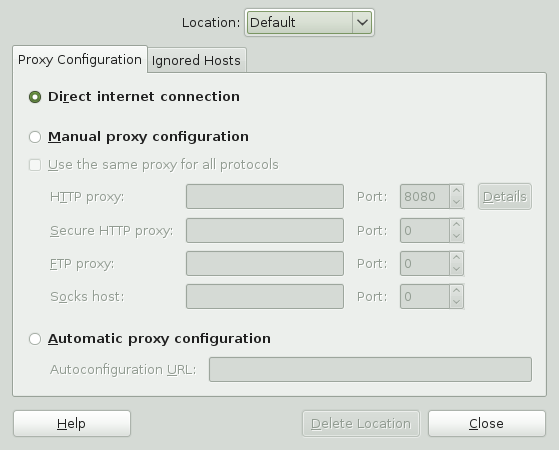
For more information on the individual options, click .
The Power Management module lets you manage your system's power-saving options. It is especially useful for extending the life of a laptop’s battery charge. However, several options also help to save electricity when you are using a computer that is plugged in to an electrical power outlet.
Sleep mode shuts down the computer when it is dormant for a specified period of time. Whether you are using battery or AC power, you can specify the period of time that the computer remains dormant before it is put to sleep. You can also put the computer’s display to sleep without shutting down the computer, saving the power required by the display.
Sleep mode is especially important when the computer is operating under battery power. Both the screen and the computer draw power from the battery, so you can save a significant amount of battery power by shutting down one or both. It is common to put the display to sleep after a shorter period of time. Then, if the computer remains dormant for an additional period of time, it is also put to sleep.
There are several sleep modes or actions you can set in the Power Management module:
The computer does not shut down or automatically go into any kind of power-saving mode. If you have a laptop, the laptop continues to run normally when the lid is closed.
The screen is blanked, reducing power consumption.
Suspend mode turns off power-consuming computer components such as the display and the hard drive without saving the contents of RAM. Any unsaved data is lost.
The computer saves the contents of RAM to the hard disk and shuts down. When you turn the computer on again, the saved data is put back into RAM, restoring your computer to its previous state. requires an amount of free hard disk space equal to the amount of RAM installed on the computer.
To open the Power Management module, click +++.
Procedure 3.4. Specifying Your Computer's Sleep Settings
Click the tab for the type of power you are using: if your computer uses AC power click . If your computer runs on battery power click . If your computer operates on both AC and battery power, you can configure the settings on both tabs.
Use the drop-down lists to set the amount of inactive time that passes before the display and computer go into sleep mode.
When the display is in sleep mode, the computer continues to run. When the computer is in sleep mode, power to the display and hard disk is shut off and the computer uses only the power needed to maintain the contents of RAM.
If the computer is a laptop, set the actions you want taken when the laptop lid is closed.
You can also save some energy by enabling the hard disk to spin down during idle times.
If you configure how a laptop manages battery power, specify the action you want taken if battery power reaches a critical level.
Choose the option you prefer by selecting it from the menu. If you have sufficient free disk space, is the best choice.
In the pane, specify the amount of time after which the display will enter the sleep mode. You can set other options for idle mode here as well, like dimming the display or reducing backlight brightness.
On the tab you can set further options, for example the action to take when the power button is pressed or the sleep type to use when the computer is inactive. The options available there depend on the type of computer you use (laptop or other computer).
You can also define when and how to display the power icon in the notification area.
When all options are set according to your wishes, click . The options you selected go into effect immediately.
The Preferred Applications module allows you change the default application for various common tasks such as browsing the Internet, sending mails or transferring data with FTP.
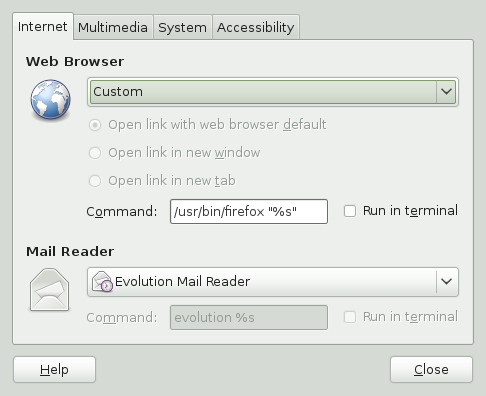
Click +++.
Click the tab for the type of application you want to set.
Select one of the available applications from the drop-down list or enter the command used to start the application.
Click .
The changes take effect immediately.
The dialog box lets you share a GNOME desktop session between multiple users and set session-sharing preferences.
| Sharing Desktop Sessions Affects System Security |
|---|---|
Be aware that sharing desktop sessions can be a security risk. Use the restriction options available. If you need to adjust the options to a lower security level, do not forget to switch back to a higher security level as soon as possible. | |
Click +++.
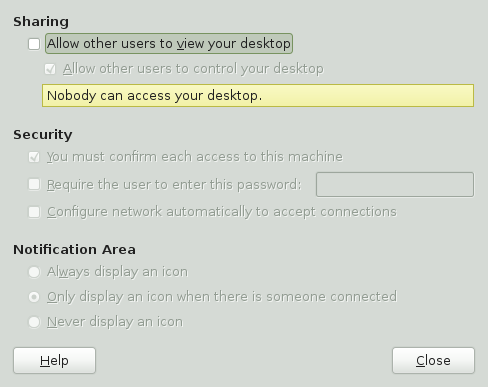
To share your desktop session with other users activate . All keyboard, pointer and clipboard events from the remote user are ignored.
If you want or need to allow other users to access and control your session from a remote location, activate . Click the highlighted text below to send the system address by e-mail to a remote user.
Make use of the security options available. If is activated, remote users require your confirmation before they can connect to your session. To achieve a higher security level, activate (if authentication is used).
Beagle is the search engine used on the GNOME desktop. By default, Beagle is configured to start automatically and index your home directory. If you want to change these settings, specify the number of results displayed after a search or change the Beagle privacy settings, click +++.
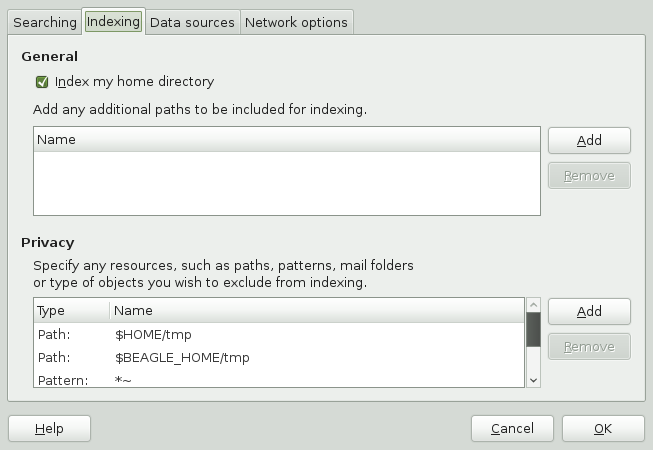
For more information, see Section 6.4, “Setting Search Preferences” and Section 6.6, “Preventing Files and Directories from Being Indexed”.
The tool lets you configure the frequency of update checking, automatic updates and update notifications.
Click +++ to open the tool.
In the section, set the frequency of update checking and whether updates should be installed automatically. You can limit automatic installation to security updates.
Click .