Chapter 1. Installation with YaST
Contents
- 1.1. Choosing the Installation Media
- 1.2. Choosing the Installation Method
- 1.3. The Installation Workflow
- 1.4. System Start-Up for Installation
- 1.5. The Boot Screen
- 1.6. Welcome
- 1.7. Installation Mode
- 1.8. Clock and Time Zone
- 1.9. Desktop Selection
- 1.10. Suggested Partitioning
- 1.11. Create New User
- 1.12. Installation Settings
- 1.13. Performing the Installation
- 1.14. Configuration of the Installed System
- 1.15. Graphical Login
Install your openSUSE® system with YaST, the central tool for installation and configuration of your system. YaST guides you through the installation process and the basic configuration of your system. During the installation and configuration process, YaST analyzes both your current system settings and your hardware components and proposes installation settings based on this analysis. By default, YaST displays an overview of all installation steps on the left hand side of the window and provides online help texts for each step. Click to view the help text.
If you are a first-time user of openSUSE, you might want to follow the default YaST proposals in most parts, but you can also adjust the settings as described here to fine-tune your system according to your preferences. Many parts of the basic system configuration, such as user accounts or system language, can also be modified after the installation process.
1.1. Choosing the Installation Media
When installing openSUSE, choose from several media available either online or in the retail box:
- DVD-retail
One DVD containing the openSUSE distribution for 32bit and 64bit systems. The second medium contains proprietary add-on software.
This installation option does not require any network access for installation, nor do you need to set up external repositories to install the full openSUSE. You can, however, make the contents of the DVD available on an installation server and make them available all across your network.
- DVD-download
One DVD5, available via download for 32bit or 64bit systems.
Choose this installation option if you want a fully-fledged openSUSE system. Beyond the downloading of the DVD ISO, there is no network connection required to make use of this installation option. Once the medium has been fully downloaded and the physical medium created, you can go ahead with the installation. You can also make the contents of the DVDs available on an installation server and make them available all across your network.
- KDE4/GNOME LiveCD
The LiveCD versions, available via download, include the KDE4 or GNOME desktops together with the most popular applications for 32-bit or 64-bit systems.
Choose this medium option for a first look at openSUSE. The LiveCD version runs on your computer using RAM without touching your hard drive and no installation is needed. However, you can also install openSUSE from the running live system. There is no network connection required beyond the mere downloading of the medium.
![[Tip]](admon/tip.png)
Booting the LiveCD from an USB Stick Live CD iso images can also be used as boot images for USB sticks. Create a bootable USB stick by using the command-line program dd with the following syntax:
dd if=
ISO_IMAGEof=USB_STICK_DEVICEbs=4Mdd is available on Linux and MacOS by default. A Microsoft Windows* version can be downloaded from http://www.chrysocome.net/dd.
Warning: Using this dd command will erase all data on the USB device!
- Mini CD
The Mini CD contains the minimal Linux system needed to run the installation. The installation system itself and the installation data are loaded from a network source. To install from a network providing SLP, please start the installation as described in Section 1.2.1, “Installing from a Network Server Using SLP”. To install from a HTTP, FTP, NFS, or SMB server, follow the instructions in Section 1.2.2, “Installing from a Network Source without SLP”.
![[Important]](admon/important.png) | Add-On CDs—Installing Additional Software |
|---|---|
Although add-on CDs (extensions or third-party products) cannot be used as stand-alone installation media, they can be embedded as additional software sources during the installation. Currently CDs with additional languages and non open source software are available as add-on CDs for openSUSE. Refer to Section 1.7.1, “Add-On Products” for more information. | |
1.2. Choosing the Installation Method
After having selected the installation medium, determine the suitable installation method and boot option that best matches your needs:
- Installing from the openSUSE Media
Choose this option if you want to perform a stand-alone installation and do not want to rely on a network to provide the installation data or the boot infrastructure. The installation proceeds exactly as outlined in Section 1.3, “The Installation Workflow”.
- Installing from the LiveCD
In order to install from a LiveCD, boot the live system from CD. In the running system, launch the installation routine by clicking on the icon on the desktop. Phase one of the installation will be carried out in a window on the desktop. It is not possible to update an existing system with a LiveCD, you can only perform a new installation (with automatic configuration).
- Installing from a Network Server
Choose this option if you have an installation server available in your network or want to use an external server as the source of your installation data. This setup can be configured to boot from physical media (Floppy, CD/DVD, or hard disk) or configured to boot via network using PXE/BOOTP. Refer to Section 1.2.1, “Installing from a Network Server Using SLP”, Section 1.2.2, “Installing from a Network Source without SLP”, or Chapter 2, Remote Installation for details.
- Installing with
openSUSE 11.4 Installerfrom Windows Choose this installation option if you prefer a smooth transition from using Windows to using Linux.
openSUSE 11.4 Installerallows you to boot into the openSUSE installation right from a running Windows by modifying the Windows boot loader. This installation option is only available from the DVD media. Refer to Section 1.2.3, “Installing with theopenSUSE 11.4 Installerfrom Windows” for details.
openSUSE supports several different boot options from which you can
choose, depending on the hardware available and on the installation
scenario you prefer. Booting from the
openSUSE media or using openSUSE 11.4
Installer are the most straightforward options, but special
requirements might call for special
setups:
Table 1.1. Boot Options
|
Boot Option |
Description |
|---|---|
|
DVD |
This is the easiest boot option. This option can be used if the system has a local DVD-ROM drive that is supported by Linux. |
|
openSUSE 11.4 Installer |
openSUSE 11.4 Installer is installed under Microsoft Windows and makes it possible to boot directly into the installation |
|
PXE or BOOTP |
Booting over the network must be supported by the system's BIOS or firmware, and a boot server must be available in the network. This task can also be handled by another openSUSE system. See http://en.opensuse.org/SDB:PXE_boot_installation for more information.Refer to Chapter 2, Remote Installation for more information. |
|
Hard Disk |
openSUSE installation can also be booted from the hard disk. To
do this, copy the kernel ( |
| Booting from DVD on UEFI machines |
|---|---|
►amd64 em64t: DVD1 can be used as a boot medium for machines equipped with UEFI (Unified Extensible Firmware Interface). Refer to your vendor's documentation for specific information. If booting fails, try to enable CSM (Compatibility Support Module) in your firmware. ◄ | |
1.2.1. Installing from a Network Server Using SLP
If your network setup supports OpenSLP and your network installation source has been configured to announce itself via SLP (described in Section 2.2, “Setting Up the Server Holding the Installation Sources”), boot the system, press F4 in the boot screen and select from the menu.
The installation program configures the network connection with DHCP and retrieves the location of the network installation source from the OpenSLP server. If the automatic DHCP network configuration fails, you are prompted to enter the appropriate parameters manually. The installation then proceeds as described below with the exception of the network configuration step that is needed prior to adding additional repositories. This step is not needed as the network is already configured and active at this point.
1.2.2. Installing from a Network Source without SLP
If your network setup does not support OpenSLP for the retrieval of network installation sources, boot the system and press F4 in the boot screen to select the desired network protocol (NFS, HTTP, FTP, or SMB/CIFS). Provide the server's address and the path to the installation media.
The installation program automatically configures the network connection with DHCP. If this configuration fails, you are prompted to enter the appropriate parameters manually. The installation retrieves the installation data from the source specified. The installation then proceeds as described below with the exception of the network configuration step needed prior to adding additional repositories. This step is not needed as the network is already configured and active at this point.
1.2.3. Installing with the openSUSE 11.4 Installer from Windows
openSUSE 11.4 Installer is a
Microsoft Windows application that prepares your computer to directly
boot into the openSUSE installation without having to adjust BIOS
settings. It is only available on DVD media. To use the installer,
insert the openSUSE media under Windows. The openSUSE
11.4 Installer setup automatically starts
(if not, run openSUSE11_2_LOCAL.exe from the DVD).
Choose a language for the installation and follow the instructions on
the screen. The language you choose here is also preconfigured to be
used for the openSUSE installation.
On the next reboot, the Microsoft Windows boot loader launches. Choose
to start the
openSUSE installation. In order to proceed with the installation,
you will be prompted to insert the installation media. The installation
proceeds as described below. When Microsoft Windows is booted again,
openSUSE 11.4 Installer is
automatically uninstalled.
| Installing openSUSE alongside Microsoft Windows |
|---|---|
openSUSE can easily be installed alongside Microsoft Windows. Carry out the installation as described below—an existing Windows installation will automatically be detected and a dual boot option will be installed. If Windows covers the whole installation disk, the installation routine will make a proposal to shrink an existing Windows partition in order to make room for the openSUSE. Please read Section 1.10.1.1, “Resizing a Windows Partition” prior to the installation for detailed information. | |
1.3. The Installation Workflow
The openSUSE installation is split into three main parts: preparation, installation, and configuration. During the preparation phase you configure some basic parameters such as language, time, desktop type, users, passwords, hard disk setup and installation scope. In the non-interactive installation phase the software is installed and the system is prepared for the first boot. Upon finishing the installation the machine reboots into the newly installed system and starts the final system configuration. You can choose whether to do a fully automatic or a manual configuration. In this stage, network and Internet access, as well as hardware components such as printers, are set up.
1.4. System Start-Up for Installation
You can install openSUSE from local installation sources, such as the openSUSE CDs or DVD, or from network source of an FTP, HTTP, NFS, or SMB server. Any of these approaches requires physical access to the system to install as well as user interaction during the installation. The installation procedure is basically the same regardless of the installation source. Any exceptions are sufficiently highlighted in the following workflow description.
1.5. The Boot Screen
The boot screen displays a number of options for the installation procedure. boots the installed system and is selected by default, because the CD is often left in the drive. Select one of the other options with the arrow keys and press to boot it. The relevant options are:
The normal installation mode. All modern hardware functions are enabled. In case the installation fails, see F5 for boot options that disable potentially problematic functions.
Starts a minimal Linux system without a graphical user interface. For more information, see Abschnitt „Verwenden des Rettungssystems“ (Anhang A, Help and Troubleshooting, ↑Start-Up). This option is not available on LiveCDs.
This option is only available when you install from media created from downloaded ISOs. In this case it is recommended to check the integrity of the installation medium. This option starts the installation system before automatically checking the media. In case the check was successful, the normal installation routine starts. If a corrupt media is detected, the installation routine aborts.
Starts a BIOS checker that validates ACPI and other parts of your BIOS. This option is not available on the LiveCDs.
Tests your system RAM using repeated read and write cycles. Terminate the test by rebooting. For more information, see Abschnitt „Computer kann nicht gebootet werden“ (Anhang A, Help and Troubleshooting, ↑Start-Up). This option is not available on the LiveCDs.

Use the function keys indicated in the bar at the bottom of the screen to change the language, screen resolution, installation source or to add an additional driver from your hardware vendor:
- F1
Get context-sensitive help for the active element of the boot screen. Use the arrow keys to navigate, to follow a link, and to leave the help screen.
- F2
Select the display language and a corresponding keyboard layout for the installation. The default language is English (US).
- F3
Select various graphical display modes for the installation. Select if the graphical installation causes problems.
- F4
Normally, the installation is performed from the inserted installation medium. Here, select other sources, like FTP or NFS servers. If the installation is deployed on a network with an SLP server, select an installation source available on the server with this option. Find information about SLP in Chapter 24, SLP Services in the Network.
- F5
If you encounter problems with the regular installation, this menu offers to disable a few potentially problematic functions. If your hardware does not support ACPI (advanced configuration and power interface) select to install without ACPI support. disables support for APIC (Advanced Programmable Interrupt Controllers) which may cause problems with some hardware. boots the system with the DMA mode (for CD/DVD-ROM drives) and power management functions disabled.
If you are not sure, try the following options first: or . Experts can also use the command line () to enter or change kernel parameters.
- F6
Press this key to notify the system that you have an optional driver update for openSUSE. With or , load drivers directly before the installation starts. If you select , you are prompted to insert the update disk at the appropriate point in the installation process.
- F7
If you install from an installation medium supporting 32bit and 64bit architectures and have a processor with 64-bit support, select whether to install a 64-bit or 32-bit system. By default, a 64-bit system is installed on a computer with 64-bit support. To install a 32-bit system, press F7 then select .
| Using IPv6 during the Installation |
|---|---|
By default you can only assign IPv4 network addresses to your machine.
To enable IPv6 during installation, enter one of the following
parameters at the bootprompt: | |
After starting the installation, openSUSE loads and configures a minimal Linux system to run the installation procedure. To view the boot messages and copyright notices during this process, press Esc. On completion of this process, the YaST installation program starts and displays the graphical installer.
| Installation without a Mouse |
|---|---|
If the installer does not detect your mouse correctly, use Tab for navigation, arrow keys to scroll, and Enter to confirm a selection. Various buttons or selection fields contain a letter with an underscore. Use Alt-Letter to select a button or a selection directly instead of navigating there with the Tab button. | |
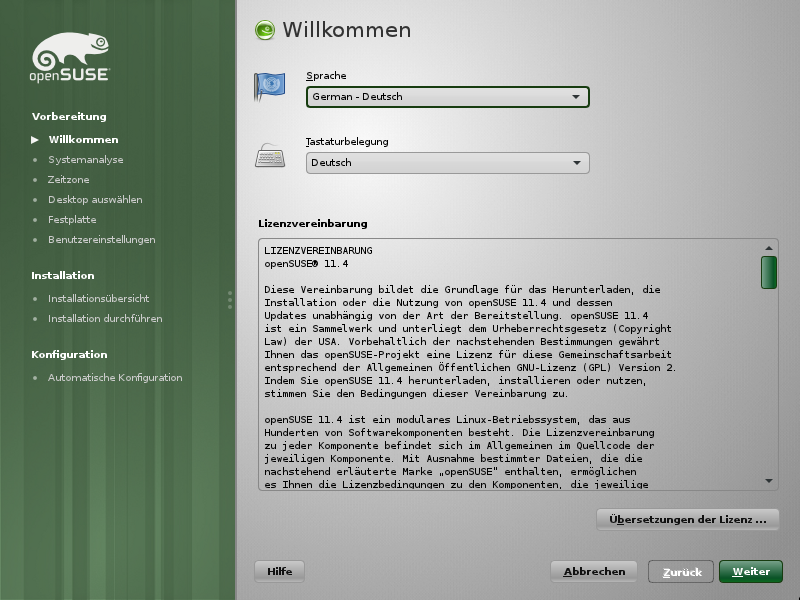
1.6. Welcome
Start the installation of openSUSE by choosing your language. Changing the language will automatically preselect a corresponding keyboard layout. Override this proposal by selecting a different keyboard layout from the drop-down menu. The language selected here is also used to assume a time zone for the system clock. This setting—along with the selection of secondary languages to install on your system—can be modified later in the , described in Section 1.12, “Installation Settings”. For information about language settings in the installed system, see Chapter 10, Changing Language and Country Settings with YaST.
Read the license agreement that is displayed beneath the language and keyboard selection thoroughly. Use to access translations. If you agree to the terms, click to proceed with the installation. If you do not agree to the license agreement click to terminate the installation.
1.7. Installation Mode
After a system analysis (where YaST probes for storage devices and tries to find other installed systems on your machine) the available installation modes are displayed. This step is skipped when installing from a LiveCD, since this medium only supports a new installation with automatic configuration.
Select this option to start a new installation from scratch.
Select this option to update an existing installation to a newer version. For more information about system updates, see Chapter 15, Upgrading the System and System Changes.
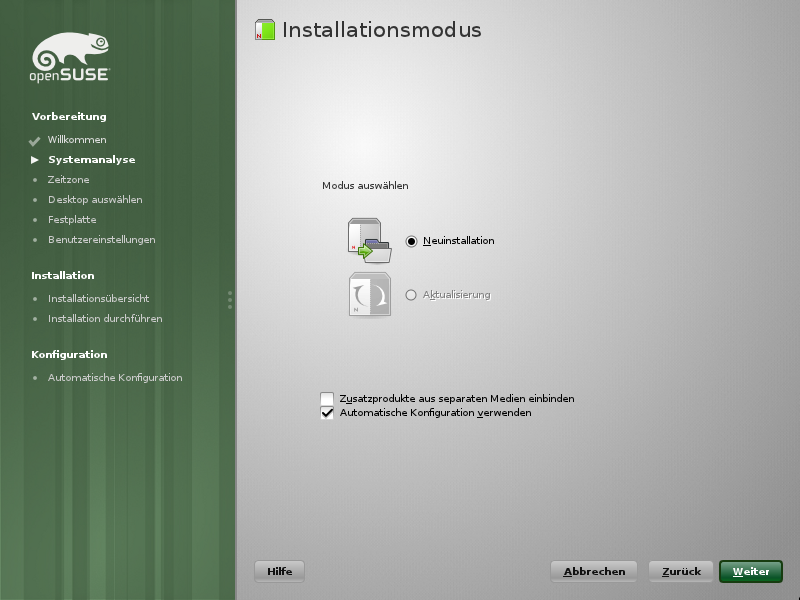
By default, the automatic configuration is used when performing a new installation. In this mode the system automatically configures your hardware and the network, so the installation is performed with minimal user interaction. If necessary, you can change every configuration that is set up later in the installed system using YaST. Uncheck if you prefer a manual configuration during the installation.
Check to include add-on products during the installation. An add-on product can include extensions, third-party products or additional software for your system such as support for additional languages.
Click to proceed. If you selected to include an add-on product, proceed with Section 1.7.1, “Add-On Products”, otherwise skip the next section and advance to Section 1.8, “Clock and Time Zone”.
1.7.1. Add-On Products
Add-on products can be installed either from a local source (CD, DVD, or directory) or from a network source (HTTP, FTP, NFS, CIFS,...). When installing from a network source, you need to configure the network first (unless you are performing a network installation— in this case the existing network configuration is used). Choose and proceed as described in Section 1.7.1.1, “Network Setup”. If the add-on product is available locally, select .
Click and specify the product source. Source types available are , , , , a or a (if no network was configured). If the add-on product is available on removable media, the system automatically mounts the media and reads its contents. If the add-on product is available on hard disk, choose to install from an unmounted hard drive, or / to install from the local file system. Add-on products may be delivered as a repository or as a set of rpm files. In the latter case, check . Whenever a network is available, you can choose from additional remote sources such as HTTP, SLP, FTP, etc. It is also possible to specify a URL directly.
Check to download the files describing the repository now. If unchecked, they will be downloaded once the installation starts. Proceed with and insert a CD or DVD if required. Depending on the product's content it may be necessary to accept additional license agreements.
It is also possible to configure add-on products later. Using add-on products on the installed system is described in Chapter 7, Installing Add-On Products.
1.7.1.1. Network Setup
When invoking the network setup, YaST scans for available network cards. If more than one network card is found, you must choose the card to configure from the list.
If an ethernet network adapter is not already connected, a warning will open. Make sure the network cable is plugged in and choose . If your network is equipped with a DHCP server, choose . To manually set up the network choose and specify , , , and the .
Some networks require the use of a proxy server to access the Internet. Tick the check box and enter the appropriate specifications. Click to perform the network setup. The installation procedure will continue with the add-on products or repositories setup as described in Section 1.7.1, “Add-On Products”.
1.8. Clock and Time Zone
In this dialog, select your region and time zone. Both are preselected according to the selected installation language. To change the preselected values, either use the map or the drop down lists for and . When using the map, point the cursor at the rough direction of your region and left-click to zoom. Now choose your country or region by left-clicking. Right-click to return to the world map.
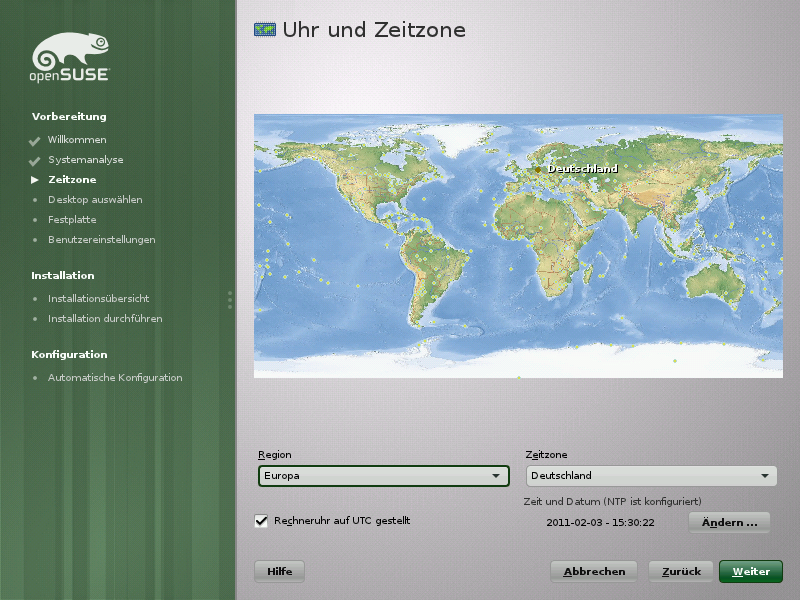
To set up the clock, choose whether the . If you run another operating system on your machine, such as Microsoft Windows, it is likely your system uses local time instead. If you only run Linux on your machine, set the hardware clock to UTC and have the switch from standard time to daylight saving time performed automatically.
If a network is already configured, the time is automatically synced via Network Time Protocol (NTP) with a time server. Click to either alter the NTP settings or to set the time. See Chapter 27, Time Synchronization with NTP for more information on configuring the NTP service. When finished, click to continue the installation.
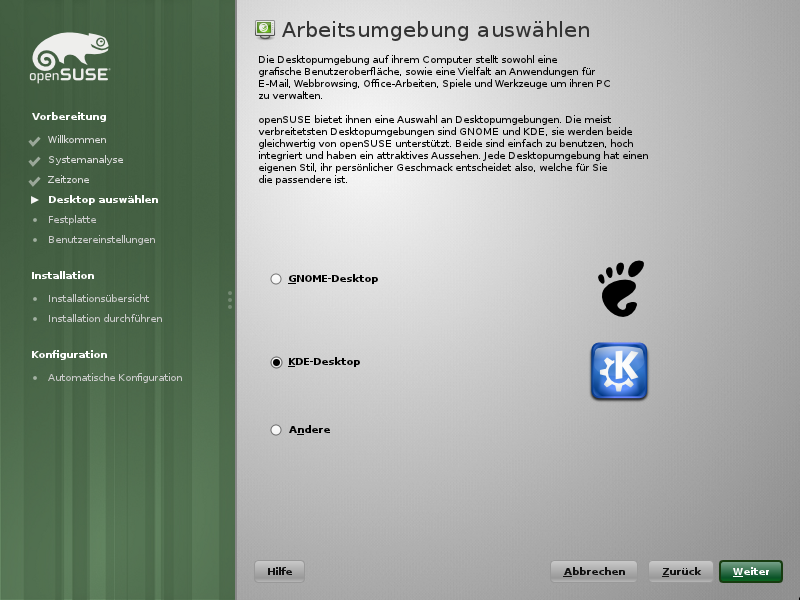
1.9. Desktop Selection
In openSUSE, you can choose from various desktops. The major ones, and , are powerful graphical desktop environments similar to Windows. This step is skipped when installing from a LiveCD, since this medium is already preconfigured to either use KDE or GNOME.
If you prefer a different desktop, choose for more options. The and the are fast and lightweight desktop environments suitable for modest hardware. With , install a graphical window manager that allows for running stand-alone X applications and console windows but does not provide the usual integrated desktop functionality. In , only console terminals are available.
1.10. Suggested Partitioning
Define a partition setup for openSUSE in this step. In most cases a reasonable scheme that can be accepted without change is proposed. If a hard disk containing only Windows FAT or NTFS partitions is selected as the installation target, YaST proposes to shrink one of these partitions. Accept the proposal with and proceed with the installation. Experienced users can also customize the proposal or apply their own partitioning scheme.
The proposed partitioning is by default. If you prefer an setup, check the respective option to automatically convert the proposal. Refer to Section 3.2, “LVM Configuration” for more information about the Logical Volume Manager (LVM).
To make small changes in the proposal (like changing the file system type or encrypt partitions), select and adjust the settings. See Section 3.1, “Using the YaST Partitioner” for instructions.

1.10.1. Partitioning a Specific Disk
If your machine contains more than one hard disk and you want to restrict the partitioning proposal to just one disk, choose and then select a specific disk from the list. If the chosen hard disk does not contain any partitions yet, the whole hard disk will be used for the proposal. Otherwise, you can choose which existing partition(s) to utilize. To add a separate partition for you personal data check . Instead of the default partition-based proposal, it is possible to . Choose two times to proceed to the next step.
1.10.1.1. Resizing a Windows Partition
If the selected hard disk only contains a Windows FAT or NTFS partition, YaST offers to delete or shrink this partition. If you select , the Windows partition is marked for deletion and the space is used for the installation of openSUSE.
![[Warning]](admon/warning.png) | Deleting Windows |
|---|---|
If you delete Windows, all data will be lost beyond recovery as soon as the formatting starts. | |
To , you need to interrupt the installation and boot Windows to prepare the partition before shrinking it. For all Windows file systems, proceed as follows:
Deactivate a
Virtual Memoryfile, if there is one.Run scandisk.
Run defrag.
After these preparations, restart the openSUSE installation. When you turn to the partitioning setup, proceed as before and select . After a quick check of the partition, the dialog for resizing the Windows partition opens.
The bar graph shows how much disk space is currently occupied by Windows and how much space is still available. To change the proposed settings use the slider or the input fields to adjust the partition sizing.
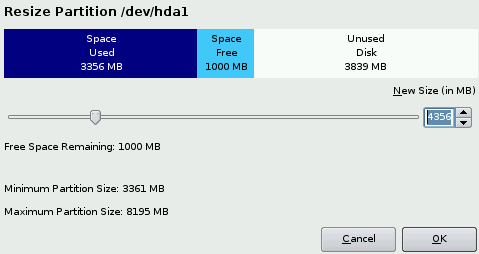
If you leave this dialog by selecting , the settings are stored and you are returned to the previous dialog. The actual resizing takes place later, before the hard disk is formatted.
| Writing on NTFS Partitions |
|---|---|
By default, the Windows uses the NTFS file system. openSUSE includes read and write access to the NTFS file system, but this feature has a few limitations. This means that you cannot read or write encrypted or compressed files. Furthermore, the Windows file permissions are not honored at the moment. See http://en.opensuse.org/SDB:NTFS for more information. | |
1.10.2. Custom Partitioning
Set up your own partitioning scheme by selecting and then . The Expert Partitioner opens, displaying the current partition setup. Expand the in the System View pane by clicking on the , then click on one of the listed hard disks. Now you can , , , or partitions. For more information about custom partitioning and configuring advanced features, refer to Section 3.1, “Using the YaST Partitioner”
1.11. Create New User
Create a local user in this step. Administrating local users is a suitable option for stand-alone workstations. If setting up a client on a network with centralized user authentication, click and proceed with the Section 1.11.1, “Expert Settings”.
After entering the first name and last name, either accept the proposal or specify a new that will be used to log in. Finally, enter a password for the user. Reenter it for confirmation (to ensure that you did not type something else by mistake). To provide effective security, a password should be between five and eight characters long. The maximum length for a password is 72 characters. However, if no special security modules are loaded, only the first eight characters are used to discern the password. Passwords are case-sensitive. Special characters (7-bit ASCII) and the digits 0 to 9 are allowed. Other special characters like umlauts or accented characters are not allowed.
Passwords you enter are checked for weakness. When entering a password that is easy to guess (such as a dictionary word or a name) you will see a warning. It is a good security practice to use strong passwords.
| Username and Password |
|---|---|
Remember both your username and the password because they are needed each time you log in to the system. | |
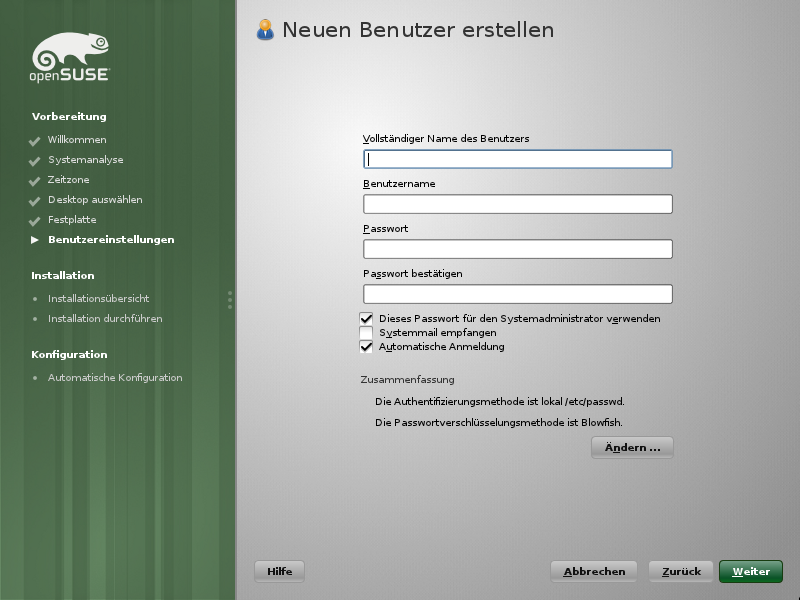
Three additional options are available:
If checked, the same password you have entered for the user will be used for the system administrator
root. This option is suitable for stand-alone workstations or machines in a home network that are administrated by a single user. When not checked, you are prompted for a system administrator password in the next step of the installation workflow (see Section 1.11.2, “Password for the System Administratorroot”).Checking this box sends messages created by the system services to the user. These are usually only sent to
root, the system administrator. This option is useful for the most frequently used account, because it is highly recommended to log in asrootonly in special cases.The mails sent by system services are stored in the local mailbox
/var/spool/mail/username, whereusernameis the login name of the selected user. To read e-mails after installation, you can use any e-mail client, for example KMail or Evolution.This option automatically logs the current user in to the system when it starts. This is mainly useful if the computer is operated by only one user.
| Automatic Login |
|---|---|
With the automatic login enabled, the system boots straight into your desktop with no authentication at all. If you store sensitive data on your system, you should not enable this option as long as the computer can also be accessed by others. | |
1.11.1. Expert Settings
Click in the Create User dialog to set up network authentication or, if present, import users from a previous installation. Also change the password encryption type in this dialog.
You can also add additional user accounts or change the user authentication method in the installed system. For detailed information about user management, see Chapter 9, Managing Users with YaST.
The default authentication method is . If a former version of openSUSE or another
system using /etc/passwd is detected, you may
import local users. To do so, check and click . In
the next dialog, select the users to import and finish with
.
Access to the following network authentication services can be configured:
- LDAP
Users are administered centrally on an LDAP server for all systems in the network. More information is available in Section “Configuring an LDAP Client with YaST” (Chapter 4, LDAP—A Directory Service, ↑Security Guide).
- NIS
Users are administered centrally on an NIS server for all systems in the network. See Section “Configuring NIS Clients” (Chapter 3, Using NIS, ↑Security Guide) for more information.
- Windows Domain
SMB authentication is often used in mixed Linux and Windows networks. and Section “Configuring a Linux Client for Active Directory” (Chapter 5, Active Directory Support, ↑Security Guide).
Along with user administration via and , you can use Kerberos authentication. To use it, select . For more information on Kerberos, refer to Chapter 6, Network Authentication with Kerberos (↑Security Guide).
1.11.2. Password for the System Administrator root
If you have not chosen in the previous step, you will be prompted to
enter a Password for the System Administrator root. Otherwise this
configuration step is skipped.
root is the name of the superuser, or the administrator of the
system. Unlike regular users (who may or may not have permission to
access certain areas or execute certain commands on the system),
root has unlimited access to change the system configuration,
install programs, and set up new hardware. If users forget their
passwords or have other problems with the system, root can help.
The root account should only be used for system administration,
maintenance, and repair. Logging in as root for daily work is
rather risky: a single mistake could lead to irretrievable loss of
system files.
For verification purposes, the password for root must be entered
twice. Do not forget the root password. Once entered, this
password cannot be retrieved.
The root can be changed any time later in the installed system. To
do so run YaST and start +.
| The root User |
|---|---|
The user | |
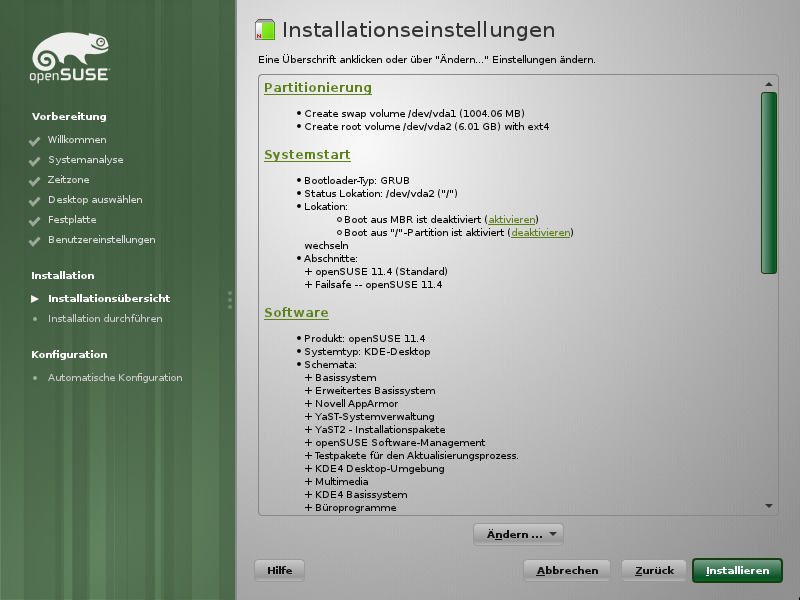
1.12. Installation Settings
On the last step before the real installation takes place, you can alter installation settings suggested by YaST and also review the settings you made so far. To modify the suggestions, either click and select the category to change or click on one of the headlines. After configuring any of the items presented in these dialogs, you are always returned to the Installation Settings window, which is updated accordingly.
| Restoring the Default Settings |
|---|---|
You can reset all changes to the defaults by clicking +. YaST then shows the original proposal again. | |
1.12.1. 
Review and, if necessary, change the partition setup you configured earlier. Modifying the partition setup opens the Expert Partitioner described in Section 3.1, “Using the YaST Partitioner”.
1.12.2. 
YaST proposes a boot configuration for your system. Other operating systems found on your computer, such as Microsoft Windows or other Linux installations, will automatically be detected and added to the boot loader. However, openSUSE will be booted by default. Normally, you can leave these settings unchanged. If you need a custom setup, modify the proposal for your system. For information, see Section 18.2, “Configuring the Boot Loader with YaST”. The boot method should only be changed by experienced users.
1.12.3. 
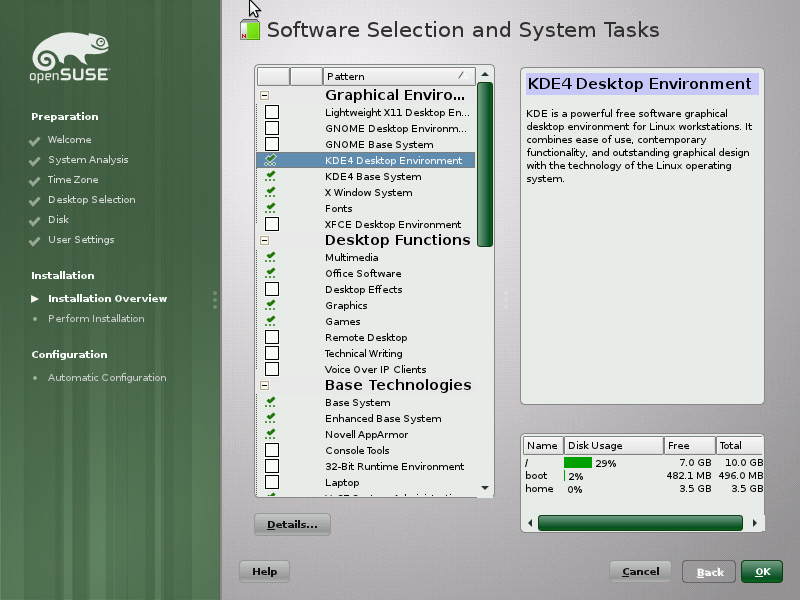
openSUSE contains a number of software patterns for various application purposes. Click to start the pattern selection and modify the installation scope according to your needs. Select your pattern from the list and see a pattern description in the right part of the window. Each pattern contains a number of software packages needed for specific functions (e.g. Multimedia or Office software). For a more detailed selection based on software packages to install, select to switch to the YaST Software Manager.
You can also install additional software packages or remove software packages from your system at any later time with the YaST Software Manager. For more information, refer to Chapter 4, Installing or Removing Software.
1.12.4. 
Here you can change the system
and you defined in the first step of the
installation. It is also possible to add additional languages. To adjust
the system language settings, select . Select
a language from the list. The primary language is used as the system
language. You can also adapt keyboard layout and time zone to the
primary language if the current settings differ.
lets you modify language settings for the
user root, set UTF-8 support, or further
specify the language (e.g. select South African English).
Choose secondary languages to be able to switch to one of these languages at any time without having to install additional packages. For more information, see Chapter 10, Changing Language and Country Settings with YaST.
To change the keyboard layout, select . By default, the layout corresponds to the language chosen for installation. Select the keyboard layout from the list. Use the field at the bottom of the dialog to check if you can enter special characters of that layout correctly. Options to fine-tune various settings are available under . When finished, click to return to the installation summary.
1.12.5. 
Adjust time zone and clock settings here. Provided a network is configured, you can also set up a Network Time Protocol (NTP) client that automatically synchronizes your computer with a time server. This is the same configuration as shown earlier in Section 1.8, “Clock and Time Zone”.
1.12.6. 
Change the current settings and change or set the here. This is the same configuration as shown earlier in Section 1.11, “Create New User”.
1.12.7. 
openSUSE can boot to different runlevels. Normally, there should be no need to change anything here, but if necessary set the default runlevel with this dialog. Refer to Section 17.2.3, “Configuring System Services (Runlevel) with YaST” for more information about runlevel configuration.
1.12.8. 
This dialog presents all the hardware information YaST could obtain about your computer. When called, the hardware detection routine is started. Depending on your system, this may take some time. Select any item in the list and click to see detailed information about the selected item. Use to save a detailed list to either the local file system or a floppy. Advanced users can also change the PCI ID setup and Kernel Settings by choosing .
1.12.9. 
Installing from images considerably speeds up the installation. Images contain compressed snapshots of installed systems matching your selection of patterns. Packages not contained in the images deployed will be installed conventionally.
Unless your custom software selection does not match any of the available images, this feature is by default. In case of problems, it for debugging purposes.
1.12.10. 
By default SuSEfirewall2 is enabled on all configured network interfaces. To globally disable the firewall for this computer, click on . If the firewall is enabled, you may the SSH port in order to allow remote connections via secure shell.
1.13. Performing the Installation
After configuring all installation settings, click in the Installation Settings window to start the installation. Some software may require a license confirmation. If your software selection includes such software, license confirmation dialogs are displayed. Click to install the software package. When not agreeing to the license, click and the software package will not be installed. In the dialog that follows, confirm with again.
The installation usually takes between 15 and 30 minutes, depending on the system performance and the selected software scope. After having prepared the hard disk, having saved and restored the user settings, and having deployed the installation images, the software installation starts. During this procedure a slide show introduces the features of openSUSE. Choose to switch to the installation log or to read important up-to-date information which was not available when the manuals were printed.
![[Note]](admon/note.png)
After the software installation has completed, the basic system is set up. Among others, “Finishing the Basic Installation” includes installing the boot manager, initializing fonts and more. Next YaST boots into the new Linux system to start the system configuration.
| Existing SSH Host Keys |
|---|---|
If you install openSUSE on a machine with existing Linux installations, the installation routine automatically imports the SSH host key with the most recent access time from an existing installation. | |
1.14. Configuration of the Installed System
The system is now installed, but not yet configured for use. The hardware, the network and other services are not yet set up. If you follow the default installation path, the system will be automatically configured. If you have deselected the , the manual system configuration starts.
1.14.1. Automatic System Configuration
Having rebooted, the system starts the Automatic Configuration. This routine attempts to configure your network and Internet access and sets up your hardware. This process does not need any interaction. You can change the settings made by Automatic Configuration at any time on the installed system with YaST. Continue with Section 1.15, “Graphical Login”.
1.14.2. Manual System Configuration
Having rebooted, the system starts the manual configuration. If the configuration fails at one of the steps of this stage, it restarts and continues from the last successful step.
1.14.2.1. Hostname and Domain Name
The hostname is the computer's name in the network. The domain name is the name of the network. A hostname and domain are proposed by default. If your system is part of a network, the hostname has to be unique in this network, whereas the domain name has to be common to all hosts on the network.
In many networks, the system receives its name over DHCP. In this case
it is not necessary to modify the proposed hostname and domain name.
Select instead. To be able
to access your system using this hostname, even when it is not
connected to the network, select . Do n ot enable this option when your machine provides
network services. If you often change networks without restarting the
desktop environment (e.g. when switching between different WLANs), do
not enable this option either, because the desktop system may get
confused when the hostname in /etc/hosts changes.
To change hostname settings at any time after installation, use YaST +. For more information, see Section 23.4.1, “Configuring the Network Card with YaST”.
1.14.2.2. Network Configuration
If you are installing openSUSE on a laptop computer, is enabled. NetworkManager is a tool that enables automatic connection with minimal user intervention. It is ideal for WLAN and mobile computing. If you want to use the traditional method without NetworkManager, click . Find detailed information about NetworkManager in Chapter 35, Using NetworkManager. If you are installing openSUSE on any other type of machine, the traditional method without NetworkManager is selected by default. This configuration step also lets you configure the network devices of your system and make security settings, for example, for a firewall or proxy.
The network can also be configured after the system installation has been completed. If you skip it now, your system is left offline unable to retrieve any available updates. To configure your network connection later, select and click .
The following network settings can be configured in this step:
Enable or disable the use of NetworkManager as described above. Also change the IPv6 support here. By default the IPv6 support is enabled. To disable it, click . For more information about IPv6, see Section 23.2, “IPv6—The Next Generation Internet”.
By default SuSEfirewall2 is enabled on all configured network interfaces. To globally disable the firewall for this computer, click on . If the firewall is enabled, you may the SSH port in order to allow remote connections via secure shell. To open the detailed firewall configuration dialog, click on . See Section “Configuring the Firewall with YaST” (Chapter 14, Masquerading and Firewalls, ↑Security Guide) for detailed information.
All network cards detected by YaST are listed here. If you have already set up a network connection during the installation (as described in Section 1.7.1.1, “Network Setup”) the card used for this connection is listed as . A click on opens the dialog, where you can change existing configurations, set up networks cards not configured yet, or add and configure additional cards.
- , , and
If your computer is equipped with an internal DSL modem, an internal ADSL Fritz Card, an ISDN card or a modem, clicking on the respective headline opens the configuration dialog.
- VNC Remote Administration
To enable remote administration of your machine via VNC, click . Choose in the following dialog and adjust your firewall settings accordingly.
- Proxy
If you have a proxy server controlling the Internet access in your network, configure the proxy URLs and authentication details in this dialog.
| Resetting the Network Configuration to the Default Values |
|---|---|
Reset the network settings to the original proposed values by clicking +. This discards any changes made. | |
1.14.2.2.1. Test Internet Connection
After having configured a network connection, you can test it. For this purpose, YaST establishes a connection to the openSUSE server and downloads the latest release notes. Read them at the end of the installation process. A successful test is also a prerequisite for the automatic addition of the default repositories and for updating online.
If you have multiple network interfaces, verify that the desired card is used to connect to the Internet. If not, click .
To start the test, select and click . In the following dialog, view the progress of the test and the results. Detailed information about the test process is available via . If the test fails, click to return to the network configuration to correct your entries.
Proceed with . If the test was successful, the official software repositories for openSUSE and the update repository will be configured. Downloading the repository data for the first time may take some time.
If you do not want to test the connection at this point, select then . This also skips downloading the release notes, and updating online. These steps can be performed any time after the system has been initially configured.
1.14.2.3. Online Update
If an Internet connection has been established, and updates are available, select whether to perform a YaST online update. If there are any patched packages available on the servers, download and install them now to fix known bugs or security issues. For detailed instructions see Chapter 5, YaST Online Update. Directives on how to perform an online update in the installed system are available at Section 4.5, “Keeping the System Up-to-date” or Chapter 5, YaST Online Update. This step is skipped if no updates are available or no Internet connection has been established. Patches fixing security issues and recommended patches applying to your installation are automatically preselected. Click to install them and to proceed with the system configuration.
| Downloading Software Updates |
|---|---|
The download of updates might take quite some time, depending on the bandwidth of the Internet connection and the size of the update files. In case the patch system itself is updated, the online update will restart and download more patches after the restart. If the kernel was updated, the system will reboot before completing the configuration. | |
1.14.2.4. New Local User
If no local user was created in phase one, you can create one in this dialog—otherwise this step is skipped. To create more users, manage groups, modify defaults for new users and set up network authentication, launch . Refer to Chapter 9, Managing Users with YaST for more information about user management. To skip this step, click without entering any data.
1.14.2.5. Release Notes
After completing the user authentication setup, YaST displays the release notes. Reading them is recommended, because they contain important up-to-date information which was not available when the manuals were printed. If you successfully tested the Internet connection, read the most recent version of the release notes, as fetched from openSUSE's servers. Use + in YaST or start the SUSE Help Center to view the release notes after installation.
1.14.2.6. Hardware Configuration
At the end of the installation, YaST opens a dialog for the configuration of a printer, the sound system and TV cards. Click the individual components to start the hardware configuration. For the most part, YaST detects and configures the devices automatically.
You can skip any peripheral devices and configure them later, as described in Chapter 12, Setting Up Hardware Components with YaST. To skip the configuration, select and click .
| Resetting Hardware Configuration to the Default Values |
|---|---|
You can cancel any changes to the hardware configuration by clicking +. YaST then shows the original proposal again. | |
1.14.2.7. Installation Completed
After a successful installation, YaST shows the Installation
Completed dialog. In this dialog, select whether to clone your newly
installed system for AutoYaST. To clone your system, select . The profile of the current system is
stored in /root/autoyast.xml.
AutoYaST is a system for installing one or more openSUSE systems automatically without user intervention. AutoYaST installations are performed using a control file with installation and configuration data. Finish the installation of openSUSE with in the final dialog.
1.15. Graphical Login
openSUSE is now fully installed and configured. Unless you enabled the automatic login function or customized the default runlevel, you should see the graphical login on your screen in which to enter a username and password to log into the system. On single user systems with automatic login enabled, the desktop starts automatically.
For a short introduction to the KDE or GNOME desktop environments, refer to the GNOME Quick Start (↑GNOME Quick Start) and the KDE Quick Start (↑KDE Quick Start). These manuals can be accessed via the function in both KDE and GNOME.