Chapter 12. Setting Up Hardware Components with YaST
YaST allows you to configure hardware items at installation time as well as on an already-installed system. Configure audio hardware, printers or scanner support or learn which hardware components are connected to your computer by using the YaST Hardware Information module.
![[Tip]](admon/tip.png) | Graphics card, monitor, mouse and keyboard settings |
|---|---|
Graphics card, monitor, mouse and keyboard can be configured with either KDE or GNOME tools. | |
12.1. Hardware Information
Use the YaST hardware information module if you want to know more about your hardware or if you need to find out details like vendor and model of a certain piece of hardware to be able to properly configure it.
Start YaST and click +. Hardware probing starts immediately and it will take some time until you see the hardware information tree in a separate window.
In the hardware information tree recursively click on the entries to expand the information about a specific device.
Click to save the output to a file.
Click to leave the hardware information overview.
12.2. Setting Up Sound Cards
YaST detects most sound cards automatically and configures them with the appropriate values. If you want to change the default settings, or need to set up a sound card that could not be configured automatically, use the YaST sound module. There, you can also set up additional sound cards or switch their order.
To start the sound module, start YaST and click +.
Alternatively, start the dialog
directly by running yast2 sound & as user
root from a command line.
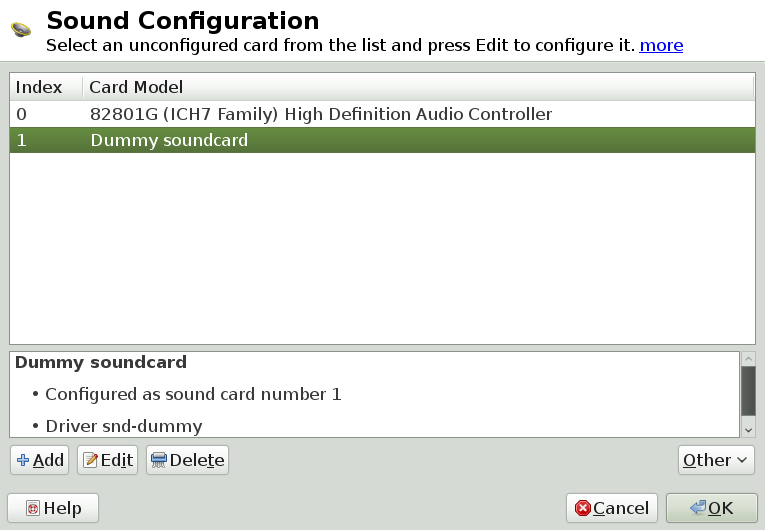 |
The dialog shows all sound cards that are already configured.
If YaST cannot detect your sound card automatically, configure it manually as described in Procedure 12.1, “Configuring a New Sound Card”. For this, you need to know your sound card vendor and model. If in doubt, refer to your sound card documentation for the required information. During configuration, you can choose between various setup options:
You are not required to go through any of the further configuration steps—the sound card is configured automatically. You can set the volume or any options you want to change later.
Allows you to adjust the output volume and play a test sound during the configuration.
For experts only. Allows you to customize all parameters of the sound card.
![[Important]](admon/important.png)
Advanced Configuration Only use this option if you know exactly what your are doing. Otherwise leave the parameters untouched and use the normal or the automatic setup options.
Procedure 12.1. Configuring a New Sound Card
In the YaST dialog, click .
Select your sound card vendor and model and click .
For a reference list of sound cards supported by ALSA with their corresponding sound modules, see http://www.alsa-project.org/main/index.php/Matrix:Main.
Choose one of the setup options and click .
If you have chosen , you can now your sound configuration and make adjustments to the volume. You should start at about ten percent volume to avoid damage to your hearing or the speakers.
If all options are set according to your wishes, click .
The dialog shows the newly configured or modified sound card.
To remove a sound card configuration that you no longer need, select the respective entry and click .
Click to save the changes and leave the YaST sound module.
Procedure 12.2. Modifying Sound Card Configurations
To change the configuration of an individual sound card (for experts only!), select the sound card entry in the dialog and click .
This takes you to the where you can fine-tune a number of parameters. For more information, click .
To adjust the volume of an already configured sound card or to test the sound card, select the sound card entry in the dialog and click . Select the respective menu item.
For playback of MIDI files, select +.
When a supported sound card is detected (like a Creative
Soundblaster Live,AudigyorAWEsound card), you can also install SoundFonts for playback of MIDI files:Insert the original driver CD-ROM into your CD or DVD drive.
Select + to copy SF2 SoundFonts™ to your hard disk. The SoundFonts are saved in the directory
/usr/share/sfbank/creative/.
If you have configured more than one sound card in your system you can adjust the order of your sound cards. To set a sound card as primary device, select the sound card in the and click +. The sound device with index
0is the default device and thus used by the system and the applications.To enable or disable the PulseAudio sound system, click +. If enabled, PulseAudio daemon is used to play sounds. Disable in case you want to use something else system-wide.
The volume and configuration of all sound cards are saved when you click
and leave the YaST sound module. The mixer
settings are saved to the file /etc/asound.conf and
the ALSA configuration data is appended to the end of the files
/etc/modprobe.d/sound and
/etc/sysconfig/hardware.
12.3. Setting Up a Scanner
You can configure a USB or SCSI scanner with YaST. The sane-backends package contains hardware
drivers and other essentials needed to use a scanner. Scanners
connected to a parallel port cannot be configured with YaST. If you
own a HP All-In-One device, see Section 12.3.1, “Configuring an HP All-In-One Device”, instructions on how to
configure a network scanner are available at Section 12.3.3, “Scanning over the Network”.
Procedure 12.3. Configuring a USB or SCSI Scanner
Connect your USB or SCSI scanner to your computer and turn it on.
Start YaST and select +. YaST builds the scanner database and tries to detect your scanner model automatically.
If a USB or SCSI scanner is not properly detected, try +.
To activate the scanner select it from the list of detected scanners and click .
Choose your model form the list and click and .
Use + to make sure you have chosen the correct driver.
Leave the configuration screen with .
12.3.1. Configuring an HP All-In-One Device
An HP All-In-One device can be configured with YaST even if it is connected to the parallel port or is made available via the network. If you own a USB HP All-In-One device, start configuring as described in Procedure 12.3, “Configuring a USB or SCSI Scanner”. If it is detected properly and the succeeds, it is ready to use.
If your USB device is not properly detected, or your HP All-In-One device is connected to the parallel port or the network, run the HP Device Manager:
Start YaST and select +. YaST loads the scanner database.
Start the HP Device Manager with + and follow the on-screen instructions. After having finished the HP Device Manager, the YaST scanner module automatically restarts the auto detection.
Test it by choosing +.
Leave the configuration screen with .
12.3.2. Sharing a Scanner over the Network
openSUSE allows the sharing of a scanner over the network. To do so, configure your scanner as follows:
Configure the scanner as described in Section 12.3, “Setting Up a Scanner”.
Choose +.
Enter the hostnames of the clients (separated by a comma) that should be allowed to use the scanner under + and leave the configuration dialog with .
12.3.3. Scanning over the Network
To use a scanner that is shared over the network, proceed as follows:
Start YaST and select +.
Open the network scanner configuration menu by +.
Enter the hostname of the machine the scanner is connected to under +
Leave with . The network scanner is now listed in the Scanner Configuration window and is ready to use.