Chapter 17. Booting and Configuring a Linux System
Contents
Booting a Linux system involves different components. The hardware itself is initialized by the BIOS, which starts the Kernel by means of a boot loader. After this point, the boot process with init and the runlevels is completely controlled by the operating system. The runlevel concept enables you to maintain setups for everyday usage as well as to perform maintenance tasks on the system.
17.1. The Linux Boot Process
The Linux boot process consists of several stages, each represented by a different component. The following list briefly summarizes the boot process and features all the major components involved.
BIOS. After turning on the computer, the BIOS initializes the screen and keyboard and tests the main memory. Up to this stage, the machine does not access any mass storage media. Subsequently, the information about the current date, time, and the most important peripherals are loaded from the CMOS values. When the first hard disk and its geometry are recognized, the system control passes from the BIOS to the boot loader.
Boot Loader. The first physical 512-byte data sector of the first hard disk is loaded into the main memory and the boot loader that resides at the beginning of this sector takes over. The commands executed by the boot loader determine the remaining part of the boot process. Therefore, the first 512 bytes on the first hard disk are referred to as the Master Boot Record (MBR). The boot loader then passes control to the actual operating system, in this case, the Linux Kernel. More information about GRUB, the Linux boot loader, can be found in Chapter 18, The Boot Loader GRUB.
Kernel and
initramfs. To pass system control, the boot loader loads both the Kernel and an initial RAM–based file system (initramfs) into memory. The contents of theinitramfscan be used by the Kernel directly.initramfscontains a small executable called init that handles the mounting of the real root file system. If special hardware drivers are needed before the mass storage can be accessed, they must be ininitramfs. For more information aboutinitramfs, refer to Section 17.1.1, “initramfs”.init on
initramfs. This program performs all actions needed to mount the proper root file system, like providing Kernel functionality for the needed file system and device drivers for mass storage controllers withudev. After the root file system has been found, it is checked for errors and mounted. If this is successful, theinitramfsis cleaned and the init program on the root file system is executed. For more information about init, refer to Section 17.1.2, “init oninitramfs”. Find more information aboutudevin Chapter 20, Dynamic Kernel Device Management withudev.init. init handles the actual booting of the system through several different levels providing different functionality. init is described in Section 17.2, “The init Process”.
17.1.1. initramfs
initramfs is a small cpio archive that the Kernel
can load to a RAM disk. It provides a minimal Linux environment that
enables the execution of programs before the actual root file system is
mounted. This minimal Linux environment is loaded into memory by BIOS
routines and does not have specific hardware requirements other than
sufficient memory. initramfs must always provide an
executable named init that should execute the actual init program on the
root file system for the boot process to proceed.
Before the root file system can be mounted and the operating system can
be started, the Kernel needs the corresponding drivers to access the
device on which the root file system is located. These drivers may
include special drivers for certain kinds of hard drives or even network
drivers to access a network file system. The needed modules for the root
file system may be loaded by init on initramfs.
After the modules are loaded, udev provides the
initramfs with the needed devices. Later in the
boot process, after changing the root file system, it is necessary to
regenerate the devices. This is done by boot.udev
with the command udevtrigger.
If you need to change hardware (for example, hard disks) in an installed
system and this hardware requires different drivers to be present in the
Kernel at boot time, you must update initramfs.
This is done in the same way as with its predecessor,
initrd—by calling
mkinitrd. Calling mkinitrd without
any argument creates an initramfs. Calling
mkinitrd -R creates an
initrd. In openSUSE®, the modules to load
are specified by the variable INITRD_MODULES in
/etc/sysconfig/kernel. After installation, this variable is automatically set to
the correct value. The modules are loaded in exactly the order in which
they appear in INITRD_MODULES. This is only
important if you rely on the correct setting of the device files
/dev/sd?. However, in current systems you also may
use the device files below /dev/disk/ that are
sorted in several subdirectories, named by-id,
by-path and by-uuid, and
always represent the same disk. This is also possible at install time by
specifying the respective mount option.
![[Important]](admon/important.png) | Updating initramfs or initrd |
|---|---|
The boot loader loads | |
17.1.2. init on initramfs
The main purpose of init on initramfs is to prepare
the mounting of and access to the real root file system. Depending on
your system configuration, init is responsible for the following tasks.
- Loading Kernel Modules
Depending on your hardware configuration, special drivers may be needed to access the hardware components of your computer (the most important component being your hard drive). To access the final root file system, the Kernel needs to load the proper file system drivers.
- Providing Block Special Files
For each loaded module, the Kernel generates device events.
udevhandles these events and generates the required block special files on a RAM file system in/dev. Without those special files, the file system and other devices would not be accessible.- Managing RAID and LVM Setups
If you configured your system to hold the root file system under RAID or LVM, init sets up LVM or RAID to enable access to the root file system later. Find information about RAID and LVM in Chapter 3, Advanced Disk Setup.
- Managing Network Configuration
If you configured your system to use a network-mounted root file system (mounted via NFS), init must make sure that the proper network drivers are loaded and that they are set up to allow access to the root file system.
When init is called during the initial boot as part of the installation process, its tasks differ from those mentioned above:
- Finding the Installation Medium
As you start the installation process, your machine loads an installation Kernel and a special
initrdwith the YaST installer on the installation medium. The YaST installer, which is run in a RAM file system, needs to have information about the location of the installation medium to access it and install the operating system.- Initiating Hardware Recognition and Loading Appropriate Kernel Modules
As mentioned in Section 17.1.1, “
initramfs”, the boot process starts with a minimum set of drivers that can be used with most hardware configurations. init starts an initial hardware scanning process that determines the set of drivers suitable for your hardware configuration. The names of the modules needed for the boot process are written toINITRD_MODULESin/etc/sysconfig/kernel. These names are used to generate a custominitramfsthat is needed to boot the system. If the modules are not needed for boot but for coldplug, the modules are written to/etc/sysconfig/hardware/hwconfig-*. All devices that are described with configuration files in this directory are initialized in the boot process.- Loading the Installation System or Rescue System
As soon as the hardware is properly recognized, the appropriate drivers are loaded, and
udevcreates the special device files, init starts the installation system with the actual YaST installer, or the rescue system.- Starting YaST
Finally, init starts YaST, which starts package installation and system configuration.
17.2. The init Process
The program init is the process with process ID 1. It is responsible for initializing the system in the required way. init is started directly by the Kernel and resists signal 9, which normally kills processes. All other programs are either started directly by init or by one of its child processes.
init is centrally configured in the /etc/inittab
file where the runlevels are defined (see
Section 17.2.1, “Runlevels”). The file also specifies which
services and daemons are available in each of the runlevels. Depending on
the entries in /etc/inittab, several scripts are run
by init. By default, the first script that is started after booting is
/etc/init.d/boot. Once the system initialization
phase is finished, the system changes the runlevel to its default
runlevel with the /etc/init.d/rc script. For reasons
of clarity, these scripts, called init scripts, all
reside in the directory /etc/init.d (see
Section 17.2.2, “Init Scripts”).
The entire process of starting the system and shutting it down is maintained by init. From this point of view, the Kernel can be considered a background process to maintain all other processes and adjust CPU time and hardware access according to requests from other programs.
17.2.1. Runlevels
In Linux, runlevels define how the system is
started and what services are available in the running system. After
booting, the system starts as defined in
/etc/inittab in the line
initdefault. Usually this is 3 or
5. See Table 17.1, “Available Runlevels”. As an
alternative, the runlevel can be specified at boot time (by adding the
runlevel number at the boot prompt, for instance). Any parameters that
are not directly evaluated by the Kernel itself are passed to init. To
boot into runlevel 3, just add the single number 3 to the boot prompt.
Table 17.1. Available Runlevels
|
Runlevel |
Description |
|---|---|
|
0 |
System halt |
|
S or 1 |
Single user mode |
|
2 |
Local multiuser mode without remote network (NFS, etc.) |
|
3 |
Full multiuser mode with network |
|
4 |
, this is not used unless the administrator configures this runlevel. |
|
5 |
Full multiuser mode with network and X display manager—KDM, GDM, or XDM |
|
6 |
System reboot |
| Avoid Runlevel 2 with a Partition Mounted via NFS |
|---|---|
You should not use runlevel 2 if your system mounts a partition
like | |
To change runlevels while the system is running, enter telinit and the corresponding number as an argument. Only the system administrator is allowed to do this. The following list summarizes the most important commands in the runlevel area.
- telinit 1 or shutdown now
The system changes to single user mode. This mode is used for system maintenance and administration tasks.
- telinit 3
All essential programs and services (including network) are started and regular users are allowed to log in and work with the system without a graphical environment.
- telinit 5
The graphical environment is enabled. Usually a display manager like XDM, GDM or KDM is started. If autologin is enabled, the local user is logged in to the preselected window manager (GNOME or KDE or any other window manager).
- telinit 0 or shutdown -h now
The system halts.
- telinit 6 or shutdown -r now
The system halts then reboots.
Runlevel 5 is the default runlevel in all
openSUSE standard installations. Users are prompted for login with
a graphical interface or the default user is logged in automatically.
Generally, two things happen when you change runlevels. First, stop scripts of the current runlevel are launched, closing down some programs essential for the current runlevel. Then start scripts of the new runlevel are started. Here, in most cases, a number of programs are started. For example, the following occurs when changing from runlevel 3 to 5:
The administrator (
root) requests init to change to a different runlevel by entering telinit5.init checks the current runlevel (runlevel) and determines it should start
/etc/init.d/rcwith the new runlevel as a parameter.Now rc calls the stop scripts of the current runlevel for which there is no start script in the new runlevel. In this example, these are all the scripts that reside in
/etc/init.d/rc3.d(the old runlevel was 3) and start with aK. The number followingKspecifies the order to run the scripts with thestopparameter, because there are some dependencies to consider.The last things to start are the start scripts of the new runlevel. In this example, these are in
/etc/init.d/rc5.dand begin with anS. Again, the number that follows theSdetermines the sequence in which the scripts are started.
When changing into the same runlevel as the current runlevel, init only
checks /etc/inittab for changes and starts the
appropriate steps, for example, for starting a getty
on another interface. The same functionality may be achieved with the
command telinit q.
17.2.2. Init Scripts
There are two types of scripts in /etc/init.d:
- Scripts Executed Directly by init
This is the case only during the boot process or if an immediate system shutdown is initiated (power failure or a user pressing Ctrl+Alt+Del). The execution of these scripts is defined in
/etc/inittab.- Scripts Executed Indirectly by init
These are run when changing the runlevel and always call the master script /etc/init.d/rc, which guarantees the correct order of the relevant scripts.
All scripts are located in /etc/init.d. Scripts
that are run at boot time are called through symbolic links from
/etc/init.d/boot.d. Scripts for changing the
runlevel are called through symbolic links from one of the
subdirectories (/etc/init.d/rc0.d to
/etc/init.d/rc6.d). This is just for reasons of
clarity and avoids duplicate scripts if they are used in several
runlevels. Because every script can be executed as both a start and a
stop script, these scripts must understand the parameters
start and stop. The scripts also
understand the restart, reload,
force-reload, and status options.
These different options are explained in
Table 17.2, “Possible init Script Options”. Scripts that are run
directly by init do not have these links. They are run independently
from the runlevel when needed.
Table 17.2. Possible init Script Options
|
Option |
Description |
|---|---|
|
|
Start service. |
|
|
Stop service. |
|
|
If the service is running, stop it then restart it. If it is not running, start it. |
|
|
Reload the configuration without stopping and restarting the service. |
|
|
Reload the configuration if the service supports this. Otherwise,
do the same as if |
|
|
Show the current status of service. |
Links in each runlevel-specific subdirectory make it possible to
associate scripts with different runlevels. When installing or
uninstalling packages, these links are added and removed with the help
of the program insserv (or using
/usr/lib/lsb/install_initd, which is a script
calling this program). See the insserv(8) man page for details.
All of these settings may also be changed with the help of the YaST
module. If you need to check the status on the command line, use the
tool chkconfig, described in the chkconfig(8)
man page.
A short introduction to the boot and stop scripts launched first or last, respectively, follows as well as an explanation of the maintaining script.
bootExecuted while starting the system directly using init. It is independent of the chosen runlevel and is only executed once. Here, the
/procand/dev/ptsfile systems are mounted and blogd (boot logging daemon) is activated. If the system is booted for the first time after an update or an installation, the initial system configuration is started.The blogd daemon is a service started by boot and rc before any other one. It is stopped after the actions triggered by these scripts (running a number of subscripts, for example, making block special files available) are completed. blogd writes any screen output to the log file
/var/log/boot.msg, but only if and when/varis mounted read-write. Otherwise, blogd buffers all screen data until/varbecomes available. Get further information about blogd on the blogd(8) man page.The
bootscript is also responsible for starting all the scripts in/etc/init.d/boot.dwith names that start withS. There, the file systems are checked and loop devices are configured if needed. The system time is also set. If an error occurs while automatically checking and repairing the file system, the system administrator can intervene after first entering the root password. The last executed script is boot.local.boot.localHere, enter additional commands to execute at boot before changing into a runlevel. It can be compared to
AUTOEXEC.BATon DOS systems.haltThis script is only executed while changing into runlevel 0 or 6. Here, it is executed either as
haltor asreboot. Whether the system shuts down or reboots depends on howhaltis called. If special commands are needed during the shutdown, add these to thehalt.localscript.rcThis script calls the appropriate stop scripts of the current runlevel and the start scripts of the newly selected runlevel. Like the
/etc/init.d/bootscript, this script is called from/etc/inittabwith the desired runlevel as parameter.
You can create your own scripts and easily integrate them into the
scheme described above. For instructions about formatting, naming and
organizing custom scripts, refer to the specifications of the LSB and to
the man pages of init,
init.d, chkconfig, and
insserv. Additionally consult the man pages of
startproc and
killproc.
![[Warning]](admon/warning.png) | Faulty init Scripts May Halt Your System |
|---|---|
Faulty init scripts may hang your machine up. Edit such scripts with great care and, if possible, subject them to heavy testing in the multiuser environment. Find useful information about init scripts in Section 17.2.1, “Runlevels”. | |
To create a custom init script for a given program or service, use the
file /etc/init.d/skeleton as a template. Save a
copy of this file under the new name and edit the relevant program and
filenames, paths and other details as needed. You may also need to
enhance the script with your own parts, so the correct actions are
triggered by the init procedure.
The INIT INFO block at the top is a required part of
the script and must be edited. See
Example 17.1, “A Minimal INIT INFO Block”.
Example 17.1. A Minimal INIT INFO Block
### BEGIN INIT INFO
# Provides:          FOO
# Required-Start:    $syslog $remote_fs
# Required-Stop:     $syslog $remote_fs
# Default-Start:     3 5
# Default-Stop:      0 1 2 6
# Description:       Start FOO to allow XY and provide YZ
### END INIT INFO
In the first line of the INFO block, after
Provides:, specify the name of the program or service
controlled by this init script. In the
Required-Start: and Required-Stop:
lines, specify all services that need to be still running when the service
itself is stopped. This information is used later
to generate the numbering of script names, as found in the runlevel
directories. After Default-Start: and
Default-Stop:, specify the runlevels in which the
service should automatically be started or stopped. Finally, for
Description:, provide a short description of the
service in question.
To create the links from the runlevel directories
(/etc/init.d/rc?.d/) to the corresponding scripts
in /etc/init.d/, enter the command insserv
new-script-name. The insserv
program evaluates the INIT INFO header to create the
necessary links for start and stop scripts in the runlevel directories
(/etc/init.d/rc?.d/). The program also takes care
of the correct start and stop order for each runlevel by including the
necessary numbers in the names of these links. If you prefer a graphical
tool to create such links, use the runlevel editor provided by YaST,
as described in Section 17.2.3, “Configuring System Services (Runlevel) with YaST”.
If a script already present in /etc/init.d/ should
be integrated into the existing runlevel scheme, create the links in the
runlevel directories right away with insserv or by enabling the
corresponding service in the runlevel editor of YaST. Your changes are
applied during the next reboot—the new service is started
automatically.
Do not set these links manually. If something is wrong in the
INFO block, problems will arise when
insserv is run later for some other service. The
manually added service will be removed with the next run of
insserv for this script.
17.2.3. Configuring System Services (Runlevel) with YaST
After starting this YaST module with ++, it displays an overview listing all the available services and the current status of each service (disabled or enabled). Decide whether to use the module in or in . The default should be sufficient for most purposes. The left column shows the name of the service, the center column indicates its current status and the right column gives a short description. For the selected service, a more detailed description is provided in the lower part of the window. To enable a service, select it in the table then select . The same steps apply to disable a service.
For detailed control over the runlevels in which a service is started or stopped or to change the default runlevel, first select . The current default runlevel or “initdefault” (the runlevel into which the system boots by default) is displayed at the top. Normally, the default runlevel of a openSUSE system is runlevel 5 (full multiuser mode with network and X). A suitable alternative might be runlevel 3 (full multiuser mode with network).
This YaST dialog allows the selection of one of the runlevels (as listed in Table 17.1, “Available Runlevels”) as the new default. Additionally, use the table in this window to enable or disable individual services and daemons. The table lists the services and daemons available, shows whether they are currently enabled on your system and, if so, for which runlevels. After selecting one of the rows with the mouse, click the check boxes representing the runlevels (, , , , , , , and ) to define the runlevels in which the selected service or daemon should be running. Runlevel 4 is undefined to allow creation of a custom runlevel. A brief description of the currently selected service or daemon is provided below the table overview.
| Faulty Runlevel Settings May Damage Your System |
|---|---|
Faulty runlevel settings may make your system unusable. Before applying your changes, make absolutely sure that you know their consequences. | |
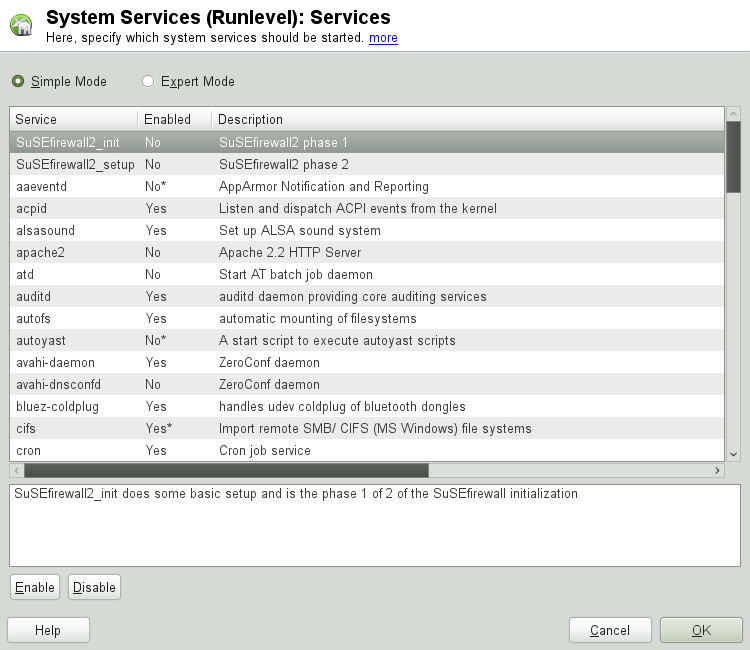
With , decide whether a service should be activated. checks the current status. lets you select whether to apply your changes to the system or to restore the settings that existed before starting the runlevel editor. Selecting saves the changed settings to disk.
17.3. System Configuration via /etc/sysconfig
The main configuration of openSUSE is controlled by the
configuration files in /etc/sysconfig. The
individual files in /etc/sysconfig are only read by
the scripts to which they are relevant. This ensures that network
settings, for example, only need to be parsed by network-related scripts.
There are two ways to edit the system configuration. Either use the YaST sysconfig Editor or edit the configuration files manually.
17.3.1. Changing the System Configuration Using the YaST sysconfig Editor
The YaST sysconfig editor provides an easy-to-use front-end for system
configuration. Without any knowledge of the actual location of the
configuration variable you need to change, you can just use the built-in
search function of this module, change the value of the configuration
variable as needed and let YaST take care of applying these changes,
updating configurations that depend on the values set in
sysconfig and restarting services.
| Modifying /etc/sysconfig/* Files Can Damage Your Installation |
|---|---|
Do not modify the | |
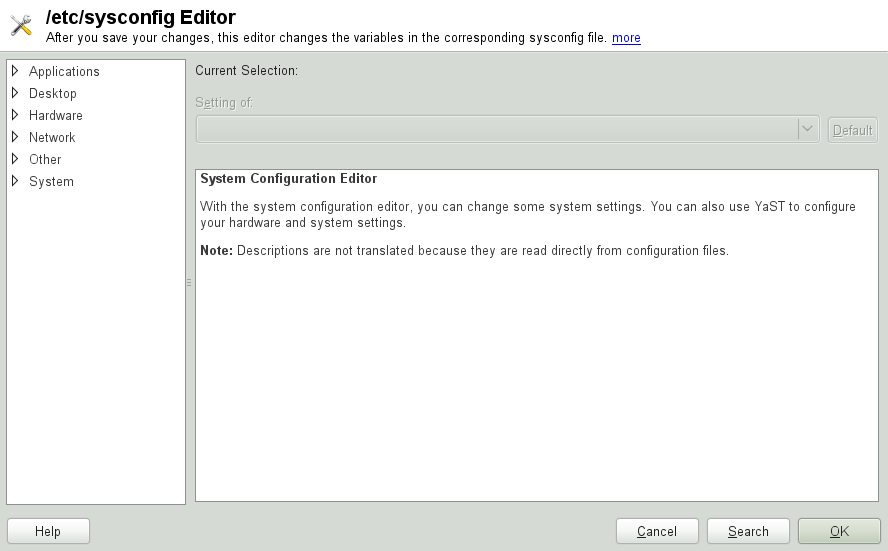
The YaST sysconfig dialog is split into three parts. The left part of the dialog shows a tree view of all configurable variables. When you select a variable, the right part displays both the current selection and the current setting of this variable. Below, a third window displays a short description of the variable's purpose, possible values, the default value and the actual configuration file from which this variable originates. The dialog also provides information about which configuration script is executed after changing the variable and which new service is started as a result of the change. YaST prompts you to confirm your changes and informs you which scripts will be executed after you leave the dialog by selecting . Also select the services and scripts to skip for now, so they are started later. YaST applies all changes automatically and restarts any services involved for your changes to take an effect.
17.3.2. Changing the System Configuration Manually
To manually change the system configuration, proceed as follows
Become
root.Bring the system into single user mode (runlevel 1) with telinit
1.Change the configuration files as needed with an editor of your choice.
If you do not use YaST to change the configuration files in
/etc/sysconfig, make sure that empty variable values are represented by two quotation marks (KEYTABLE="") and that values with blanks in them are enclosed in quotation marks. Values consisting of one word only do not need to be quoted.Execute SuSEconfig to make sure that the changes take effect.
Bring your system back to the previous runlevel with a command like telinit
default_runlevel. Replacedefault_runlevelwith the default runlevel of the system. Choose5if you want to return to full multiuser with network and X or choose3if you prefer to work in full multiuser with network.
This procedure is mainly relevant when changing systemwide settings, such as the network configuration. Small changes should not require going into single user mode, but you may still do so to make absolutely sure that all the programs concerned are correctly restarted.
![[Tip]](admon/tip.png)