Contents
From your desktop, you can access files and directories or certain services on remote hosts or make your own files and directories available to other users in your network. openSUSE® offers various different ways of accessing and creating network shared resources:
- Network Browsing
Your file managers, Dolphin or Konqueror, let you browse your network for shared resources and services. Learn more about this in Section 5.2, “Accessing Network Shares”.
- Sharing Folders in Mixed Environments
Using Dolphin or Konqueror, configure your files and folders to share with other members in your network. Make your data readable or writable for users from any Windows or Linux workstation. Learn more about this in Section 5.3, “Sharing Folders in Mixed Environments”.
- Managing Windows Files
openSUSE can be configured to integrate into an existing Windows network. Your Linux machine then behaves like a Windows client. It takes all account information from the Active Directory domain controller, just as Windows clients do. Learn more about this in Section 5.4, “Managing Windows Files”.
![[Note]](admon/note.png) | Network Share Support in Dolphin |
|---|---|
Dolphin is KDE 4's default file manager and most of the network functions described in this chapter are already integrated. However not all of them might work flawlessly—if in doubt, try using Konqueror instead. | |
Whether and to what extent you can use file sharing and network browsing on your machine and in your network highly depends on the network structure and on the configuration of your machine. Before setting up either of them, contact your system administrator to make sure that your network structure supports this feature and to check whether your company's security policies permit it.
Network browsing, be it SMB browsing for Windows shares or SLP browsing for remote services, relies heavily on the machine's ability to send broadcast messages to all clients in the network. These messages and the clients' replies to them enable your machine to detect any available shares or services. For broadcasts to work effectively, your machine must be part of the same subnet as all other machines it is querying. If network browsing does not work on your machine or the detected shares and services do not match with what you expected, contact your system administrator to make sure that you are connected to the appropriate subnet.
To allow network browsing, your machine needs to keep several network ports open to send and receive network messages that provide details on the network and the availability of shares and services. The standard openSUSE is configured for tight security and has a firewall up and running that protects your machine against the Internet. To adjust the firewall configuration, you would either need to ask your system administrator to open a certain set of ports to the network or to tear down the firewall entirely according to your company's security policy. If you try to browse a network with a restrictive firewall running on your machine, Dolphin warns you about security restrictions not allowing it to query the network.
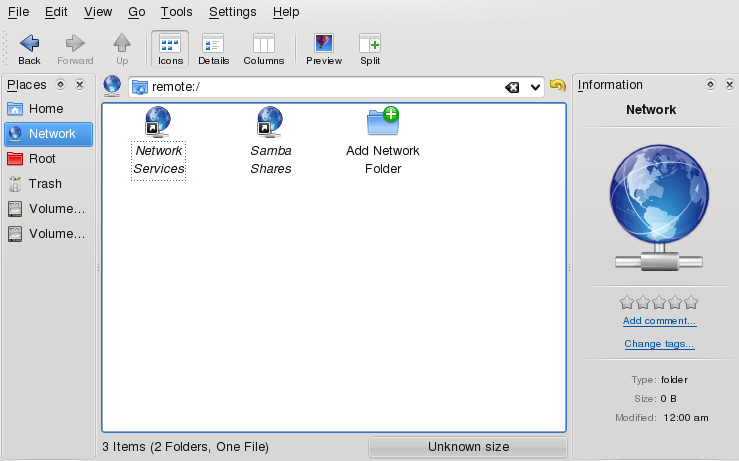
Networking workstations can be set up to share folders. Typically, files and folders are marked to let remote users access them. These are called network shares. If your system is configured to access network shares, you can use your file manager to access and browse them just as easily as if they were located on your local machine. Having read or write access to the shared folders depends on the permissions granted to you by the owner of the shares.
To access network shares, start Dolphin and click the icon in the panel or enter remote:/ in the location bar. Dolphin then opens a virtual folder that displays the network share types that you can access. Click a network resource type then click the network share to access. You might be required to authenticate to the resource by providing a username and password.
Sharing and exchanging documents is a must-have in corporate
environments. Dolphin offers you file sharing with Samba, which makes
your files and folders available to both Linux and Windows users. For
information on how to install and set up Samba, refer to
Kapitel Samba (↑Referenz). After you have installed Samba and set
up a server, you can configure the folders to share with Dolphin. Dolphin
then writes its configuration to a paragraph in the main Samba
configuration file at /etc/samba/smb.conf.
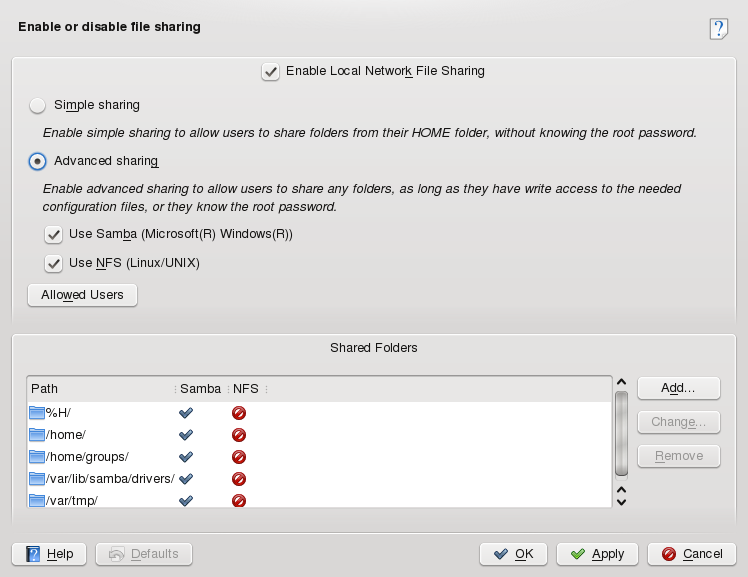
Procedure 5.1. Configuring Samba File Shares with Dolphin
Open Dolphin.
Select , right-click the window background and then select from the context menu.
In the dialog, click the tab. If file sharing is not yet enabled, you are alerted to this on the tab. To enable file sharing or select the files to share, click and enter the
rootpassword.To enable or disable file sharing, select or deselect .
Select the appropriate sharing option: or .
To limit the number of users allowed to share folders to certain groups, click , select , click , and select the appropriate group from the list in the window that opens. Click to close that window.
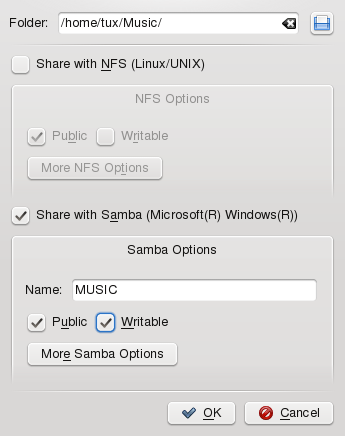
In the dialog, add the folder to share to the list of shared items by clicking at the bottom of the dialog and specifying the folder's exact path.
Activate to enable Samba file sharing. If needed, apply some fine-tuning to the Samba options:
Specify a name other than the preset default.
Determine which kind of access to grant others to your share. You can grant users full read and write access or limit their access to read-only.
Apply your settings and leave the file sharing dialog with .
The folder now appears in Dolphin with a globe icon.
To revoke the share, enter the file sharing dialog again and remove the folder from the list of shared items. The folder then appears without a globe icon.
Other members of your network can reach your share by entering
smb:/ in the location bar of Dolphin and clicking
the appropriate workgroup icon and hostname.
![[Important]](admon/important.png) | Samba Domain Browsing |
|---|---|
Samba domain browsing only works if your system's firewall is configured accordingly. Either disable the firewall entirely or assign the browsing interface to the internal firewall zone. Ask your system administrator about how to proceed. This procedure is described in more detail in Section “Configuring a Linux Client for Active Directory” (Chapter 5, Active Directory Support, ↑Security Guide). | |
With your openSUSE machine being an Active Directory client as described in Section “Configuring a Linux Client for Active Directory” (Chapter 5, Active Directory Support, ↑Security Guide), you can browse, view, and manipulate data located on Windows servers. The following examples are just the most prominent ones:
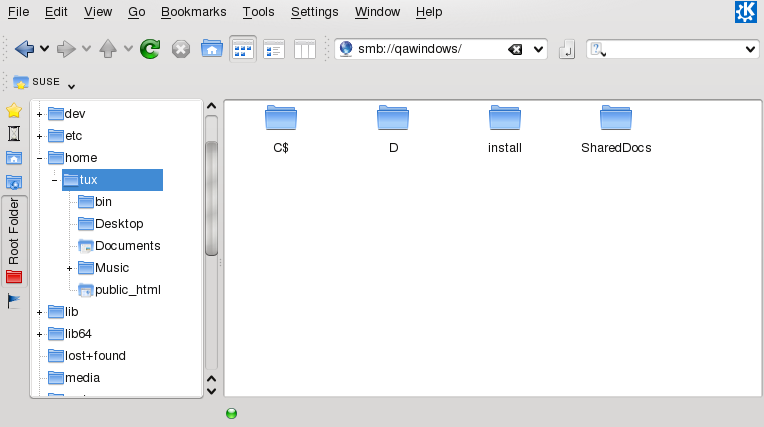
- Browsing Windows Files with Dolphin
Use Dolphin's
smb:/browsing option to browse your Windows data.- Viewing Windows Data with Dolphin
Use Dolphin to display the contents of your Windows user folder just as you would for displaying a Linux directory. Create new files and folders on the Windows server.
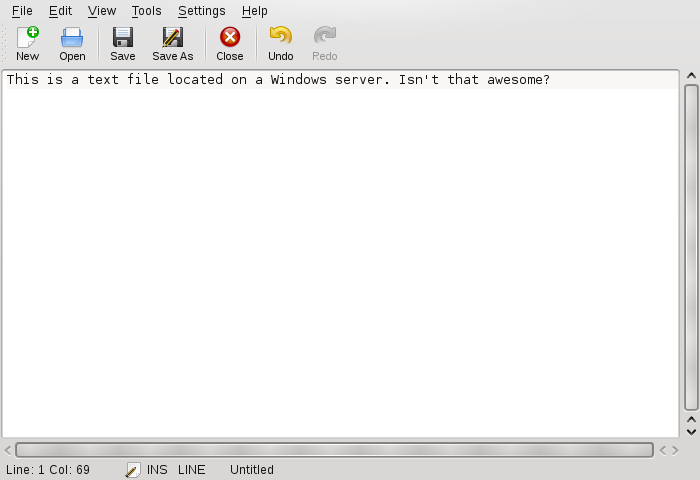
- Manipulating Windows Data with KDE Applications
KDE applications, such as the Kate text editor, allow you to open files on the Windows server, manipulate them, and save them to the Windows server.
- Single-Sign-On
KDE applications (including Dolphin) support Single-Sign-On, which means that to access other Windows resources, such as Web servers, proxy servers, or groupware servers like MS Exchange, you do not need to reauthenticate. Authentication against all these is handled silently in the background after you provide your username and password on login.
Procedure 5.2. Accessing Windows Data with Dolphin
Press Alt+F2 and enter
smb:/or start Dolphin and entersmb:/in the location bar.Dolphin displays all Samba workgroups and domains that could be found in your network.
Click the icon of the workgroup or domain of your AD server.
Click the folder and select your personal user folder icon. The contents of your folder are displayed.
To create folders in your Windows user folder using Dolphin, proceed as you would when creating a Linux folder:
Right-click the background of the Dolphin folder view to open the menu.
Select +.
Enter the new folder's name when prompted to do so.
To create a file on the AD server, proceed as described in the following example for the KWrite text editor.
Press Alt+F2 and enter kwrite.
Enter your text.
To save the newly created text, select .
Click the icon in the view and select .
Navigate to your Windows folder.
Enter the filename and click .
The file is saved on the Windows server.
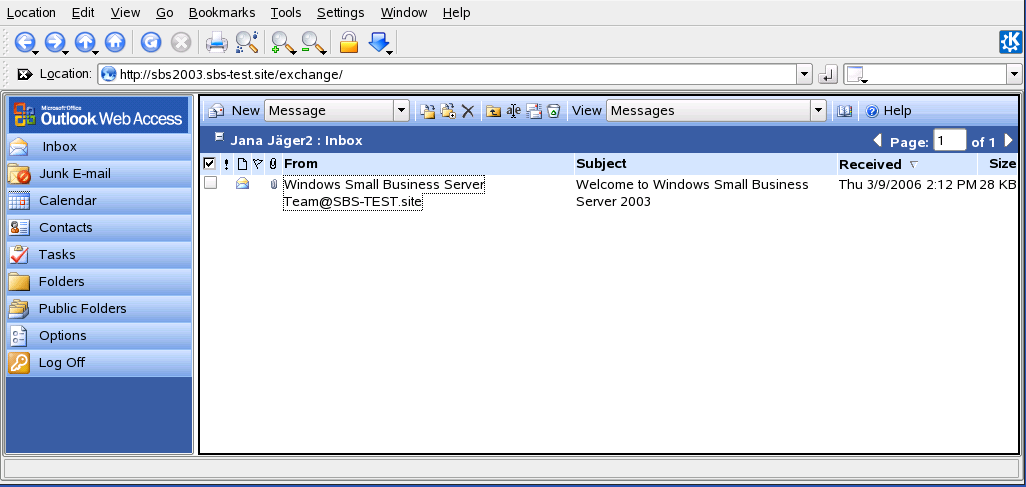
Make use of Dolphin's Single-Sign-On support, as in the following example—Web access to your MS Exchange mailbox:
Make sure that you have a valid MS Exchange account under your current Windows user identity.
Request the Exchange server's address from your system administrator.
Press Alt+F2 and enter dolphin
http://.address_exchange_serverYou are logged in to your Exchange account without having to reauthenticate.
Write or read your e-mails and log out as usual.
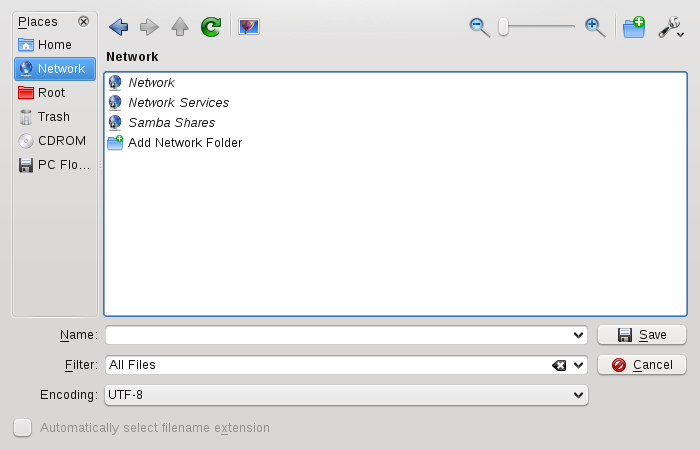
With KNetAttach, you can also add new network folders to this view by
clicking in a Dolphin
remote:/ view. A wizard opens where you can select
the type of network folder to access and enter the details, such as a
name for the network folder, the address of the server (either the IP
address or domain name), the login name, the port, and the path to folder
to access.
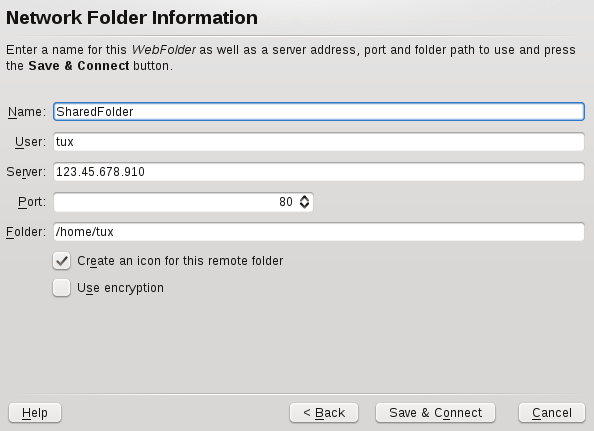
After finishing, you can access the network share in Dolphin by clicking in the panel.
If you add a network folder in this way, you can also access this folder easily when opening or saving a file from a KDE application. If you click in the left-hand bar of an or a dialog, the network folder you added appears.
![[Tip]](admon/tip.png) | Linking to Network Shares on the Desktop |
|---|---|
For quick access to network shares, you can also create links to these resources on your desktop. To do so, select the desired resource in Dolphin and drag it onto your desktop while keeping the left mouse button pressed. From the context menu, select or to either display the folder as icon or in the folder view, directly displaying the contents of the directory. | |
Kepas is a file transfer utility that lets you transfer files (or other
contents such as Klipper or KNotes entries) to your friends. You can also
use it to set up and monitor a small public file server. To use Kepas,
install the kepas package with
YaST or zypper. You can then either add Kepas as widget to your KDE 4
desktop or run Kepas from the system tray, both provide the same
functions.
| Security Considerations |
|---|---|
When setting up a public file server with Kepas, there are no access restrictions to shared files. Whatever you select for sharing is available to anyone. Before doing so, check with your system administrator whether your company's security policies allow to set up a public file server. Also in a private environment, you should only set up a public file server if your network is protected by an outer firewall. Otherwise you risk accidentally leaking sensitive information to the Web. In addition to that, any Web server is a potential target for hackers. | |
Kepas is designed to be used for sharing files with friends, not to act as a fully-fledged Web server like Apache. Kepas is the successor of kpf that was primarily conceived as an easy way to share files with others while chatting on IRC (Internet Relay Chat, or chat rooms).
Procedure 5.3. Setting Up a Public File Server with Kepas
To add Kepas to your system tray, press Alt+F2 and enter kepas. If you want to add a Kepas widget to your desktop instead, proceed as outlined in Procedure 3.2, “Adding Widgets to the Desktop”.
To set up a file server, left-click the Kepas widget (or right-click the Kepas icon in the system tray) and select +.
Specify the directory containing the files you want to share then click . Typically the
public_htmlfolder in your home directory is designed for that purpose.Public Availability of Sensitive Information When sharing a directory, all files in the directory and its subdirectories are made publicly available, including hidden files (files that start with a dot) and symbolic links.
Be careful not to share sensitive information, such as passwords, cryptographic keys, your address book, or documents private to your organization. Make sure that any symbolic links included do not point outside your published folder, because that would give others access to areas of your system that are not intended for public viewing.
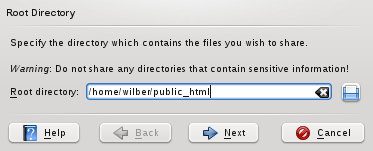
You can keep the default values for the , the and the in the next steps (they can also be altered later, if needed).
Click to publish the availability of the newly created file server in the network.
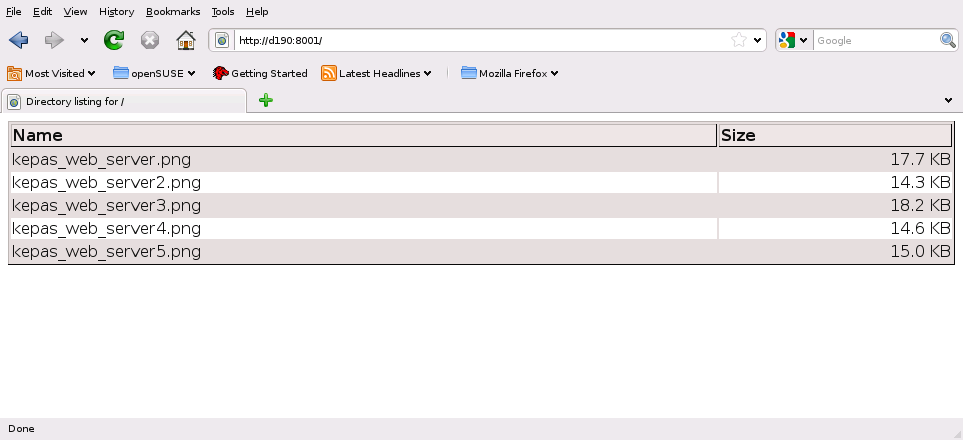
To make a file available to people with whom you are chatting online,
just copy the file into your public_html folder and
announce to those listening that your file is now available at
http://
(rather than sending them each an e-mail with the file attached).
servername:8001/filename
To display an overview of all contents published on your public file
server, the others only need to enter the following URL into their
browsers:
http://.
servername:8001
To revoke the public file server, right-click the system tray icon (or left click the Kepas widget) and select ++. If you want to change the file server settings (like port, bandwith limit, server name or if to follow symbolic links or not), instead select ++ from the context menu to access the configuration dialog.