Chapter 37. Copying and Sharing Files
Contents
- 37.1. Scenarios
- 37.2. Access Methods
- 37.3. Accessing Files Using a Direct Connection
- 37.4. Accessing Files on Different OS on the Same Computer
- 37.5. Copying Files between Linux Computers
- 37.6. Copying Files between Linux and Windows Computers with SSH
- 37.7. Sharing Files between Linux Computers
- 37.8. Sharing Files between Linux and Windows with Samba
- 37.9. For More Information
If using multiple operating systems (OS) simultaneously, it is often necessary to exchange files among them. Different systems may reside on different partitions on the same machine or on different machines across your network. There are various approaches to file exchange with different basic instructions and possible pitfalls.
![[Warning]](admon/warning.png) | Scenarios for Private Home Networks Only |
|---|---|
Do not use the following scenarios in networks other than your own private and trusted home network that is protected by a firewall. Implementing high security measures for the configurations featured in the following sections is beyond the scope of this document. | |
Exchanging data may encompass either one of the following tasks:
- Copying
To copy your data means to transfer your data from one system to the other. This results in identical objects on both the source and the target system.
Synchronizing data is a special way to copy data. If you change a file on one computer, it is automatically changed on the other computer after the synchronization. For example, think of a laptop that contains your modified files and you want to have the same contents on your desktop computer.
- Sharing
Sharing your files means establishing a client/server relationship. The server provides files that can be accessed by the client. When changing a file, you modify it on the server, not locally on the client. File servers typically serve a large number of clients simultaneously.
37.1. Scenarios
The following list provides a number of possible scenarios involving file transfer:
- Different OS on the Same Computer
Many users have an operating system preinstalled by their vendor and run Linux in a separate partition. Refer to Section 37.4, “Accessing Files on Different OS on the Same Computer” for more information.
- Different Computers Not Connected by a Network
Save the data to any media (CD, DVD, USB flash drive, or external hard disk) and connect these to the target machine to copy your files. This solution is inexpensive, intuitive, and straightforward. However, you need the appropriate drives or ports on both computers. Additionally the operating systems have to understand the filesystem.
Media are suited to occasional file transfers with limited file size. If you need a more permanent solution, consider connecting them with a network.
- Different Computers Connected to the Same Network
Set up a server of any kind on one computer, connect the server and the client, and transfer the files from server to client. Choose from various protocols available and pick the one that best matches your needs and expertise.
The client/server setup requires more expertise and maintenance efforts, but is better suited to routine transfer needs and exchange with multiple systems. If you are looking for a permanent file exchange, choose a client/server-based method. This method does not impose any limits on the amount of data that can be transferred. See Section 37.2, “Access Methods”.
- Different Computers on Different Networks
This scenario requires connection of different networks and is beyond the scope of this document. Transfer files as if the computers were not connected to a network.
37.2. Access Methods
The following methods and protocols are well-suited to file transfer and sharing.
- FTP
Use FTP (File Transfer Protocol) if you need to exchange files very often and with different users. Set up an FTP server on one system and access it with clients. There are many graphical client applications available for FTP on Windows*, MacOS, and Linux. Depending on how your FTP server is used, enable read and write permissions. See Section 37.5.4, “Copying Files with FTP” for more details on FTP.
- NFS
NFS (Network File System) is a client/server system. A server exports one or more directories that can be imported by a client. For more information, see Chapter 28, Sharing File Systems with NFS.
Use NFS if you share files very often and for different users. Generally, this protocol is more common in the Linux world than in the Windows world. An NFS export integrates well into your Linux system and you can browse the imported directory structure like any other folder on your local machine. Depending on your configuration, enable either read or write permissions or both on the server. In general, for a home user it makes sense to allow read and write access.
- rsync
Use rsync to transfer regularly large volumes of data that does not change considerably. It is available on Linux and Windows. A typical use case for rsync is managing data backups. Refer to the manual page of the rsync command and Section 37.5.2, “Transferring Files with rsync” for more information.
- Unison
Unison is an alternative to rsync. It is used to regularly synchronize files between different computers but has the advantage to behave bidirectionally. Refer to the manual page of the Unison command and Section 37.5.3, “Transferring Files with Unison” for more information. Unison is available on Linux and Windows.
- CSync
CSync is an alternative to Unison. Just like Unison it synchronizes files bidirectionally. However, its architecture is modular so it can be extended with plug-ins. See http://www.csync.org for more details.
- SMB
Samba is a client/server system and an implementation of the SMB protocol. It is usually used in Windows networks, but is supported by several operating systems. Refer to Chapter 29, Samba for more information about Samba.
Use Samba if you need to share files very often and with different users, especially to Windows systems. Samba as a Linux-only solution is uncommon, use NFS instead. For more information about setting up a Samba server, refer to Section 37.8, “Sharing Files between Linux and Windows with Samba”.
- SSH
SSH (Secure Shell) enables a secure connection between computer. The SSH suite consists of several commands and uses public key encryption to authenticate users. For more information, see Chapter 13, SSH: Secure Network Operations (↑Security Guide).
Use SSH if you copy files occasionally over an untrusted network and if you are the only user doing so. Although there are graphical user interfaces available, SSH is mainly considered a command line utility and is available on Linux and Windows.
37.3. Accessing Files Using a Direct Connection
This section describes one way to exchange files between two computers using an Ethernet crossover cable.
You need:
Ethernet crossover cable. For further information see: http://en.wikipedia.org/wiki/Ethernet_crossover_cable
openSUSE on both computers
An established connection.
The SSH daemon running on both machines. To start the service, run the command rcsshd start as
root.
Proceed as follows:
Procedure 37.1. GNOME
Start Nautilus.
Click on +.
Set the to .
Enter the IP address and port of the remote computer (default is 22).
Specify the folder you want to open on the remote Computer.
Click .
Procedure 37.2. KDE
Start Dolphin.
Click on , . Re-attach the pane if it is not available with ++.
Set the type of network to .
Enter any name and the correct user, IP address, port (default is 22) and folder of the remote Computer. It is also possible to create an icon for this connection by enabling the checkbox below. This connection icon appears in the tab in Dolphin.
Click on a dialog box opens and requests the password.
A new window containing the files of the remote computer will be opened.
37.4. Accessing Files on Different OS on the Same Computer
New computers generally ship with a preinstalled operating system, usually Windows. If you have installed Linux on a different partition, you might want to exchange files between the different operating systems.
Windows cannot read Linux partitions by default. If you want to exchange files between these two operating systems, you have to create an “exchange partition”. For a more direct approach, see http://www.fs-driver.org/ to get a driver supporting an ext2 filesystem on Windows. The following file systems are used by Windows and can be accessed from a Linux machine:
- FAT
Various flavors of this file system are used by MS-DOS and Windows 95 and 98. You can create this type of file system with YaST. It is possible to read and write files on FAT partitions from Linux. The size of a FAT partition (and even the maximum size of a single file) is subject to restrictions, depending on the FAT version. See http://en.wikipedia.org/wiki/VFAT for more information about FAT file systems.
- NTFS
The NTFS file system is used by Windows. openSUSE includes write access support to the NTFS file system. See http://en.opensuse.org/SDB:NTFS for more information about NTFS-3g.
During the installation of openSUSE, your Windows partitions are detected. After starting your Linux system, the Windows partitions usually are mounted. These are possible ways of accessing your Windows data:
- KDE
Press +F2 and enter
sysinfo:/. A new window opens displaying the characteristics of your machine. lists your partitions. Look at those that are of the file system typentfsorvfatand click these entries. If the partition is not already mounted, KDE mounts the partition now and displays the contents.- Command Line
Just list the contents of
/windowsto see one or more directories containing your Windows drives. The directory/windows/cmaps to the WindowsC:\drive, for example.
![[Note]](admon/note.png) | Changing the Accessibility of Windows Partitions |
|---|---|
Initially, Windows partitions are mounted read-only for normal users to
avoid accidental damage to the file system. To grant normal users full
access to a mounted Windows partition, change the mount behavior of this
Windows partition. Refer to the manual page of the
mount command for more information on mount options
for vfat and to the manual page of | |
37.5. Copying Files between Linux Computers
Linux offers a rich set of protocols you can use to copy files between
computers. Which protocol you use depends on how much effort you want to
invest and whether it needs to be compatible with future Windows
installations. The following sections feature various methods to transfer
files from and to Linux computers. Make sure that you have a working
network connection, because otherwise they will not work. All scenarios
rely on working name resolution in the network. If your network does not
include a name service, use IP addresses directly or add the IP addresses
along with respective hostnames to /etc/hosts on all
clients.
The following example IP addresses and hostnames are used across this section:
|
Target Hostname |
|
|
Target IP |
|
|
Source Hostname |
|
|
Source IP |
|
|
User |
|
37.5.1. Copying Files with SSH
The following requirements must be met on both computers that are accessed via SSH:
If you use a hostname, make sure each hostname is listed in
/etc/hostson both computers (see Section 23.6.1.6, “/etc/hosts”.) If you use SSH with IP addresses, you do not need to change anything.If you use a firewall, open the SSH port. To do so, start YaST, and select +. Go to and check whether is displayed as part of the list. If this is not the case, select SSH from and click . Apply your changes and leave YaST with and .
To copy files from one computer to another, you need to know where the
files are located. For example, to copy the single file
/srv/foo_file from computer
jupiter.example.com to the current directory, use the
following scp command (the dot represents the current
directory as the copy target location):
scp tux@jupiter.example.com:/srv/foo_file .
To copy a whole directory structure, use the recursive mode of scp:
scp -r tux@jupiter.example.com:/srv/foo_directory .
If your network does not provide name resolution, use the server's IP address directly:
scp tux@192.168.2.100:/srv/foo_file .
If you do not know exactly where your files are, use the sftp command. Copying files in KDE or GNOME with SFTP is very simple. Proceed as follows:
Press +F2.
Enter the following at the address prompt (correct it to your own values):
sftp://tux@jupiter.example.com
Confirm the question regarding of authenticity and enter the password of
tuxonjupiter.example.com.Drag and drop the desired files or directories to your desktop or a local directory.
KDE provides another protocol called fish that can be
used if sftp is not available. The use of this
protocol is similar to sftp. Just replace the
sftp protocol prefix of the URL with
fish:
fish://tux@jupiter.example.com
37.5.2. Transferring Files with rsync
rsync is useful for archiving or copying data and can also be used as a daemon to provide directories to the network (see Procedure 37.3, “Advanced Setup for rsync Synchronization”).
Before using rsync to synchronize files and directories between different computers, make sure that the following requirements are met:
The package
rsyncis installed.Identical users are available on both systems.
Enough disk space is available on the server.
If you want to benefit from rsync's full potential, make sure that rsyncd is installed on the system to use as the server.
37.5.2.1. rsync Basic Mode
The basic mode of operation of rsync does not require any special
configuration. rsync mirrors complete directories onto another system.
Its usage is not much different from a regular copying tool, such as
scp. The following command creates a backup of the home directory of
tux on a backup
server called jupiter:
rsync -Hbaz -e ssh /home/tux/ tux@jupiter:backup
Use the following command to restore your backup (without option
-b):
rsync -Haz -e ssh tux@jupiter:backup /home/tux/
37.5.2.2. rsync Daemon Mode
Start the rsyncd daemon on one of your systems to make use of the full functionality of rsync. In this mode, it is possible to create synchronization points (modules) that can be accessed without an account. To use the rsyncd daemon, proceed as follows:
Procedure 37.3. Advanced Setup for rsync Synchronization
Log in as
rootand install thersyncpackage.Configure your synchronization points in
/etc/rsyncd.conf. Add a point with its name in brackets and add thepathkeyword like in the following example:[FTP] path = /srv/ftp comment = An Example
Start the rsyncd daemon as
rootwith rcrsyncd start. To start the rsync service automatically during each system boot, run insserv rsyncd.List all files located in the
/srv/ftpdirectory (note the double colon):rsync -avz jupiter::FTP
Initiate the transfer by providing a target directory (in this example, the current directory is represented by a dot):
rsync -avz jupiter::FTP .
By default, files are not deleted while synchronizing with rsync. To
force file deletion, add the --delete option. To make
sure that --delete does not accidentally remove newer
files, use the --update option instead. Any conflicts
that arise must be resolved manually.
37.5.3. Transferring Files with Unison
Before using Unison to synchronize files and directories between different computers, make sure that the following requirements are met:
The package
unisonis installed.Enough disk space is available on your local and remote computer.
If you want to benefit from Unison's full potential, make sure that Unison is also installed and running on the remote computer.
In case you need help, run Unison with the -doc topics
option to get a full list of available sections.
For permanent settings, Unison allows the creation of
profiles that specify Unison preferences such as
the directories (roots) to synchronize, which types of files to ignore,
and other options. The profiles are stored as text files in
~/.unison with the file extension
*.prf.
37.5.3.1. Using the GUI
To synchronize different directories with Unison's GUI, proceed as follows:
Start Unison by pressing +F2 and entering unison.
If you run Unison for the first time and without any further options, you are prompted for a source directory. Enter the source directory you want to synchronize and click .
Enter the target directory. It can be either local or remote. If you want to synchronize to a remote directory, choose the method (SSH, RSH or Socket) and enter the hostname and an optional user.
If you have not synchronized these two directories before, a warning dialog appears, informing you that Unison will now compare the contents of those directories. Close the warning with and wait until Unison has collected the information from both directories and displays the differences in the main window.
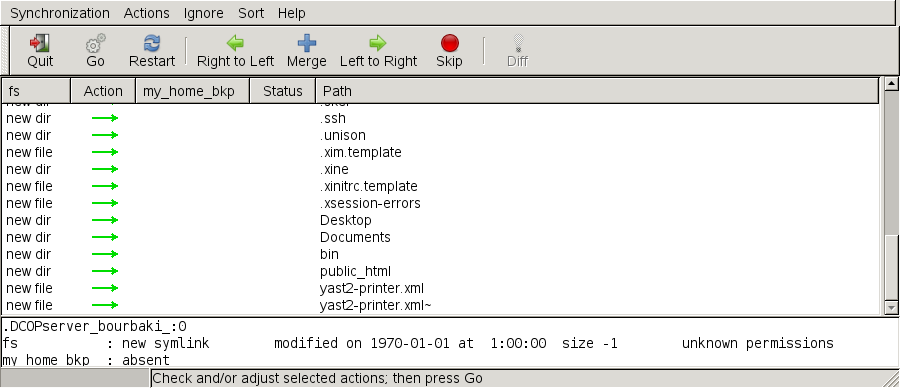
The left column shows the source directory you have selected, the third column shows the target directory. If there are differences between the directories, the column shows a symbol, proposing an action. A green arrow indicates that a file has been modified, added or deleted in the source or the target directory. The direction of the arrow indicates the direction that the change would be propagated if you performed the synchronization now. A question mark indicates a conflict (both files have been changed and Unison cannot decide which one to overwrite).
To modify the proposals Unison shows for each file (for example, if you want to change the direction), select the file and click or . With , exclude a file from synchronization. The symbol in the column changes accordingly.
To start the synchronization, click .
The next time you start Unison, a dialog box shows the existing profiles, each specifying a pair of directories to be synchronized. Select a profile or create a new profile (for another pair of directories) and perform the synchronization as described above.
37.5.3.2. Using the Command Line
Unison can also be operated through the command line. To synchronize a local directory to a remote computer, proceed as follows:
Open a shell and enter the following command:
unison -ui text
DIRssh://tux@jupiter.example.com//PATHReplace the placeholders with the respective values.
Unison asks you what to do with your files and directories, for example:
local                  jupiter
           <----  new file   dir [f]
Press F if you want to follow Unison's recommendation. For other commands, press ?.
Proceed with y, if you want to propagate your updates.
37.5.4. Copying Files with FTP
Before configuring your FTP server, make sure that the following requirements are met:
The package
vsftpis installed.You have
rootaccess to your FTP server.Enough disk space is available on your computer.
| For Home Networks Only |
|---|---|
This setup is suited for use in home networks only. Do not deploy it to sites unprotected by firewalls and do not enable world wide access. | |
To configure an FTP server, proceed as follows:
Prepare the FTP server:
Open a shell, log in as
root, and save a backup copy of/etc/vsftpd.conf:cp /etc/vsftpd.conf /etc/vsftpd.conf.bak
Create an access point for anonymous FTP
mkdir ~ftp/incoming
chown -R ftp:ftp ~ftp/incoming
Replace the configuration files according to the preferred scenario (refer to the manual page of vsftpd.conf for advanced configuration options):
- Allowing Anonymous Read and Write Access
#
listen=YES

# Enable anonymous access to FTP server
anonymous_enable=YES

#
local_enable=YES
# Enable write access
write_enable=YES
anon_upload_enable=YES
anon_mkdir_write_enable=YES
dirmessage_enable=YES
# Write log file
xferlog_enable=YES
connect_from_port_20=YES
chown_uploads=YES
chown_username=ftp
ftpd_banner=Welcome to FTP service.
anon_root=/srv/ftp
- Grant Restricted Permissions to FTP Users (Home Only)
chroot_local_users=YES
Restart the FTP server:
rcvsftp start
On the client, just enter the URL
ftp:// in your browser
or FTP client. Replace HOSTHOST with the hostname
or IP address of your server. There are many graphical user interfaces
available that are suited to browsing the contents of your FTP server.
For a list of them, just enter FTP at the search prompt of the YaST
package manager.
37.6. Copying Files between Linux and Windows Computers with SSH
To transfer files from Linux to Windows using SSH, choose one of the following applications:
- PuTTY
PuTTY is a suite of different command line tools for working with an SSH daemon. Download it from http://www.chiark.greenend.org.uk/~sgtatham/putty.html.
- WinSCP
WinSCP is very similar to PuTTY, but includes a graphical user interface. Choose from an Explorer or Norton Commander style. Download it from http://winscp.net.
To copy a file from Windows to Linux with PuTTY, proceed as follows (on the Windows machine):
Start PSCP.
Enter the hostname of your SSH server.
Enter your login and password to the SSH server.
To connect from Windows to Linux with WinSCP, proceed as follows (on the Windows machine):
Start WinSCP.
Enter the hostname of the SSH server and username.
Click and acknowledge the resulting warning.
Drag and drop any files or directories from or to your WinSCP window.
| SSH Fingerprint |
|---|---|
With both PuTTY and WinSCP, you must accept the SSH fingerprint when you log in for the first time. | |
37.7. Sharing Files between Linux Computers
The following sections feature various methods for sharing data. Use one of these if you are looking for a permanent solution for data sharing.
37.7.1. Transferring Files with NFS
To configure the server, proceed as follows:
Prepare the system:
Open a shell, log in as
root, and grant write permissions to all users:mkdir /srv/nfs chgrp users /srv/nfs chmod g+w /srv/nfs
Make sure that your user name and user ID is known on the client as well as on the server. Refer to Chapter 9, Managing Users with YaST for detailed instructions about how to create and manage user accounts.
Prepare the NFS server:
Start YaST as
root.Select + (this module is not installed by default. If it is missing in YaST, install the package
yast2-nfs-server).Enable NFS services with .
Open the appropriate firewall port with if you are using a firewall.
Export the directories:
Click and select
/srv/nfs.Set the export options to:
rw,root_squash,async
Repeat these steps, if you need to export more than one directory.
Apply your settings and leave YaST. Your NFS server is ready to use.
To manually start the NFS server, enter rcnfsserver
start as root. To stop the server, enter
rcnfsserver stop. By default, YaST takes care of
starting this service at boot time.
To configure the client, proceed as follows:
Prepare the NFS client:
Start YaST as
root.Select +.
Activate if using a firewall.
Import the remote file system:
Click .
Enter the name or IP address of the NFS server or click to automatically scan the network for NFS servers.
Enter the name of your remote file system or automatically choose it with .
Enter an appropriate mount point, for example
/mnt. If you repeat this step with another exported file system, make sure you choose another mount point than/mnt.Repeat these steps if you need to import more than one external directory.
Apply your settings and leave YaST. Your NFS client is ready to use.
To start the NFS client manually, enter rcnfs start.
| Consistent User Names |
|---|---|
If your home network is used by just a small number of users, set up identical users manually on all machines. If, however, you need a larger consistent user base across a larger home network, consider using NIS or LDAP to manage user data. For further information, refer to Chapter 3, Using NIS (↑Security Guide) and Chapter 4, LDAP—A Directory Service (↑Security Guide). | |
37.7.2. Sharing Files with Samba
This sections introduces various methods to access files on a Samba server. Both KDE and GNOME ship with graphical tools for working with Samba shares. There is also a command line tool for accessing Samba servers.
37.7.2.1. Accessing Shares with KDE and GNOME
Both the KDE and GNOME desktops can access Samba shares through their file browsers. To access your share, proceed as follows:
Press +F2 and enter
smb://jupiter.example.com/.shareThe syntax of this URL is
smb://withHOST/SHARENAMEHOSTrepresenting the hostname (jupiter.example.com) or IP address andSHARENAMErepresenting the share. See Step 3.b.Log in with the username and password. The password is set in Step 4 or just hit if no password is needed.
Drag and drop any files or directories from or to your window.
If you do not know your workgroup, enter smb:/ to list
all workgroups available in your network. The Smb4K tool (package
smb4k) can also be used to
display all workgroups in your network and mount them on demand.
37.7.2.2. Accessing Shares from the Command Line
If you prefer using the command line, use the smbclient command. To log in to your Samba server, run:
smbclient //jupiter/share -U tux
Omit the -U option if you are the current user
tux. After logging
in successfully, use some basic commands like ls
(list contents), mkdir (create directory),
get (download file), and put
(upload file). Use help to display all commands.
Refer to the manual page of smbclient for more
information.
37.8. Sharing Files between Linux and Windows with Samba
Samba is the first choice for transferring files between Windows and Linux machines. These are the most common use cases for Samba:
- Transferring Files from Linux to Windows with the SMB Scheme
In the easiest case you do not have to configure a Linux server. Use the
smb:/scheme. For more information, see Section 37.7.2.1, “Accessing Shares with KDE and GNOME”. Make sure that your workgroup is identical on both systems and that your directories are shared.- Transferring Files from Windows to Linux Using a Server
Configure a Samba server on your Linux computer. See Procedure 37.4, “Setting Up a Samba Server”.
![[Tip]](admon/tip.png) | Using Default Registry Entries for Your Windows System |
|---|---|
Some Windows versions (95, 98) require a small change in the registry
for enabling a different password authentication method. Simplify this
step by installing the
| |
Procedure 37.4. Setting Up a Samba Server
To set up a Samba server, do the following:
Prepare the Samba server:
Start YaST as
root.Install the
sambapackage.Create a directory (for example,
/srv/share).
Create the server configuration:
Select +.
Select one of the workgroups or enter a new one (for example,
Penguin).Check
Select if the Samba service should be started every time your computer boots. Otherwise select .
Activate if you use a firewall.
Create your Windows share:
Change to the tab and click .
Select your path (for example,
/src/share).Proceed with .
Activate .
Provide a password for all users that are allowed to use this service:
smbpasswd -a tux
For easier configuration, just hit to leave the password empty. Take into account that the usernames on your Windows and Linux computers are probably different. Configuring a consistent user base for both Windows and Linux is beyond the scope of this document.
Start the Samba server:
rcnmb start
rcsmb start
To check if everything has been successfully configured, enter:
smbclient -L localhost
After you hit , you should get something like the following:
Anonymous login successful
Domain=[PENGUIN] OS=[Unix] Server=[Samba 3.0.22-11-SUSE-CODE10]

    Sharename       Type      Comment
    ---------       ----      -------
    share           Disk      Shared directory
    netlogon        Disk      Network Logon Service
    IPC$            IPC       IPC Service (Samba 3.0.22-11-SUSE-CODE10)
    ADMIN$          IPC       IPC Service (Samba 3.0.22-11-SUSE-CODE10)
Anonymous login successful
Domain=[PENGUIN] OS=[Unix] Server=[Samba 3.0.22-11-SUSE-CODE10]

    Server               Comment
    ---------            -------
    SUSE-DESKTOP         Samba 3.0.22-11-SUSE-CODE10

    Workgroup            Master
    ---------            -------
    TUX-NET              jupiter