Contents
Abstract
During installation, YaST normally identifies and configures the sound cards of your computer automatically. Otherwise (or if you installed a new sound card), start YaST and configure the sound card manually in the module. For details, refer to Abschnitt „Einrichten von Soundkarten“ (Kapitel 2, Einrichten von Hardware-Komponenten mit YaST, ↑Start). When your sound card has been configured, you can control the volume and balance with a mixer and start other sound applications.
Linux includes a wide range of sound and multimedia applications. Some of these applications are installed on your Linux system by default. With the applications described here you can control the volume and balance of playback and play CDs, music and movie files.You can also record and compress your own audio data.
In case one of the listed applications is not installed by default on your system, use YaST to install the missing packages. Use the search function of the YaST package management tool to find the package names. For details on installing software, see Kapitel Installieren bzw. Entfernen von Software (↑Referenz).
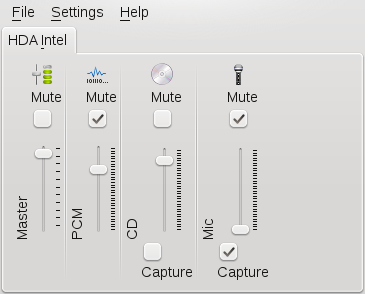
Mixers provide a convenient means of controlling the volume and balance of the sound output and input of computers.
The main difference between the various mixers is the outward appearance of the user interface. However, there are a number of mixers that are designed for specific hardware. From the mixers available, select the one that best suits your needs.
The default KDE mixer application is KMix. If the mixer icon (a loudspeaker symbol) is not visible in the panel of your desktop, press Alt+F2 and enter kmix or start the mixer from the main menu. By default, clicking the KMix icon in the system tray shows the master controller with which to control the overall volume. To fine-tune your sound settings for several channels, right-click the KMix icon and select .
You can mute and increase or decrease the volume for all of the channels separately. If you need or want to change the channel to be used as master channel, right-click the KMix icon and click . If you want more or less channels to appear in the mixer window, select + and select the ones you want to show.
![[Tip]](admon/tip.png) | Starting the Mixer |
|---|---|
Generally, it is advisable to open a mixer application before opening other sound applications. Use the mixer to test and adjust the control settings for the input and output of the sound card. | |
In Linux, find a variety of programs for playing music files, such as Ogg Vorbis or WAV. Ogg Vorbis is a free audio compression format that is now supported by the majority of audio players and even portable MP3 players. The file types supported by the applications depend on the engine used.
![[Note]](admon/note.png) | Playing MP3 Files |
|---|---|
openSUSE currently does not benefit from an MP3 codec agreement. However, community support for MP3 and alternatives is strong. For more information and any options that might work for you legally and technically, refer to http://opensuse-community.org/Restricted_Formats and http://en.opensuse.org/Restricted_Formats#Possible_Solutions_2. | |
The Amarok music player allows you to play various audio formats, create playlists, and to listen to streaming audio broadcasts of radio stations on the Internet. The file types supported depend on the engine used.
To start Amarok, press Alt+F2 and enter amarok.
By default, the Amarok main window is divided into three main parts: the browser pane on the left, the context view in the middle and the playlist on the right side. Both the browser pane and the context view include several tabs. Click a tab to switch view and to access the information available from there. Clicking a tab twice in the browser pane hides the browser pane and expands the context view to the left.
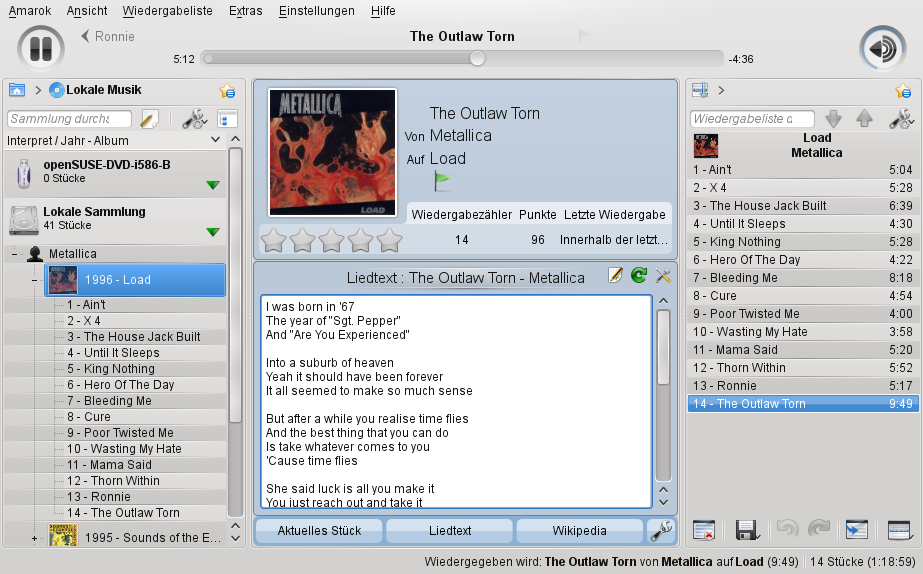
- Browser Pane
Includes the following tabs:
Collection: Shows your personal music collection. The search field on top allows you to filter for certain artists or titles configure. Click the wrench icon at the right of the browser pane if you want to configure the way your collection is displayed, or to reorganize the collection. For more information about customizing the tab, refer to Procedure 19.8, “Customizing the Tab”.
Internet: Shows the Internet services configured for Amarok. For details on how to configure the services, refer to Section 19.2.1.5, “Configuring Amarok”. Click an entry to access the respective service. To get back to the list of services, click the arrow icon in the top left corner.
Playlists: Lets you generate based on certain criteria. To access and organize any playlists you have saved before, click . From the playlist tab, you can also add or update . For more information about playlists, refer to Procedure 19.3, “Saving and Exporting Playlists”. To learn more about podcasts, refer to Procedure 19.1, “Subscribing and Listening to Podcasts”.
Filelists: Shows a file browser that corresponds to the standard KDE file manager. This view is designed for finding audio files you want to play, but not to add to your collection. Use the icons at the top to navigate the file system, change the view or to create bookmarks.
- Context View
Shows information about the currently played track. Depending on your configuration of this view the follows tabs are available: , , , , , , and . To change view, click one of the tabs. To learn how to configure the context view, refer to Procedure 19.9, “Customizing the Context View”.
- Playlist
Shows the list of tracks that has been added there to be played. This can include tracks from your music collection, streams from the Internet, or podcasts . The currently played track is highlighted in the list. Use the icons at the bottom of the playlist to clear, modify, save or export the current playlist or click the wrench icon to configure the playlist layout. For more information about playlists, refer to Section 19.2.1.3, “Using Playlists”.
With Amarok, you can listen to music from various sources—be it your music collection on hard disc or streams from the Internet.
To fill the playlist area, just drag and drop items from the browser pane on the left to the playlist pane on the right (or double-click to move them to the playlist). This works for items on the , the or the tab. To select multiple items, keep Shift or Ctrl pressed while selecting the items. Alternatively, right-click an item on one of the tabs and select if to append it to the playlist or if to replace the current playlist with this item.
Double-click an item in the playlist to play it. Alternatively, use the control buttons in the upper part of the Amarok main window to play, pause, stop or skip items in the playlist.
For example, to listen to the music of your neighbors, select ++, add this entry to the playlist and start playing.
Usually, Amarok plays all tracks displayed in the playlist pane from top to bottom and stops after the last track. To modify play mode and behavior, select + or + and select the desired options. Instead of manually adding items to the playlist and then playing them in random order, you can also let Amarok create dynamic playlists as described in Procedure 19.4, “Creating Dynamic Playlists”.
Procedure 19.1. Subscribing and Listening to Podcasts
Podcasts are series of audio (or video) files that are released periodically and can be downloaded automatically by subscribing to a Web feed. You can add and manage podcasts on the tab of the browser pane. If the Web service is configured for Amarok, you can also access a huge number of podcasts from there.
To add a podcast channel that you already know the URL of, switch to the tab and click .
Copy or enter the podcast URL into the next dialog and confirm with .
Right-click a podcast channel to open a context-menu allowing you to append or load the podcast to the playlist, to download an episode, to configure the podcast, to remove your subscription or to update the podcast channel.
If you want Amarok to automatically scan for updates on this podcast channel or to automatically download new episodes, right-click the podcast channel and select . In the podcast configuration dialog you can also define the location to where Amarok should save this podcast or limit the number of episodes stored.
To use the integrated Web service to browse for available podcasts, switch to the tab and click . For more information about the Amarok Web services, refer to Procedure 19.7, “Defining Basic Amarok Settings”.
When clicking for the first time, Amarok automatically fetches the list of podcasts, which takes a few seconds. Otherwise click to enforce a reload of the list. The available podcasts are sorted into categories.
Browse the list of podcasts or enter a term in the search field to filter for certain podcasts.
To get automatic updates for a podcast, select the podcast and click .
View and manage the podcasts that you have subscribed to as described in steps Step 1 to Step 1 above.
Procedure 19.2. Listening to Web Radio
When listening to Web radio streams, Amarok also displays the current title and track played by the station.
To listen to a certain stream (like for example, a Web radio channel), select +.
Copy or enter the stream URL into the next dialog and confirm with . The stream is automatically added to the playlist pane on the right.
Double-click the stream entry in the playlist to start listening. Alternatively, use the control buttons in the upper part of the Amarok main window to play, pause, or stop the stream.
If you have added several items form your music collection to the playlist pane on the right, you can also save and export the current tracks as playlist for later reuse.
Instead of manually adding items to the playlist pane and setting a certain play mode, Amarok can also make use of dynamic playlists. Dynamic playlists allow you to play tracks from your collection in a random order or to define how Amarok should mix the music an then turn the dynamic mode on.
Procedure 19.3. Saving and Exporting Playlists
If you save a playlist, it can be played again later with Amarok by accessing it from the tab. In contrast to this, exporting a playlist allows you to store and use it also outside of Amarok.
To save a playlist, either click the icon at the bottom of the playlist pane.
The browser pane automatically switches to the tab. It shows the newly added playlist below and prompts you to enter a name for the playlist. If you do not enter a name, date and time of creation are automatically set as name for the playlist.
To create folders in , click the icon.
You can also modify an already saved playlist by dragging and dropping new items from the playlist pane on the right onto the playlist entry shown below .
To load, rename or delete a playlist, right-click the playlist and select the appropriate menu item from the context menu.
To use a playlist in players other than Amarok, click the icon at the bottom of the playlist pane.
Sharing Playlists with Other Players Save playlists in
m3uformat, so you can share them with any other players using this format.Select or enter a location and filename for your playlist and click .
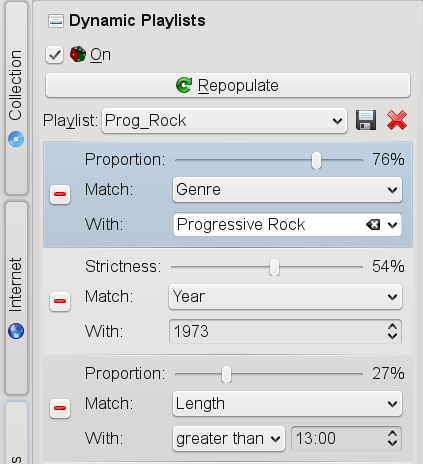
Procedure 19.4. Creating Dynamic Playlists
With dynamic playlists, Amarok lets you either play tracks from your collection in a random order or lets you create biased playlists according to probability-driven criteria (“biases”). You can create weighted random playlists that adhere to certain criteria exactly () and to certain criteria approximately (). It is possible to mix both types of biases when configuring a dynamic playlist.
Click the tab at the left side of the Amarok main window and select .
To create a random playlist without matching any criteria, set the drop-down list to
Random(which is the default value) and activate the check-box. A randomly created list of tracks appears in the playlist pane.To add a criterion that should be matched exactly:
Click the icon in the category.
Select the desired criterion from the drop-down list.
From the drop-down list, select the value that you want to set for this criterion.
With the slider, define which portion of the playlist should match this criterion.
To add a criterion that should be matched approximately:
Click the icon in the category.
Select the desired criterion from the drop-down list.
From the drop-down list, select the value that you want to set for this criterion.
With the slider, define how strictly to match this criterion.
Add further proportional or fuzzy biases as desired.
To remove a bias, click the icon in front of this bias.
To save the current configuration for the dynamic playlist, click the icon at the upper right corner of the category and enter a name.
The saved dynamic playlist configuration can now be accessed from the drop-down list at any time.
To use the selected dynamic playlist, activate the check-box.
Click if you want to replace the current tracks in the playlist area with the newly generated dynamic playlist.
| Many Services Depend on Proper Tagging |
|---|---|
When compressing (ripping) your audio data,
Many services (like retrieving covers from Amazon, or scrobbling your
music to | |
Amarok offers a lot of options for managing your personal music collection: For example, you can let Amarok scan for any changes to your music collection, edit track information (like tags or ratings and statistics) or automatically retrieve the cover artwork for each album.
After initial creation and basic configuration of your collection as described in Section 19.2.1.5, “Configuring Amarok”, you can at any time trigger an update by selecting +. This reflects any changes done to your collection folder on the tab immediately, without waiting for Amarok to update the collection automatically during the next check.
Tracks of unknown artists or albums are grouped under at the beginning of your collection. Compilation albums appear under . To mark an album as compilation album, right-click the album and select .
To search or filter your collection for a certain track or album, enter the title (or part of it) in the search field at the top. Each character you enter narrows down the search and the selection in the browser is adjusted as you type. To search for specific metadata such as or , or to combine several search options, click the button to the right of the search field to open a dialog that provides advanced filter options.
In the following, find examples for further common tasks you might want to execute.
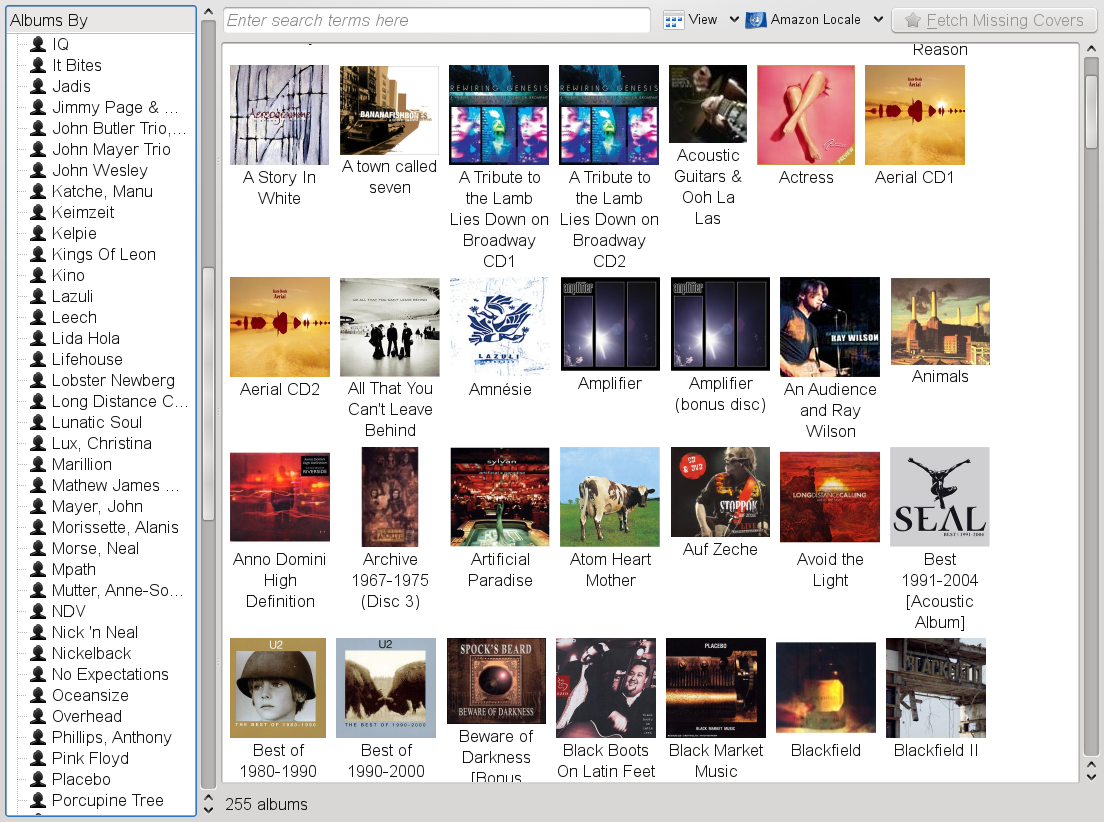
Procedure 19.5. Assigning Album Covers
Amarok's lets you comfortably add, correct or fetch any missing covers for your music collection. If automatic cover retrieval is configured, Amarok tries to fetch any album covers from an Amazon Web server. If Amarok cannot find an album cover (which is sometimes the case if the collection is not tagged properly or if the album is only available via a direct sales channel), you can also manually assign a cover or custom picture.
If not configured otherwise, album covers are displayed on the tab, in the context view and on the on-screen display (or on external widgets like PlayWolf).
Retrieval of covers relies on the tags of your music collection:
Amarok uses the Artist - Album query to
search Amazon for covers. The better your collection is tagged, the
better the hit rate when automatically retrieving covers.
If you want Amarok to automatically retrieve cover artwork for each album, select ++ and activate the respective option in the configuration dialog.
Confirm your changes and close the configuration dialog.
To define from which Amazon Web server Amarok should get the covers, click +.
From the drop-down list choose the location of the Web server that suits your needs best.
If Amarok could not retrieve all covers automatically, you can check for any missing covers by setting the to .
If necessary, change the , then click .
If retrieval is still not successful or if you are not satisfied with a certain cover, right-click the cover and select to manually refine the search by editing the search string.
To remove a cover, right-click the respective cover and select .
If you already have your own cover images, you can assign them by right-clicking an album cover and choosing .
Procedure 19.6. Editing Tags, Statistics and Ratings
Although tags are usually created automatically when ripping your
music, it is sometimes necessary to edit or correct tags. Apart from
editing tags, Amarok also lets you manually edit statistics for a
track like the rating or score. Amarok automatically assigns a score
to a song (ranging from 0-100), based on how many
times you have played that song and if you have played it completely
(or skipped it). Every time the song finishes playing, the score is
changed.
To edit or set tags for an artist, a complete album or individual tracks, right-click the respective entry on the tab and select .
On the tab, add or adjust the information as desired.
To set a custom rating for a track or to change the score, switch to the tab.
Move your mouse pointer over the star symbols until they change color. The more stars appear in yellow, the higher the rating. Click the mouse button to set the rating.
If desired, also adjust the track's .
Confirm your changes with .
Amarok offers a variety of configuration options. At first start-up, the most important settings to configure are the folders for your personal music collection and which back-end and sound system to use for playback. Although you can use Amarok without a music collection, it is recommended to create a collection. Most of the powerful, advanced features are only available with an existing collection.
Apart from that, Amarok comes with integrated Internet services that
you can activate or deactivate, like for example support for
Last.fm, a popular Internet radio and music
community Web site.
Procedure 19.7. Defining Basic Amarok Settings
Select + to access the Amarok configuration dialog.
Click and in the tree view, select the folder (or multiple folders) where Amarok should scan for your music files.
Activate the respective options to make Amarok scan the folders recursively or watch for changes in your music folders.
If you want to import an existing music collection (for example, from an older Amarok version), click and follow the steps on the screen.
From the category of the configuration dialog, you can also adjust the back-end and the output device for playing music, if necessary. To do so, click to open the module (also accessible from the KDE ). For more details about the output devices available from the list, hover your mouse pointer over the respective entries.
To discover the Web services integrated with Amarok, click the category. From there, you can activate, deactivate or configure access to several services like Web media server, legal and free music download, music community, , music locker or podcasts and shoutcasts directories.
Some of the services require registration. To sign up for a service or to enter your data for an already existing account, click the wrench icon next to the service.
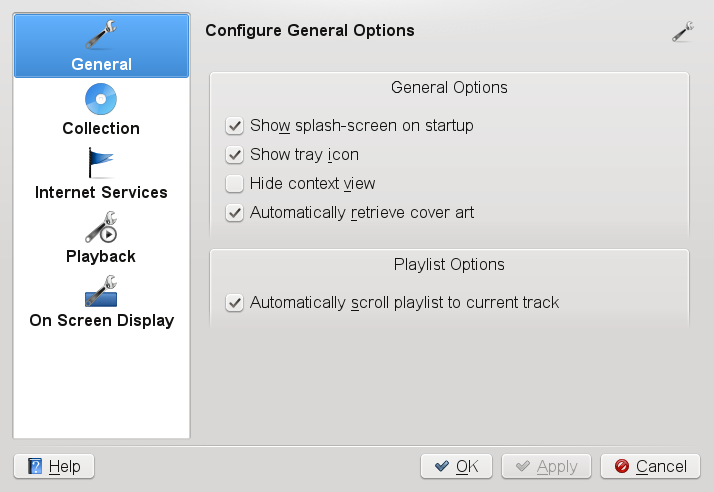
To use and customize the appearance of an showing information like cover and artist of the currently played track, activate .
Set the appearance options as desired and drag the preview to the desired place to define the position where the on-screen display should appear.
Confirm your changes with .
| Using Amarok Widgets |
|---|---|
Instead of using the on-screen display to show information about the current track, you can also add external widgets to your desktop for displaying information or controlling Amarok, for example, the widget. For details on how to add or download widgets, refer to Procedure “Adding Widgets to the Desktop” (↑KDE User Guide). | |
Apart from configuring basic settings, Amarok also allows you to customize most of the panels in the main window: you can define the way your collection is displayed, which information to see in the context view and how the tracks in the playlist on the right are shown.
Procedure 19.8. Customizing the Tab
To change the criteria according to which your collection is sorted and displayed, click the icon at the upper right corner of the tab.
Select one of the predefined criteria that are displayed at the top of the menu.
Alternatively, create your own sort options by using , , and .
Define if you want publication year and cover art of the albums to be displayed in the collection.
Procedure 19.9. Customizing the Context View
You can choose from a number of applets to be displayed in the context view. These allow you to access different types of information about the currently played track by clicking the respective applet. For example, the applet searches for the artist's name and displays the corresponding Wikipedia article in the context browser. shows the album cover (if available) and the listening statistics related to the current track. To automatically search for the of a track and display them in the context view, add the applet. This applet depends on one or more lyrics scripts configured for Amarok. To add any scripts, use the that is available from the menu in the Amarok main window.
To configure which applets should be displayed, click the wrench icon at the bottom right corner of the context view. The panel at the bottom of the context view changes and shows its configurations options.
To add an applet, click any of the icons.
Use the arrow icons to scroll through the list of available applets.
Click an entry to add the respective applet.
To move applets to a different place within the panel, hover the mouse pointer over the respective applet until the cursor turns into a crosslines-like form. Move the cursor to the desired position in the panel, then click again to insert the applet.
To remove an applet, click the applet's icon.
To leave the configuration mode and to lock the applets in their position, click the wrench icon.
Procedure 19.10. Customizing the Playlist
Amarok comes with several predefined layout settings for the playlist pane on the right, but you can also choose to create your own layout from scratch (or based on one of the default layouts).
To select one of the predefined layouts, click the wrench icon at the bottom of the playlist and select , or .
To create your own layout, click the wrench icon and select .
Click the default layouts in to see the options configured for each layout on the , and tabs on the right side.
Use the icons below to create a new playlist layout from scratch or to copy an existing layout as a basis for a new layout. Enter a name for the new layout.
On each of the tabs on the right, configure the elements Amarok should display by dragging and dropping the desired elements from the top row onto the respective tab.
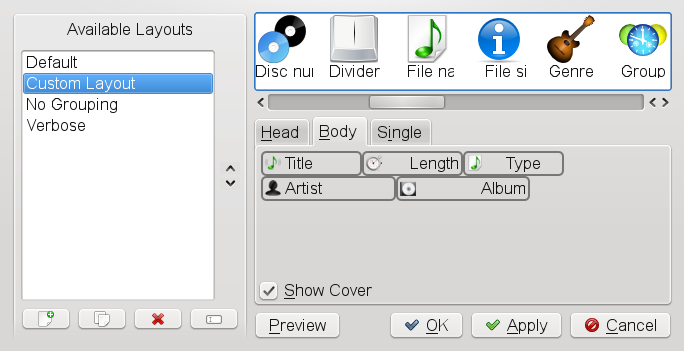
Change the position of an element on a tab by clicking it and moving it around.
To set format options like or or , , or , right-click an element and select the respective option.
To remove an element from a tab, drag it back to the top row.
If all options are set according to your wishes, leave the with to save the newly defined layout.
You can now switch to the new playlist layout at any time by clicking the wrench icon and selecting the layout's name from the context menu.
Like other KDE applications, Amarok adds an icon to the KDE system tray. You can use this icon to control a large number of Amarok's features. Hovering the mouse pointer over the icon displays information about the track currently played. By scrolling the mouse wheel simultaneously you can reduce or increase the playback volume. A single left-click closes the application window without affecting playback. Click again to reopen the window. Clicking with the middle mouse button pauses playback—middle-click again to resume playback. Right-clicking opens a context menu where you have access to the player controls and can exit Amarok.
Using the Shift and Ctrl keys together with the mouse gives you access to more advanced features. Holding Shift while scrolling the mouse wheel seeks through the current track. Holding Ctrl while scrolling the mouse wheel skips through tracks in the playlist.
You may also drag items and drop them on the tray icon to add them to the current playlist. A pop-up menu opens, asking whether to append the track to the playlist, append and play it, or queue it after the current track.
For more information about Amarok 2.x, refer to the following Web sites:
JuK is a jukebox application that lets you manage your music file collection and playlists. JuK maintains a list of all files it knows about. This is called the collection list. The list is specific to JuK and is not shared with other applications. Independent of the collection list are playlists. You can have as many playlists as you want and you can share your JuK playlists with other media players. You can also edit the tags of your music files.
JuK is included in the juk
package. If JuK is installed, start it from the main menu or press
Alt+F2 and
enter juk. On initial start-up you are prompted for
the folders Juk should scan for your music collection. Find more
information about JuK in the online help.
There are many ways to listen to your favorite music tracks. Either play a CD or play digitized versions of them. The following section features CD player applications as well as some applications that can be used for digitizing audio CDs.
For information about how to create your own CDs, refer to Chapter 22, K3b: Burning CDs and DVDs.
![[Important]](admon/important.png) | CDDA and Analog CD Playback |
|---|---|
There are two different ways of playing audio CDs. CD and DVD drives capable of analog CD playback read the audio data and send it to the sound output device. Some external drives connected via PCMCIA, FireWire, or USB need to use CDDA (Compact Disk Digital Audio) to extract the audio data first then play it as digital PCM. The players featured in the following sections do not support CDDA. Use XMMS if you need CDDA support. | |
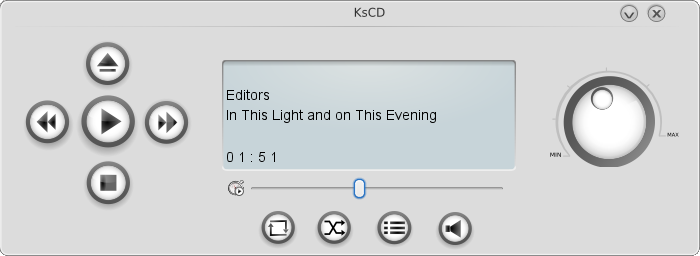
KsCD is an easy-to-use audio CD player included in the
skscd package. If it is
installed, press Alt+F2 and enter kscd to start the application.
Audio compression can be handled by various tools. The following sections feature a command line approach to encoding and playing audio data as well as some graphical applications capable of audio compression.
Konqueror is not only a browser and a file manager, it also allows you to rip audio CDs. Before you start the actual ripping process with Konqueror, configure the handling of audio CDs and the Ogg Vorbis encoder in the . From the main menu select , then click +. The configuration module is divided into three tabs: , , and . Normally, a suitable CD device is detected automatically. Do not change this default setting unless the autodetection fails and you need to set the CD device manually. Error correction and encoder priority can also be set here. The tab determines the quality of the encoding. To configure online lookup of album, track, and artist information for your ripped audio data, select .
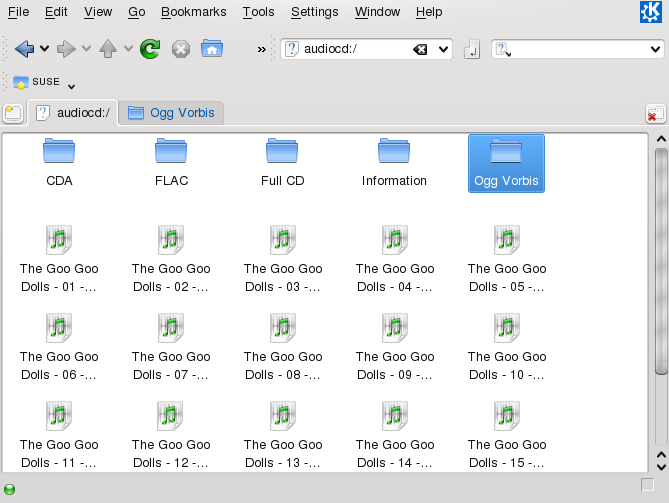
To start Konqueror, press Alt+F2 and enter konqueror.
Insert the CD into the CD-ROM drive and enter
audiocd:/ in the bar.
Konqueror then lists the tracks of the CD, and some folders.
To keep uncompressed audio data on your disk, just select the
.wav files and drag them into another Konqueror
window to copy them to their final destination. To start the Ogg Vorbis
encoding, drag the Ogg Vorbis folder or files from
this folder to another Konqueror window. The encoding starts as soon as
you drop the Ogg Vorbis folder at its destination.
Ogg Vorbis (package vorbis-tools) is a free
audio compression format that is now supported by the majority of audio
players and even portable MP3 players. The Web page of the project is
http://www.xiph.org/vorbis.
Your system comes with several tools supporting Ogg
Vorbis. oggenc is a command line tool used for
encoding WAV files to Ogg. Just run oggenc
to transform a given myfile.wav.wav file into Ogg Vorbis.
The -h option displays an overview of the other
parameters. Oggenc supports encoding with a variable bit rate. In this
way, an even higher degree of compression can be achieved. Instead of
the bit rate, specify the desired quality with the parameter
-q. -b determines the average bit
rate. -m and -M specify the minimum
and maximum bit rate.
ogg123 is a command line Ogg player. Start it with a command like
ogg123 mysong.ogg.
You can choose between several movie players shipped with your openSUSE. Kaffeine, for example, can be run with several back-ends, such as Xine and MPlayer.
To start Kaffeine, press Alt+F2 and enter kaffeine.
The formats you can view with Kaffeine depends on the back-end (by default, Xine is used). Xine interprets many of the most common multimedia formats available. For more information, refer to http://www.xine-project.org/.
In case the format is not supported by the player's engine, openSUSE offers to search for a suitable codec which you can then install with YaST.
Kaffeine can also play multimedia streamed over the Internet, and can be used as a plug-in for Konqueror. It provides the usual options for playing files in full screen mode, navigating through files, and more. You can also take a snapshot of the video and save it as an image.
KDE 4 also ships with Dragon Player, included in the
dragonplayer) package.
Dragon Player uses the Phonon, which is a multimedia API that connects to
any of several multimedia frameworks. If Dragon Player is installed,
start it by pressing Alt+F2 and entering dragon.
For more information on using Dragon Player, refer to the online help.
In case you do not get any audio output, check the following:
- Sound Card Configured?
Check if your sound card is properly configured with YaST. For more information, see Abschnitt „Einrichten von Soundkarten“ (Kapitel 2, Einrichten von Hardware-Komponenten mit YaST, ↑Start).
- Volume Control in Mixer Application?
Check the volume control of the master channel and the other channels available in a mixer application. For more information, see Section 19.1, “Mixers”.
- Volume Control via Keyboard?
Many keyboards also have keys for controlling the volume. Check the volume control keys of your keyboard.
- Volume Control of the Application?
Most multimedia applications also provide volume controls. Check the volume control in the application that you use to play music or movie files.
- Sound Configuration in ?
Check the defaults for the sound system configuration in the . Access them from the main menu by selecting . In the , click to open the .
- External Devices Plugged In Properly?
In case you have external devices like loudspeaker or headphones connected to your machine, check that they are plugged in properly and that they are connected to the right ports.
For more information, also refer to which provides an overview of many common problems and possible solutions.