Contents
Evolution™ makes the tasks of storing, organizing, and retrieving your personal information easy, so you can work and communicate more effectively with others. It’s a highly evolved groupware program and an integral part of the Internet-connected desktop.
Evolution can help you work in a group by handling email, addresses, and other contact information, and one or more calendars. It can do that on one or several computers, connected directly or over a network, for one person or for large groups.
With Evolution, you can accomplish your most common daily tasks. For example, it takes only one or two clicks to enter appointment or contact information sent to you by email, or to send email to a contact or appointment. People who get lots of email will appreciate advanced features like search folders, which let you save searches as though they were ordinary email folders.
This chapter introduces you to Evolution and helps you get started. For more details, refer to the Evolution documentation.
To start the Evolution client click +, or typeevolution in a terminal window.
The first time you run Evolution, it creates a directory called
.evolution in your home directory, where it stores
all of its local data. Then, it opens a Setup Assistant to help you set
up email accounts and import data from other applications.
With the Setup Assistant you can get started in only two to five minutes .
Later on, if you want to change this account, or if you want to create a new one, click +, then click . Select the account you want to change, then click . To add a new account you can also click .
The Setup Assistant helps you to provide all the required information .
The Identity window is the first step in the assistant.
Here, you enter some basic personal information. You can define multiple identities later by clicking +, then clicking .
When the First-Run Assistant starts, the Welcome page is displayed. Click to proceed to the Identity window.
Type your full name in the field.
Type your email address in the field.
(Optional) Select if this account is your default account.
(Optional) Type a reply to address in the field.
Use this field if you want replies to emails sent to a different address.
(Optional) Type your organization name in the field.
This is the company where you work, or the organization you represent when you send email.
Click .
The Receiving E-mail option lets you determine the server where you want to receive your email.
You need to specify the type of server you want to receive mail with. If you are not sure about the type of server, contact your system administrator or ISP.
Select a server type in the list.
The following is a list of available server types:
Novell GroupWise: Select this option if you want to connect to Novell® GroupWise®. Novell GroupWise keeps email, calendar, and contact information on the server.
Microsoft Exchange: Available only if you have installed the connector for Microsoft* Exchange. You can connect to a Microsoft Exchange 2000, 2003 or 2007 server, which stores email, calendar, and contact information on the server.
IMAP: Keeps the email on your server so you can access your email from multiple systems.
IMAP4rev1: Keeps the email on your server so you can access your email from multiple systems.
POP: Downloads your email to your hard disk for permanent storage, freeing up space on the email server.
USENET News: Connects to the news server and downloads a list of available news digests.
Local Delivery: If you want to move email from the spool and store it in your home directory, you need to provide the path to the mail spool you want to use. If you want to leave mail in your system’s spool files, choose the Standard Unix Mbox Spool option instead.
MH Format Mail Directories: If you want to download your email using mh or another MH-style program, you need to provide the path to the mail directory you want to use.
Maildir Format Mail Directories: If you download your email using Qmail or another maildir-style program, you should use this option. You need to provide the path to the mail directory you want to use.
Standard Unix Mbox Spool or Directory: If you want to read and store email in the mail spool on your local system, choose this option. You need to provide the path to the mail spool you want to use.
None: If you do not plan to check email with this account, select this option. There are no configuration options.
If you have selected Novell GroupWise, IMAP, POP, or USENET News as your server, you need to specify additional information.
Type the hostname of your email server in the field.
If you are not sure about the hostname, contact your system administrator.
Type your username for the account in the field.
Select a secure (SSL) connection.
If your server supports secure connections, enable this security option. If you are not sure about secure connections, contact your system administrator.
Select your authentication type in the list.
or
Click to have Evolution check for supported types. Some servers do not announce the authentication mechanisms they support, so clicking this button is not a guarantee that available mechanisms actually work.
If you are not sure about the required server type, contact your system administrator.
Select if you want Evolution to remember your password.
Click .
(Conditional) If you chose Microsoft Exchange, provide your username in the field and your Outlook Web Access (OWA) URL in the field. OWA URL and user names should be entered as in OWA. If the mailbox path is different from the username, the OWA path should include the mailbox path also. You should see something similar to this: http://<server name>/exchange/<mail box path>
When you have finished, continue with Section 6.1.1.3, “Receiving Mail Options”.
If you selected , , , or , you must specify the path to the local files in the path field. Continue with Section 6.1.1.3, “Receiving Mail Options”.
After you have selected a mail delivery mechanism, you can set some preferences for its behavior.
If you select Novell GroupWise as your receiving server type, you need to specify the following options:
Select if you want Evolution to automatically check for new mail.
If you select this option, you need to specify how often Evolution should check for new messages.
Select if you want to check for new messages in all folders.
Select if you want to apply filters to new messages in the Inbox on the server.
Select if you want to check new messages for junk content.
Select if you want to only check for junk messages in the Inbox folder.
Select if you want to automatically synchronize remote mail locally.
Type your Post Office Agent SOAP port in the field.
If you are not sure what your Post Office Agent SOAP port is, contact your system administrator.
Click .
When you have finished, continue with Section 6.1.1.4, “Sending Mail”.
If you select Microsoft Exchange as your receiving server type, you need to specify the following options.
Select if you want Evolution to automatically check for new mail.
If you select this option, you need to specify how often Evolution should check for new messages.
Specify the Global Catalog server name in the field.
The Global Catalog Server contains the user information for users. If you are not sure what your Global Catalog server name is, contact your system administrator.
Select if you want to limit the number of Global Address Lists (GAL).
The GAL contains a list of all email addresses. If you select this option, you need to specify the maximum number of responses.
Select if you want the password expire warning period.
If you select this option, you need to specify how often Evolution should send the password expire message.
Select if you want to automatically synchronize remote mail locally.
Click .
When you have finished, continue with Section 6.1.1.4, “Sending Mail”.
If you select IMAP or IMAP4rev1 as your receiving server type, you need to specify the following options:
Select if you want Evolution to automatically check for new mail.
If you select this option, you need to specify how often Evolution should check for new messages.
Select if you want Evolution to use custom commands to connect to Evolution.
If you select this option, specify the custom command you want Evolution to use.
Select if you want Evolution to show only subscribed folders.
Subscribed folders are folders that you have chosen to receive mail from by subscribing to them.
Select if you want Evolution to override server-supplied folder namespaces.
By choosing this option you can rename the folders that the server provides. If you select this option, you need to specify the namespace to use.
Select if you want to apply filters to new messages in the Inbox.
Select if you want to check new messages for junk content.
Select if you want to check for junk messages in the Inbox folder.
Select if you want to automatically synchronize remote mail locally.
Click .
When you have finished, continue with Section 6.1.1.4, “Sending Mail”.
If you select POP as your receiving server type, you need to specify the following options:
Select if you want Evolution to automatically check for new mail. If you select this option, you need to specify how often Evolution should check for new messages.
Select if you want to leave messages on the server.
Select if you want to disable support for all POP3 extensions (support for POP3).
Click .
When you have finished, continue with Section 6.1.1.4, “Sending Mail”.
If you select USENET News as your receiving server type, you need to specify the following options:
Select if you want Evolution to automatically check for new mail. If you select this option, you need to specify how often Evolution should check for new messages.
Select if you want to show folders in short notation.
For example, comp.os.linux would appear as c.o.linux.
Select if you want to show relative folder names in the subscription dialog box.
If you select to show relative folder names in the subscription page, only the name of the folder is displayed. For example the folder evolution.mail would appear as evolution.
Click .
When you have finished, continue with Section 6.1.1.4, “Sending Mail”.
If you select Local Delivery as your receiving server type, you need to specify the following options:
Select if you want Evolution to automatically check for new mail. If you select this option, you need to specify how often Evolution should check for new messages.
Click .
When you have finished, continue with Section 6.1.1.4, “Sending Mail”.
If you select MH-Format Mail Directories as your receiving server type, you need to specify the following options:
Select if you want Evolution to automatically check for new mail. If you select this option, you need to specify how often Evolution should check for new messages.
Select if you want to user the
.folderssummary file.Click .
When you have finished, continue with Section 6.1.1.4, “Sending Mail”.
If you select Maildir-Format Mail Directories as your receiving server type, you need to specify the following options:
Select if you want Evolution to automatically check for new mail. If you select this option, you need to specify how often Evolution should check for new messages.
Select if you want to apply filters to new messages in the Inbox.
Click .
When you have finished, continue with Section 6.1.1.4, “Sending Mail”.
If you select Standard Unix Mbox Spool or Directory as your receiving server type, you need to specify the following options:
Select if you want Evolution to automatically check for new mail. If you select this option, you need to specify how often Evolution should check for new messages.
Select if you want to apply filters to new messages in the Inbox.
Select if you want to store status headers in Elm, Pine, and Mutt formats.
Click .
When you have finished, continue with Section 6.1.1.4, “Sending Mail” Section 6.1.1.4, “Sending Mail”.
Now that you have entered information about how you plan to get mail, Evolution needs to know about how you want to send it.
Select a server type from the list.
The following server types are available:
Send Mail: Uses the Sendmail program to send mail from your system. Sendmail is more flexible, but is not as easy to configure, so you should select this option only if you know how to set up a Sendmail service.
SMTP: Sends mail using an outbound mail server. This is the most common choice for sending mail. If you choose SMTP, there are additional configuration options.
Type the host address in the field.
If you are not sure what your host address is, contact your system administrator.
Select if your server requires authentication.
If you selected that your server requires authentication, you need to provide the following information:
Select your authentication type in the list.
or
Click to have Evolution check for supported types. Some servers do not announce the authentication mechanisms they support, so clicking this button is not a guarantee that available mechanisms actually work.
Type your username in the field.
Select if you want Evolution to remember your password.
Select if you use a secure connection (SSL).
Click .
Continue with Section 6.1.1.5, “Account Management”.
Now that you have finished the email configuration process you need to give the account a name. The name can be any name you prefer. Type your account name on the field, then click .
Continue with Section 6.1.1.6, “Time Zone”.
In this step, you need to select your time zone either on the map or select from the time zone drop-down list.
When you have finished, click , then click . Evolution opens with your new account created.
If you want to import email from another client, continue with Section 6.1.1.7, “Importing Mail (Optional)”. If not, skip to Section 6.2, “Using Evolution: An Overview”.
If Evolution finds email or address files from another application, it offers to import them.
Microsoft Outlook* (and versions of Outlook Express after version 4), use proprietary formats that Evolution cannot read or import. To import information, you might want to use the Export tool under Windows*.
Before importing email from Netscape*, make sure you have selected +. If you don’t, Evolution will import and undelete the messages in your Trash folders.
![[Note]](admon/note.png) | |
Evolution uses standard file types for email and calendar information,
so you can copy those files from your
Contacts files are stored in a database, but can be saved as a standard vCard*. To export contact data, open your contacts tool and select the contacts you want to export (press Ctrl+A to select them all). Click +. | |
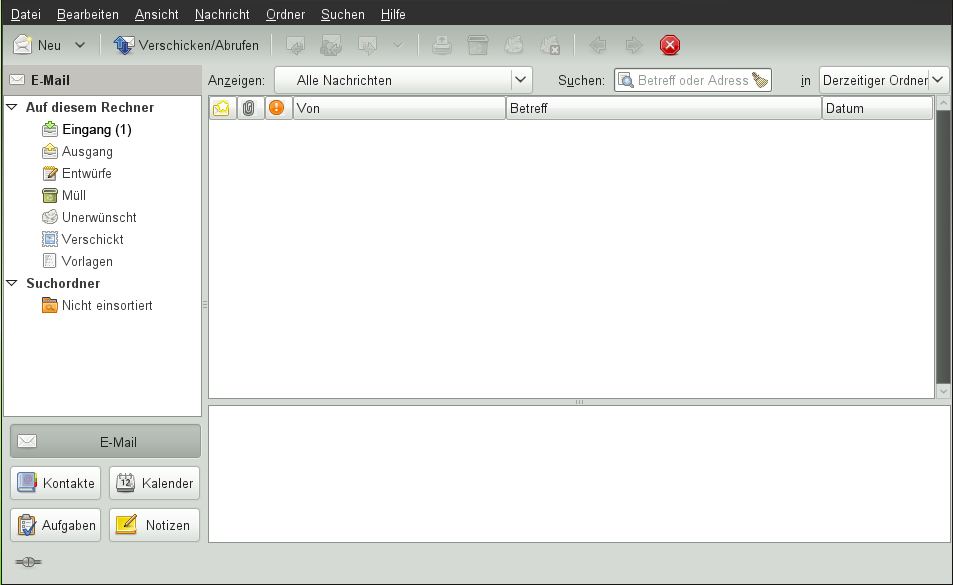
Now that the first-run configuration has finished, you’re ready to begin using Evolution. Here’s a quick explanation of what’s happening in your main Evolution window.
Menu Bar
The menu bar gives you access to nearly all of Evolution features.
Folder List
The folder list gives you a list of the available folders for each account. To see the contents of a folder, click the folder name. The contents are displayed in the email list.
Toolbar
The toolbar gives you fast and easy access to the frequently used features in each component.
Search Tool
The search tool lets you search for emails either in the current account or in all accounts. You can filter emails, contacts, calendar entries and tasks using different criteria. The Search tool can also save frequently used searches to a search folder.
Message List
The message list displays a list of emails that you have received. The radio button above the list lets you view mesasages according to predifened and custom labels. To view an email in the preview pane, click the email in the email list.
Shortcut Bar
The shortcut bar lets you switch between folders. At the bottom of the shortcut bar there are tool buttons that let you switch tools, and above that is a list of all the available folders for the current tool. If you have the Evolution Connector for Microsoft Exchange installed, you have an Exchange button in addition to buttons for the other tools.
Status Bar
The status bar periodically displays a message, or tells you the progress of a task. This most often happens when you’re checking or sending email. These progress queues are shown in the previous figure. The Online/Offline indicator is here, too, in the lower left of the window.
Preview Pane
The preview pane displays the contents of the emails that are selected in the email list.
The menu bar’s contents always provide all the possible actions for any given view of your data. If you’re looking at your Inbox, most of the menu items relate to email. Some content relates to other components of Evolution and some, especially those in the File menu, relates to the application as a whole.
File: Anything related to a file or to the operations of the application usually falls under this menu, such as creating things, saving them to disk, printing them, and quitting the program itself.
Edit: Contains useful tools that help you edit text and move it around. Lets you access the settings and configuration options in the Edit menu.
View: Lets you decide how Evolution should look. Some of the features control the appearance of Evolution as a whole, and others the way a particular kind of information appears.
Folder: Contains actions that can be performed on folders. You can find things like copy, rename, delete, and so on.
Message: Contains actions that can be applied to a message. If there is only one target for the action (such as replying to a message), you can normally find it in the Message menu.
Search: Lets you search for messages, or phrases within a message. You can also see previous searches you have made. In addition to the Search menu, there is a text entry box in the toolbar that you can use to search for messages. You can also create a search folder from a search.
Help: Opens the Evolution Help files.
Evolution’s most important job is to give you access to your information and help you use it quickly. One way it does that is through the shortcut bar, which is the column on the left side of the main window. The buttons, such as Mail and Contacts, are the shortcuts. Above them is a list of folders for the selected Evolution tool.
The folder list organizes your email, calendars, contact lists, and task lists in a tree, similar to a file tree. Most people find one to four folders at the base of the tree, depending on the tool and their system configuration. Each Evolution tool has at least one, called On This Computer, for local information. For example, the folder list for the email tool shows any remote email storage you have set up, plus local folders and search folders.
If you get large amounts of email, you might want to create more folders than just your Inbox. You can create multiple email folders, address books, calendars, task lists, or memo lists.
To create a new folder:
Click +.
Type the name of the folder in the field.
Select the location of the new folder.
Click .
Right-click a folder or subfolder to display a menu with the following options:
New Folder: Creates a new folder or subfolder in the same location.
Copy: Copies the folder to a different location. When you select this item, Evolution offers a choice of locations to copy the folder to.
Move: Moves the folder to another location.
Delete: Deletes the folder and all contents.
Mark Messages As Read: Marks all the messages in the folder as read.
Rename: Lets you change the name of the folder.
Refresh: Refreshes the folder.
Disable: Disables the account.
Properties: Checks the number of total and unread messages in a folder and, for remote folders, lets you select whether to copy the folder to your local system for offline operation.
You can also rearrange folders and messages by dragging and dropping them.
Any time new email arrives in a email folder, that folder label is displayed in bold text, along with the number of new messages in that folder.
Evolution email is like other email programs in several ways:
It can send and receive email in HTML or as plain text, and makes it easy to send and receive multiple file attachments.
It supports multiple email sources, including IMAP, POP3, and local mbox or mh spools and files created by other email programs.
It can sort and organize your email in a wide variety of ways with folders, searches, and filters.
It lets you guard your privacy with encryption.
However, Evolution differs from other email programs in some very essential ways. First, it’s built to handle very large amounts of email. The junk email, message filtering and searching functions were built for speed and efficiency. There’s also the search folder, an advanced organizational feature not found in some email clients. If you get a lot of email, or if you keep every message you get in case you need to refer to it later, you’ll find this feature especially useful. Here’s a quick explanation of what’s happening in your main Evolution email window. You can also run Evolution now in Windows.
Message List
The message list displays all the emails that you have. This includes all your read and unread messages and email that is flagged to be deleted. With the Show radio button above the message you can filter the message list view using several predifned and custom labels.
Preview Pane
This is where your email is displayed.
If you find the preview pane too small, you can resize the pane, enlarge the whole window, or double-click the message in the message list to have it open in a new window. To change the size of a pane, drag the divider between the two panes.
As with folders, you can right-click messages in the message list and get a menu of possible actions, including moving or deleting them, creating filters or search folders based on them, and marking them as junk mail.
Email-related actions, like Reply and Forward, appear as buttons in the toolbar and are also located in the right-click menu and as keyboard shortcuts.
Templates
Evolution allows you to create and edit message templates that you can use at any time to send mail with the same pattern.
To begin using the calendar, click Calendar in the shortcut bar. By default, the calendar shows today’s schedule on a ruled background. At the upper right, there’s a Tasks list, where you can keep a list of tasks separate from your calendar appointments. Below that, there’s a list for memos.
Appointment List
The appointment list displays all your scheduled appointments.
Month Pane
The month pane is a small view of a calendar month. You can also select a range of days in the month pane to display a custom range of days in the appointment list.
Tasks
Tasks are distinct from appointments because they generally don’t have times associated with them. You can see a larger view of your task list by clicking Tasks in the shortcut bar.
Memos
Memos, like Tasks, don’t have times associated with them. You can see a larger view of your Memo list by clicking Memos in the shortcut bar.
The Evolution contacts tool can handle all of the functions of an address book or phone book. However, it’s easier to update Evolution than it is to change an actual paper book, in part because Evolution can synchronize with Palm OS* devices and use LDAP directories on a network.
Another advantage of the Evolution contacts tool is its integration with the rest of the application. For example, you can right-click on an email address in Evolution mail to instantly create a contact entry.
To use the contacts tool, click in the shortcut bar. By default, the display shows all your contacts in alphabetical order, in a minicard view. You can select other views from the menu, and adjust the width of the columns by clicking and dragging the gray column dividers.
The largest section of the contacts display shows a list of individual contacts. You can also search the contacts in the same way that you search email folders, using the search tool on the right side of the toolbar.
Get more information about Evolution from the official knowledge base available via F1. More useful information is available from the following links:
| Offical project homepage: http://projects.gnome.org/evolution/ |
| Wiki reference: http://www.go-evolution.org/Main_Page |