Contents
You can sign or encrypt data with KGpg, a graphical user interface for GnuPG. This program helps you to generate and manage all needed keys. Use its editor function for the quick creation and encryption of files or use the applet in your panel to encrypt or decrypt by dragging and dropping. Other programs, such as your mail program (Kontact or Evolution), access the key data to process signed or encrypted contents. In the following sections, learn how to execute the following steps necessary for signing and encrypting data with KGpg:
- Signing
Signing means attaching electronic signatures to mails (or even software) to prove its origin. To avoid someone writing mails using your name and to protect both you and the recipients, you should sign your mails. Signatures help you to easily check the sender of the mails you receive and to distinguish authentic from malicious mails.
Software developers sign their software so you are able to check its integrity. Even if you have the software from an unofficial server, you can verify the package with the signature.
- Encrypting
You might have sensitive information you want to protect from other parties. Encrypting helps you to transform data and make it unreadable for others. This is especially important for companies who must protect internal information as well as the employees' privacy.
To be able to exchange encrypted messages with other users, first generate your own key pair. One part of it—the public key—is distributed to your communication partners, who can use it to encrypt the files or e-mail messages they send. The other part of the key pair—the private key—is used to decrypt the encrypted contents.
![[Important]](admon/important.png) | Private Key versus Public Key |
|---|---|
Only you should have access to the private key. Do not grant other users access to this data. Your private key is protected with a passphrase. Choose the passphrase carefully: do not use words from a dictionary, and mix alphabetic with non-alphabetic characters. | |
To create a new pair, proceed as follows:
Start KGpg from the main menu or press Alt+F2 and enter kgpg. When you start the program for the first time, a wizard appears, guiding you through the configuration. Follow the instructions up to the point where you are prompted to create a key.
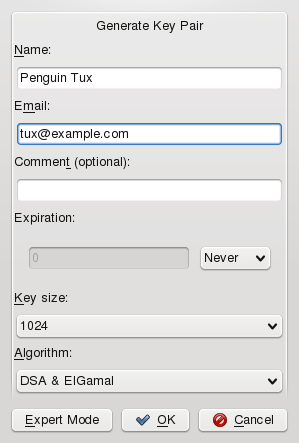
Select +, if you want to create a new key pair.
Enter a name, an e-mail address, and optionally, a comment. If you do not like the default settings provided, also set the expiration time for the key, the key size, and the encryption algorithm used.
To generate a standard key, confirm your settings with . After clicking , a dialog prompts you to enter a passphrase twice. The passphrase protects your private key. The relative strength of your chosen password is measured and displayed by the . The key pair will be generated. This can take some time.
![[Note]](admon/note.png)
Expert Mode If you are an experienced user, use the to define additional options. This takes you to a terminal window where you can set the type of key to be generated, the key size (in bits) and the date of expiration. After entering your name and email address, you are prompted for a passphrase to protect your private key.
After the key generation is finished, a summary will be displayed. Save and print the revocation certificate and keep it in a save place. You will need the certificate to revoke your passphrase if you forgot it. After you have confirmed with , KGpg displays its main window and you are finished.
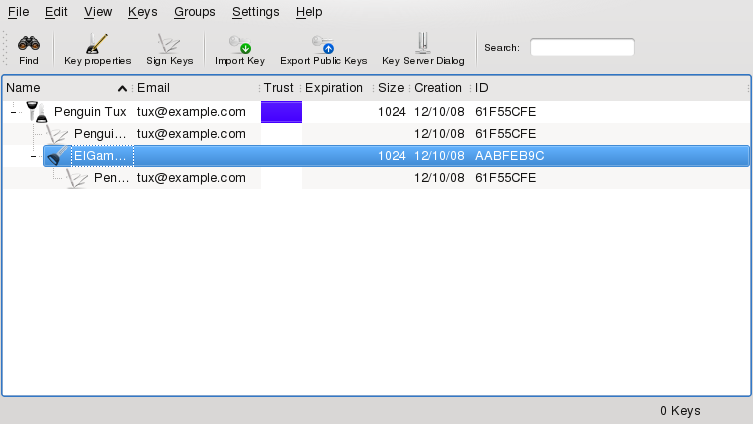
The main window shows the keys that belong to your key ring: your own key and the keys from other persons that you have already imported. As GnuPG uses a more sophisticated implementation of key pairs, for each user name, several sub keys are displayed but these can be neglected for the purpose of this chapter. Apart from some other details (like expiration date or creation date of the key and the ID), the main windows also shows the level of trust for each key, indicated by colors. White means that the trust level is unknown, blue indicates a high level of trust. For more information, see Section 7.4.2, “Trusting Keys”.
| KGpg Icon and Main Window |
|---|---|
When you start KGpg in later sessions, only a small icon with a padlock appears in the system tray. Click that icon to display the main KGpg window on your desktop. | |
After generating your key pair, make the public key available to other users. This enables them to use it to encrypt or sign the messages or files they send you. For example, if you want to encrypt a message for user tux, you encrypt it using tux' public key. To decrypt the message, tux uses his private key. If tux wants to send you a message, he encrypts it using your public key and you decrypt the message with your private key.
To make the public key available for others, select +. The dialog that opens offers four options:
Your public key is sent to a recipient of your choice by email. If you activate this option and confirm with , the dialog for creating a new email message with your default mail program appears. Enter the recipient and click . The recipient receives your key and can then send you encrypted contents.
You can place your public key here before continuing to process it.
To make your public key available to a wide audience, export it to one of the key servers on the Internet. For more information, refer to Section 7.5, “The Key Server Dialog”.
If you prefer to distribute your key as a file on a data medium instead of sending it by email, click this option, confirm or change the file path and name, and click .
If you receive a key in a file (for example, as an e-mail attachment), integrate it in your key ring with and use it for encrypted communication with the sender. You can also import keys from a public server if the person you want to communicate with has stored his public key there. For more information, see Section 7.5, “The Key Server Dialog”. The procedure is similar to the procedure for exporting keys already described.
Keys can be signed like every other file to guarantee their authenticity and integrity. If you are absolutely sure an imported key belongs to the individual specified as the owner, express your trust in the authenticity of the key with your signature.
| Establishing a Web of Trust |
|---|---|
Encrypted communication is only secure to the extent that you can positively associate public keys in circulation with the specified user. By cross-checking and signing these keys, you contribute to the establishment of a Web of Trust. For these reasons, make really sure you only sign keys you have personally checked. | |
Before you can use your key, you need to sign it yourself.
Procedure 7.1. Signing A Key
Select the key to sign in the key list in the window.
Select +.
Select the private key to use for the signature. An alert reminds you to check the authenticity of this key before signing it. In the drop down list, select how you carefully you have checked that the key belongs to the person with whom you want to communicate.
Click and enter your passphrase in the next step. With entering the passphrase, you sign the key with your own private key. The signed key now appears green in the trust column.
Other users can now check the signature by means of your public key.
Normally, you are asked by the corresponding program whether you trust the key, or rather, whether you assume it is really used by its authorized owner. This happens each time a message needs to be decrypted or a signature has to be checked. To avoid this, edit the trust level of the newly imported key. To trust a key and set a certain trust level, do the following:
Right-click the key and select .
Adjust the trust level in the drop-down list. This value indicates how much you trust the owner of this key to correctly verify the identity of the keys he signs.
Close the property dialog. If you have set the trust level to or , the key now appears blue in the trust column.
The lower the trust level is, the less you trust the signer of the key to have checked the true identity of the keys signed. You may be entirely sure about the signer's identity, but this user may not check other people's identities properly before signing their keys. Notice that the trust level does not trigger any automatic actions by KGpg.
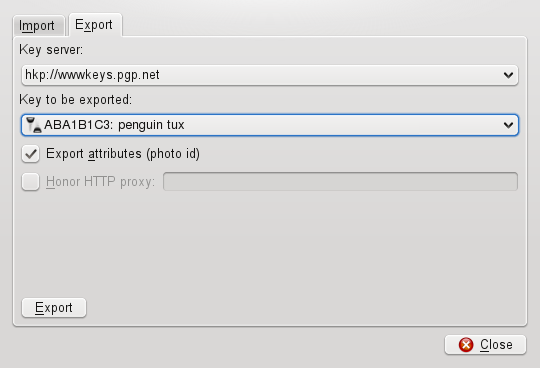
Several Internet-based key servers offer the public keys of many users. To engage in encrypted communication with a large number of users, use these servers to distribute your public key. For this purpose, export your public key to one of these servers. Similarly, KGpg enables you to search one of these servers for the keys of certain people and import their public keys from the server. Open the key server dialog with +.
By means of the tab in the key server dialog, import public keys from one of the Internet-based key servers. Select one of the preconfigured key servers and enter a search string (e-mail address of the communication partner) or the ID of the key to find. When you click , your system connects to the Internet and searches the specified key server for a key that matches your specifications.
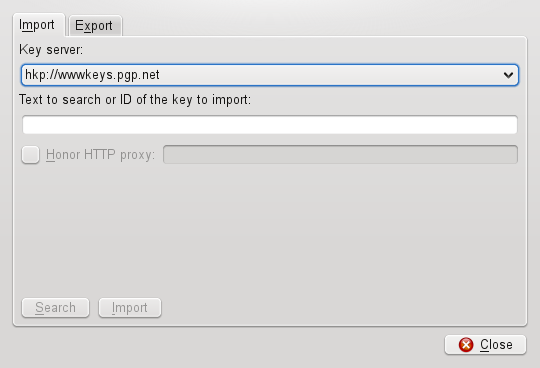
If your search on the key server is successful, a list of all retrieved server entries is displayed in a new window. Select the key to include in your key ring and click . Confirm the following message with , then exit the key server dialog with . The imported key then appears in the main overview of the key manager and is ready for use.
After you have generated your key pair, exported your public key and imported public keys from others, you can also send or receive encrypted mails. Refer to Section 5.2.5, “Signing and Encrypting emails” to learn how to make use of those options in KMail.
KGpg also offers the possibility to encrypt text. To open the integrated editor choose +.
KGpg is also integrated into file managers like Dolphin or Konqueror.
Generally, PGP-encrypted files are designated with the suffix
asc. There are several options how to encrypt or
decrypt files inside a File Manager:
To encrypt a file inside a File Manager, right-click the file and select +. Choose one of the trusted keys in the dialog. After clicking in the dialog, a new file with the
ascsuffix will be created in the same directory.To decrypt an encrypted file instantly, right-click the file and select . If the original filename already exists, a dialog opens that asks how to name the file or if it should be overwritten. KGpg prompts for the password of your private key and saves the decrypted file in the same directory.
To decrypt an encrypted file with the editor, right-click the file in the File Manager and select +.
Instead of creating contents for encryption in an external editor then encrypting the file with one of the methods described above, you can use the integrated editor of KGpg. To open the editor, select +. In the editor, enter the desired text (or copy it into the editor from the clipboard or any file), and click . Then select the key to use and complete the encryption procedure. To decrypt files, use and enter the password associated with the key.
Generating and checking signatures is just as easy as encrypting directly from the editor. Go to + and select the file to sign from the file dialog. Select the private key to use and enter the associated password. KGpg informs you of the successful generation of the signature. Files can also be signed from the editor by simply clicking . To check a signed file, go to + and select the file to check in the following dialog. After you confirm the selection, KGpg checks the signature and reports the result of the operation. Another possibility is to load the signed file into the editor and click .
For comprehensive background information about the encryption method, refer to the GnuPG project pages at http://www.gnupg.org/documentation/index.en.html.