Chapter 34. Wireless LAN
Contents
Wireless LANs, or Wireless Local Area Network (WLANs), have become an indispensable aspect of mobile computing. Today, most laptops have built-in WLAN cards. This chapter describes how to set up a WLAN card with YaST, encrypt transmissions, and use tips and tricks. Alternatively, you can configure and manage WLAN access with NetworkManager. For details, refer to Chapter 35, Using NetworkManager.
34.1. WLAN Standards
WLAN cards communicate using the 802.11 standard, prepared by the IEEE organization. Originally, this standard provided for a maximum transmission rate of 2 Mbit/s. Meanwhile, several supplements have been added to increase the data rate. These supplements define details such as the modulation, transmission output, and transmission rates (see Table 34.1, “Overview of Various WLAN Standards”). Additionally, many companies implement hardware with proprietary or draft features.
Table 34.1. Overview of Various WLAN Standards
|
Name |
Band (GHz) |
Maximum Transmission Rate (Mbit/s) |
Note |
|---|---|---|---|
|
802.11 Legacy |
2.4 |
2 |
Outdated; virtually no end devices available |
|
802.11a |
5 |
54 |
Less interference-prone |
|
802.11b |
2.4 |
11 |
Less common |
|
802.11g |
2.4 |
54 |
Widespread, backwards-compatible with 11b |
|
802.11n |
2.4 and/or 5 |
300 |
Common |
802.11 Legacy cards are not supported by openSUSE®. Most cards using 802.11a, 802.11b, 802.11g and 802.11n are supported. New cards usually comply with the 802.11n standard, but cards using 802.11g are still available.
34.2. Operating Modes
In wireless networking, various techniques and configurations are used to ensure fast, high-quality, and secure connections. Different operating types suit different setups. It can be difficult to choose the right authentication method. The available encryption methods have different advantages and pitfalls.
Basically, wireless networks can be classified into three network modes:
- Managed Mode (Infrastructure Mode), via Access Point
Managed networks have a managing element: the access point. In this mode (also referred to as infrastructure mode), all connections of the WLAN stations in the network run through the access point, which may also serve as a connection to an ethernet. To make sure only authorized stations can connect, various authentication mechanisms (WPA, etc) are used.
- Ad-hoc Mode (Peer-to-Peer Network)
Ad-hoc networks do not have an access point. The stations communicate directly with each other, therefore an ad-hoc network is usually faster than a managed network. However, the transmission range and number of participating stations are greatly limited in ad-hoc networks. They also do not support WPA authentication. If you are intending to use WPA security, then you should not use Ad-Hoc_Mode.
- Master Mode
In master mode your network card is used as the access point. It works only if your WLAN card supports this mode. Find out the details of your WLAN card on http://linux-wless.passys.nl.
34.3. Authentication
Because a wireless network is much easier to intercept and compromise than a wired network, the various standards include authentication and encryption methods. In the original version of the IEEE 802.11 standard, these are described under the term WEP (Wired Equivalent Privacy). However, because WEP has proven to be insecure (see Section 34.6.3, “Security”), the WLAN industry (joined under the name Wi-Fi Alliance) has defined an extension called WPA, which is supposed to eliminate the weaknesses of WEP. The later IEEE 802.11i standard includes WPA and some other authentication and encryption methods. IEEE 802.11i is also referred to as WPA2, because WPA is based on a draft version of 802.11i.
To make sure that only authorized stations can connect, various authentication mechanisms are used in managed networks:
- None (Open)
An open system is a system that does not require authentication. Any station can join the network. Nevertheless, WEP encryption can be used, see Section 34.4, “Encryption”.
- Shared Key (according to IEEE 802.11)
In this procedure, the WEP key is used for the authentication. However, this procedure is not recommended, because it makes the WEP key more susceptible to attacks. All an attacker needs to do is to listen long enough to the communication between the station and the access point. During the authentication process, both sides exchange the same information, once in encrypted form and once in unencrypted form. This makes it possible for the key to be reconstructed with suitable tools. Because this method makes use of the WEP key for the authentication and for the encryption, it does not enhance the security of the network. A station that has the correct WEP key can authenticate, encrypt, and decrypt. A station that does not have the key cannot decrypt received packets. Accordingly, it cannot communicate, regardless of whether it had to authenticate itself.
- WPA-PSK (or WPA-Personal, according to IEEE 802.1x)
WPA-PSK (PSK stands for preshared key) works similarly to the Shared Key procedure. All participating stations as well as the access point need the same key. The key is 256 bits in length and is usually entered as a passphrase. This system does not need a complex key management like WPA-EAP and is more suitable for private use. Therefore, WPA-PSK is sometimes referred to as WPA “Home”.
- WPA-EAP (or WPA-Enterprise, according to IEEE 802.1x)
Actually, WPA-EAP (Extensible Authentication Protocol) is not an authentication system but a protocol for transporting authentication information. WPA-EAP is used to protect wireless networks in enterprises. In private networks, it is scarcely used. For this reason, WPA-EAP is sometimes referred to as WPA “Enterprise”.
WPA-EAP needs a Radius server to authenticate users. EAP offers three different methods for connecting and authenticating to the server:
Transport Layer Security (EAP-TLS): TLS authentication relies on the mutual exchange of certificates for both server and client. First, the server presents its certificate to the client where it is evaluated. If the certificate is considered valid, the client in turn presents its certificate to the server. While TLS is secure, it requires a working certification management infrastructure in your network. This infrastructure is rarely found in private networks.
Tunneled Transport Layer Security (EAP-TTSL)
Protected Extensible Authentication Protocol (EAP-PEAP): Both TTLS and PEAP are two-stage protocols. In the first stage, a secure connection is established and in the second the client authentication data is exchanged. They require far less certification management overhead than TLS, if any.
34.4. Encryption
There are various encryption methods to ensure that no unauthorized person can read the data packets that are exchanged in a wireless network or gain access to the network:
- WEP (defined in IEEE 802.11)
This standard makes use of the RC4 encryption algorithm, originally with a key length of 40 bits, later also with 104 bits. Often, the length is declared as 64 bits or 128 bits, depending on whether the 24 bits of the initialization vector are included. However, this standard has some weaknesses. Attacks against the keys generated by this system may be successful. Nevertheless, it is better to use WEP than to not encrypt the network at all.
Some vendors have implemented the non-standard “Dynamic WEP”. It works exactly as WEP and shares the same weaknesses, except that the key is periodically changed by a key management service.
- TKIP (defined in WPA/IEEE 802.11i)
This key management protocol defined in the WPA standard uses the same encryption algorithm as WEP, but eliminates its weakness. Because a new key is generated for every data packet, attacks against these keys are fruitless. TKIP is used together with WPA-PSK.
- CCMP (defined in IEEE 802.11i)
CCMP describes the key management. Usually, it is used in connection with WPA-EAP, but it can also be used with WPA-PSK. The encryption takes place according to AES and is stronger than the RC4 encryption of the WEP standard.
34.5. Configuration with YaST
![[Important]](admon/important.png) | Security Risks in Wireless Networks |
|---|---|
Unencrypted WLAN connections allow third parties to intercept all network data. Be sure to protect your network traffic by using one of the supported authentication and encryption methods. Use the best possible encryption method your hardware allows. However, to use a certain encryption method, all devices in the network must support this method, otherwise they cannot communicate with each other. For example, if your router supports both WEP and WPA but the driver for your WLAN card only supports WEP, WEP is the least common denominator you can use. But even a weak encryption with WEP is better than none at all. Refer to Section 34.4, “Encryption” and Section 34.6.3, “Security” for information. | |
To configure a wireless LAN with YaST, you need to define the following parameters:
- IP Address
Use either a static IP address or let a DHCP server dynamically assign an IP address to the interface.
- Operating Mode
Defines how to integrate your machine into a WLAN, depending on the network topology. For background information, refer to Section 34.2, “Operating Modes”.
- Network Name (ESSID)
Unique string identifying a network.
- Authentication and Encryption Details
Depending on the authentication and encryption method your network uses, you need to enter one or more keys and/or certificates.
Several input options are available for entering the respective keys: , (only available for WEP authentication methods), and .
34.5.1. Deactivating NetworkManager
A WLAN card is usually detected during installation. If your machine is a mobile computer, NetworkManager is usually activated by default. If instead you want to configure your WLAN card with YaST, you need to deactivate NetworkManager first:
Start YaST as user
root.In the YaST Control Center, select + to open the dialog.
If your network is currently controlled by NetworkManager, you see a warning message that the network settings cannot be edited by YaST.
To enable editing with YaST, leave the message with and on the tab, activate .
For further configuration, proceed with Section 34.5.2, “Configuration for Access Points” or Section 34.5.3, “Establishing an Ad-Hoc Network”.
Otherwise confirm your changes with to write the network configuration.
34.5.2. Configuration for Access Points
In this section, learn how to configure your WLAN card to connect to an (external) access point or how to use your WLAN card as access point (if supported by your WLAN card) . For configuration of networks without an access point, refer to Section 34.5.3, “Establishing an Ad-Hoc Network”.
Procedure 34.1. Configuring Your WLAN Card for Using an Access Point
Start YaST and open the dialog.
Switch to the tab where all network cards are listed that have been detected by the system. If you need more information about general network configuration, refer to Section 23.4, “Configuring a Network Connection with YaST”.
Choose your wireless card from the list and click to open the dialog.
On the tab, configure whether to use a dynamic or a static IP address for the machine. Usually with is fine.
Click to proceed to the dialog.
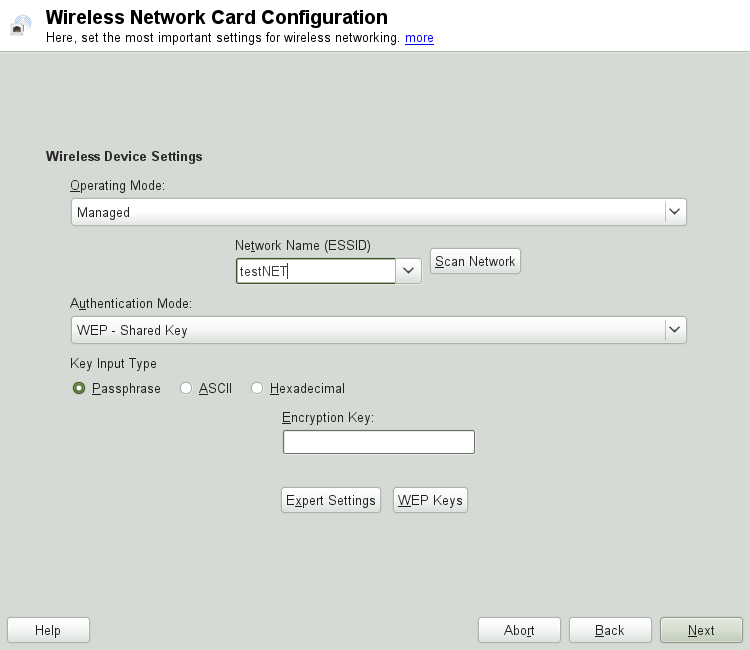
To use your WLAN card to connect to an access point, set the to .
If however you want to use your WLAN card as access point, set the to . Note that not all WLAN cards support this mode.
![[Note]](admon/note.png)
Using WPA-PSK or WPA-EAP If you want to use WPA-PSK or WPA-EAP authentication modes, the operating mode must be set to .
To connect to a certain network, enter the . Alternatively, click and select a network from the list of available wireless networks.
All stations in a wireless network need the same ESSID for communicating with each other. If no ESSID is specified, your WLAN card automatically associates with the access point that has the best signal strength.
WPA Authentication Requires an ESSID If you select authentication, a network name (ESSID) must be set.
Select an for your network. Which mode is suitable, depends on your WLAN card's driver and the ability of the other devices in the network.
If you have chosen to set the to , finish the configuration by clicking . Confirm the message about this potential security risk and leave the tab (showing the newly configured WLAN card) with .
If you haven chosen any of the other authentication modes, proceed with Procedure 34.2, “Entering the Encryption Details”.
Procedure 34.2. Entering the Encryption Details
The following authentication methods require an encryption key: , , and .
For WEP, usually only key is needed—however, up to 4 different WEP keys can be defined for your station. One of them needs to be set as the default key and is used for encryption. The others are used for decryption. Per default, a key length of 128-bit is used, but you can also choose to set the length to 64-bit.
For higher security, WPA-EAP uses a RADIUS server to authenticate
users. For authentication at the server, three different methods are
available: TLS, TTLS and PEAP. The credentials and certificates you
need for WPA-EAP depend on the authentication method used for the
RADIUS server. Ask your system administrator to provide the needed
information and credentials. YaST searches for any certificate under
/etc/cert. Therefore, save the certificates given
to you to this location and restrict access to these files to
0600 (owner read and write).
To enter the key for or :
Set the either to , or .
Enter the respective (usually only one key is used):
If you have selected , enter a word or a character string from which a key is generated according to the specified key length (per default, 128-bit) .
requests an input of 5 characters for a 64-bit key and 13 characters for a 128-bit key.
For , enter 10 characters for a 64-bit key or 26 characters for a 128-bit key in hexadecimal notation.
To adjust the key length to a lower bit rate (which might be necessary for older hardware), click and set the to bit. The dialog also shows the WEP keys that have been entered so far. Unless another key is explicitly set as default, YaST always uses the first key as default key.
To enter more keys for WEP (or to modify one of the keys), select the respective entry and click . Select the and enter the key.
Confirm your changes with .
To enter a key for :
Select the input method or .
Enter the respective .
In the mode, the input must be 8 to 63 characters. In the mode, enter 64 characters.
If you have chosen authentication, click to switch to the dialog, where to enter the credentials and certificates you have been given by your network administrator.
Select the the RADIUS server uses for authentication. The details you need to enter in the following depend on the selected .
For TLS, provide , , , and . To increase security, you can also configure a used to validate the server's authenticity.
TTLS and PEAP require and , whereas and are optional.
To enter the advanced authentication dialog for your WPA-EAP setup, click .
Select the for the second stage of EAP-TTLS or EAP-PEAP communication (inner authentication). The choice of methods depends on the authentication method for the RADIUS server you selected in the previous dialog.
If the automatically-determined setting does not work for you, choose a specific to force the use of a certain PEAP implementation.
Confirm your changes with . The tab shows the details of your newly configured WLAN card.
Click to finalize the configuration and to leave the dialog.
34.5.3. Establishing an Ad-Hoc Network
In some cases it is useful to connect two computers equipped with a WLAN card. To establish an ad-hoc network with YaST, do the following:
Start YaST and open the dialog.
Switch to the tab, choose your wireless card from the list and click to open the dialog.
Choose and enter the following data:
:
192.168.1.1. Change this address on the second computer to192.168.1.2, for example.:
/24: Choose any name you like.
Proceed with .
Set the to .
Choose a . This can be any name, but it has to be used on every computer in the ad-hoc network.
Select an for your network. Which mode is suitable, depends on your WLAN card's driver and the ability of the other devices in the network.
If you have chosen to set the to , finish the configuration by clicking . Confirm the message about this potential security risk and leave the tab (showing the newly configured WLAN card) with .
If you haven chosen any of the other authentication modes, proceed with Procedure 34.2, “Entering the Encryption Details”.
If you do not have
smpppdinstalled, YaST asks you to do so.Configure the other WLAN cards in the network accordingly, using the same , the same but different IP addresses.
34.5.4. Setting Additional Configuration Parameters
Usually there is no need to change the preconfigured settings when configuring your WLAN card. However, if you need detailed configuration of your WLAN connection, YaST allows you to tweak the following settings:
- Channel
The specification of a channel on which the WLAN station should work. This is only needed in and modes. In mode, the card automatically searches the available channels for access points.
- Bit Rate
Depending on the performance of your network, you may want to set a certain bit rate for the transmission from one point to another. In the default setting , the system tries to use the highest possible data transmission rate. Some WLAN cards do not support the setting of bit rates.
- Access Point
In an environment with several access points, one of them can be preselected by specifying the MAC address.
- Power Management
When you are on the road, power saving technologies can help to maximize the operating time of your battery. Using power management may affect the connection quality and increase the network latency.
To access the advanced options:
Start YaST and open the dialog.
Switch to the tab, choose your wireless card from the list and click to open the dialog.
Click to proceed to the dialog.
Click .
In mode, select one of the offered channels (11 to 14, depending on your country) for the communication of your station with the other stations. In mode, determine on which your card should offer access point functionality. The default setting for this option is .
Select the to use.
Enter the MAC address of the you want to connect to.
Choose if to or not.
Confirm your changes with and click and to finish the configuration.
34.6. Tips and Tricks for Setting Up a WLAN
The following tools and tips can help to monitor and improve speed and stability as well as security aspects of your WLAN.
34.6.1. Utilities
The package wireless-tools
contains utilities that allow to set wireless LAN specific parameters
and get statistics. See
http://www.hpl.hp.com/personal/Jean_Tourrilhes/Linux/Tools.html
for more information.
kismet (package kismet) is a
network diagnosis tool with which to listen to the WLAN packet traffic.
In this way, you can also detect any intrusion attempts in your network.
More information is available at
http://www.kismetwireless.net/ and in the manual
page.
34.6.2. Stability and Speed
The performance and reliability of a wireless network mainly depend on
whether the participating stations receive a clear signal from the other
stations. Obstructions like walls greatly weaken the signal. The more
the signal strength sinks, the more the transmission slows down. During
operation, check the signal strength with the
iwconfig utility on the command line (Link
Quality field) or with the NetworkManager applets provided by KDE or
GNOME. If you have problems with the signal quality, try to set up the
devices somewhere else or adjust the position of the antennas of your
access points. Auxiliary antennas that substantially improve the
reception are available for a number of PCMCIA WLAN cards. The rate
specified by the manufacturer, such as 54 Mbit/s, is a nominal
value that represents the theoretical maximum. In practice, the maximum
data throughout is no more than half this value.
The iwspy command can displays WLAN statistics:
iwspy wlan0
wlan0 Statistics collected:
00:AA:BB:CC:DD:EE : Quality:0 Signal level:0 Noise level:0
Link/Cell/AP : Quality:60/94 Signal level:-50 dBm Noise level:-140 dBm (updated)
Typical/Reference : Quality:26/94 Signal level:-60 dBm Noise level:-90 dBm34.6.3. Security
If you want to set up a wireless network, remember that anybody within the transmission range can easily access it if no security measures are implemented. Therefore, be sure to activate an encryption method. All WLAN cards and access points support WEP encryption. Although this is not entirely safe, it does present an obstacle for a potential attacker.
For private use, use WPA-PSK if available. Although Linux supports WPA on most hardware components, some drivers do not offer WPA support. It may also not be available on older access points and routers with WLAN functionality. For such devices, check if WPA can be implemented by means of a firmware update. If WPA is not available, WEP is better than no encryption. In enterprises with advanced security requirements, wireless networks should only be operated with WPA.
Use strong passwords for your authentication method. For example, the Web page https://www.grc.com/passwords.htm generates random 64 character passwords.
34.7. Troubleshooting
If your WLAN card is not automatically detected, check whether it is supported by openSUSE. A list of supported WLAN network cards is available under http://en.opensuse.org/HCL:Network_(Wireless). If your card is not supported, it may be possible to make it work using the Microsoft Windows drivers with Ndiswrapper. Please refer to http://en.opensuse.org/SDB:Ndiswrapper for detailed information.
If your WLAN card fails to respond, check the following prerequisites:
Do you know the device name of the WLAN card? Usually it is
wlan0. Check with the tool ifconfig.Have you checked your needed firmware? Refer to
/usr/share/doc/packages/wireless-tools/README.firmwarefor more information.Is the ESSID of your router broadcasted and visible (not hidden)?
34.7.1. Check the Network Status
The command iwconfig can give you important information about your wireless connection. For example, the following line displays the ESSID, the wireless mode, frequency, if you signal is encrypted, the link quality, and much more:
iwconfig wlan0
wlan0 IEEE 802.11abg ESSID:"guest"
Mode:Managed Frequency:5.22GHz Access Point: 00:11:22:33:44:55
Bit Rate:54 Mb/s Tx-Power=13 dBm
Retry min limit:7 RTS thr:off Fragment thr:off
Encryption key:off
Power Management:off
Link Quality:62/92 Signal level:-48 dBm Noise level:-127 dBm
Rx invalid nwid:0 Rx invalid crypt:0 Rx invalid frag:0
Tx excessive retries:10 Invalid misc:0 Missed beacon:0You can also get the previous information with the iwlist command. For example, the following line displays the current bit rate:
iwlist wlan0 rate
wlan0    unknown bit-rate information.
         Current Bit Rate=54 Mb/s
If you want an overview how many access points are available, it can also be done with the iwlist command. It gives you a list of “cells” which looks like this:
iwlist wlan0 scanning
wlan0   Scan completed:
   Cell 01 - Address: 00:11:22:33:44:55
             Channel:40
             Frequency:5.2 GHz (Channel 40)
             Quality=67/70  Signal level=-43 dBm
             Encryption key: off
             ESSID:"Guest"
             Bit Rates: 6 Mb/s; 9 Mb/s; 12 Mb/s; 18 Mb/s;
                        24 Mb/s; 36 Mb/s; 48 Mb/s
             Mode: Master
             Extra:tsf=0000111122223333
             Extra: Last beacon: 179ms ago
             IE: Unknown: ...
34.7.2. Multiple Network Devices
Modern laptops usually have a network card and a WLAN card. If you configured both devices with DHCP (automatic address assignment), you may encounter problems with the name resolution and the default gateway. This is evident from the fact that you can ping the router but cannot surf the Internet. The Support Database features an article on this subject at http://old-en.opensuse.org/SDB:Name_Resolution_Does_Not_Work_with_Several_Concurrent_DHCP_Clients.
34.7.3. Problems with Prism2 Cards
Several drivers are available for devices with
Prism2 chips. The various cards work more or
less smoothly with the various drivers. With these cards, WPA is only
possible with the hostap driver. If such a card does not work properly
or not at all or you want to use WPA, read
/usr/share/doc/packages/wireless-tools/README.prism2.
34.8. For More Information
More information can be found on the following pages:
- http://www.hpl.hp.com/personal/Jean_Tourrilhes/Linux/Wireless.html
The Internet pages of Jean Tourrilhes, who developed the Wireless Tools for Linux, present a wealth of useful information about wireless networks.
- tuxmobil.org
Useful hands-on information about mobile computers under Linux.
- http://www.linux-on-laptops.com
More information about Linux on laptops.
- http://en.opensuse.org/HCL:Network_(Wireless)
Lists supported WLAN network cards.
- http://en.opensuse.org/SDB:Ndiswrapper
Offers a work-around for running unsupported WLAN cards with the Microsoft Windows using Ndiswrapper.