Chapter 4. LDAP—A Directory Service
Contents
- 4.1. LDAP versus NIS
- 4.2. Structure of an LDAP Directory Tree
- 4.3. Configuring an LDAP Server with YaST
- 4.4. Configuring an LDAP Client with YaST
- 4.5. Configuring LDAP Users and Groups in YaST
- 4.6. Browsing the LDAP Directory Tree
- 4.7. Manually Configuring an LDAP Server
- 4.8. Manually Administering LDAP Data
- 4.9. For More Information
The Lightweight Directory Access Protocol (LDAP) is a set of protocols designed to access and maintain information directories. LDAP can be used for user and group management, system configuration management, address management, and more. This chapter provides a basic understanding of how OpenLDAP works and how to manage LDAP data with YaST.
In a network environment it is crucial to keep important information structured and to serve it quickly. A directory service—like the common yellow pages, keeps information available in a well-structured and readily-searchable form.
Ideally, a central server stores the data in a directory and distributes it to all clients using a well-defined protocol. The structured data allow a wide range of applications to access them. A central repository reduces the necessary administrative effort. The use of an open and standardized protocol like LDAP ensures that as many different client applications as possible can access such information.
A directory in this context is a type of database optimized for quick and effective reading and searching:
To make multiple concurrent reading accesses possible, the number of updates is usually very low. The number of read and write accesses is often limited to a few users with administrative privileges. In contrast, conventional databases are optimized for accepting the largest possible data volume in a short time.
When static data is administered, updates of the existing data sets are very rare. When working with dynamic data, especially when data sets like bank accounts or accounting are concerned, the consistency of the data is of primary importance. If an amount should be subtracted from one place to be added to another, both operations must happen concurrently, within one transaction, to ensure balance over the data stock. Traditional relational databases usually have a very strong focus on data consistency, such as the referential integrity support of transactions. Conversely, short-term inconsistencies are usually acceptable in LDAP directories. LDAP directories often do not have such strong consistency requirements as relational databases.
The design of a directory service like LDAP is not laid out to support complex update or query mechanisms. All applications are guaranteed to access this service quickly and easily.
4.1. LDAP versus NIS
Unix system administrators traditionally use NIS (Network Information
Service) for name resolution and data distribution in a network. The
configuration data contained in the files group,
hosts, mail,
netgroup, networks,
passwd, printcap,
protocols, rpc, and
services in the /etc directory is
distributed to clients all over the network. These files can be maintained
without major effort because they are simple text files. The handling of
larger amounts of data, however, becomes increasingly difficult due to
nonexistent structuring. NIS is only designed for Unix platforms, and is
not suitable as a centralized data administration tool in heterogeneous
networks.
Unlike NIS, the LDAP service is not restricted to pure Unix networks. Windows servers (from 2000) support LDAP as a directory service. The application tasks mentioned above are additionally supported in non-Unix systems.
The LDAP principle can be applied to any data structure that needs to be centrally administered. A few application examples are:
Replacement for the NIS service
Mail routing (postfix, sendmail)
Address books for mail clients, like Mozilla, Evolution, and Outlook
Administration of zone descriptions for a BIND9 name server
User authentication with Samba in heterogeneous networks
This list can be extended because LDAP is extensible, unlike NIS. The clearly-defined hierarchical structure of the data eases the administration of large amounts of data, as it can be searched more easily.
4.2. Structure of an LDAP Directory Tree
To get background knowledge on how a LDAP server works and how the data is stored, it is vital to understand the way the data is organized on the server and how this structure enables LDAP to provide fast access to the data. To successfully operate an LDAP setup, you also need to be familiar with some basic LDAP terminology. This section introduces the basic layout of an LDAP directory tree and provides the basic terminology used with respect to LDAP. Skip this introductory section if you already have some LDAP background knowledge and just want to learn how to set up an LDAP environment in openSUSE. Read on at Section 4.3, “Configuring an LDAP Server with YaST” or Section 4.7, “Manually Configuring an LDAP Server”.
An LDAP directory has a tree structure. All entries (called objects) of the directory have a defined position within this hierarchy. This hierarchy is called the directory information tree (DIT). The complete path to the desired entry, which unambiguously identifies it, is called the distinguished name or DN. A single node along the path to this entry is called relative distinguished name or RDN.
The relations within an LDAP directory tree become more evident in the following example, shown in Figure 4.1, “Structure of an LDAP Directory”.
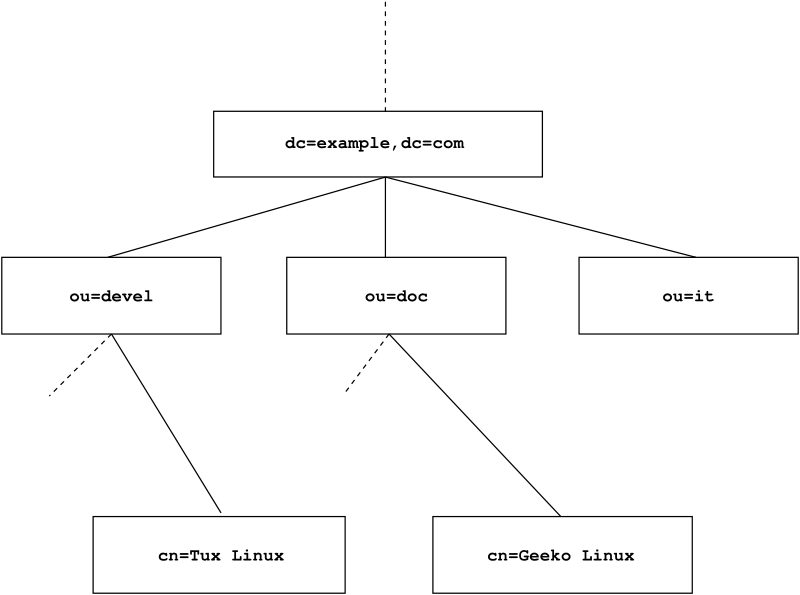
The complete diagram is a fictional directory information tree. The
entries on three levels are depicted. Each entry corresponds to one box
in the image. The complete, valid distinguished name
for the fictional employee Geeko
Linux, in this case, is cn=Geeko
Linux,ou=doc,dc=example,dc=com. It is composed by adding the
RDN cn=Geeko Linux to the DN of the preceding entry
ou=doc,dc=example,dc=com.
The types of objects that can be stored in the DIT are globally determined following a Schema. The type of an object is determined by the object class. The object class determines what attributes the relevant object must or can be assigned. The Schema, therefore, must contain definitions of all object classes and attributes used in the desired application scenario. There are a few common Schemas (see RFC 2252 and 2256). The LDAP RFC defines a few commonly used Schemas (see e.g., RFC4519). Additionally there are Schemas available for many other use cases (e.g., Samba, NIS replacement, etc.). It is, however, possible to create custom Schemas or to use multiple Schemas complementing each other (if this is required by the environment in which the LDAP server should operate).
Table 4.1, “Commonly Used Object Classes and Attributes” offers a small overview of the object
classes from core.schema and
inetorgperson.schema used in the example, including
required attributes and valid attribute values.
Table 4.1. Commonly Used Object Classes and Attributes
|
Object Class |
Meaning |
Example Entry |
Required Attributes |
|---|---|---|---|
|
dcObject |
domainComponent (name components of the domain) |
example |
dc |
|
organizationalUnit |
organizationalUnit (organizational unit) |
doc |
ou |
|
inetOrgPerson |
inetOrgPerson (person-related data for the intranet or Internet) |
Geeko Linux |
sn and cn |
Example 4.1, “Excerpt from schema.core” shows an excerpt from a Schema directive with explanations.
Example 4.1. Excerpt from schema.core
attributetype (2.5.4.11 NAME ( 'ou' 'organizationalUnitName')DESC 'RFC2256: organizational unit this object belongs to'
SUP name )
... objectclass ( 2.5.6.5 NAME 'organizationalUnit'
DESC 'RFC2256: an organizational unit'
SUP top STRUCTURAL
MUST ou
MAY (userPassword $ searchGuide $ seeAlso $ businessCategory
$ x121Address $ registeredAddress $ destinationIndicator $ preferredDeliveryMethod $ telexNumber $ teletexTerminalIdentifier $ telephoneNumber $ internationaliSDNNumber $ facsimileTelephoneNumber $ street $ postOfficeBox $ postalCode $ postalAddress $ physicalDeliveryOfficeName $ st $ l $ description) ) ...
The attribute type organizationalUnitName and the
corresponding object class organizationalUnit serve as
an example here.
| The name of the attribute, its unique OID (object identifier) (numerical), and the abbreviation of the attribute. |
|
A brief description of the attribute with |
|
|
|
The definition of the object class
|
| A brief description of the object class. |
|
The |
|
With |
|
With |
A very good introduction to the use of Schemas can be found in the
OpenLDAP documentation. When installed, find it in
/usr/share/doc/packages/openldap2/guide/admin/guide.html.
4.3. Configuring an LDAP Server with YaST
Use YaST to set up an LDAP server. Typical use cases for LDAP servers include the management of user account data and the configuration of mail, DNS, and DHCP servers.
To set up an LDAP server for user account data, make sure the
yast2-ldap-server and
openldap2 packages are installed. Then proceed as follows:
Start YaST as
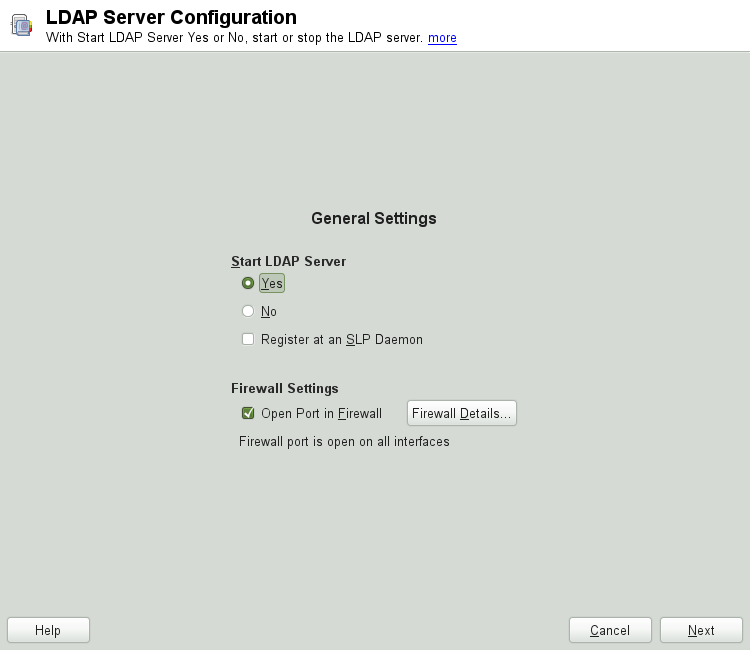
rootand select + to invoke the configuration wizard.Configure the of your LDAP server (you can change these settings later)—see Figure 4.2, “YaST LDAP Server Configuration”:
Set LDAP to be started.
If the LDAP server should announce its services via SLP, check .
Configure .
Click .
Select the server type: stand-alone server, master server in a replication setup, or replication (slave) server.
Select security options ().
It is strongly recommended to . For more information, see Step 4.
![[Warning]](admon/warning.png)
Password Encryption Enabling TLS ensures passwords are sent encrypted over the network. When this option is not enabled, passwords are sent unencrypted.
Also consider to use LDAP over SSL and certificates.
Confirm with entering an and then clicking —see Figure 4.2, “YaST LDAP Server Configuration”.
Check the and click to exit the configuration wizard.
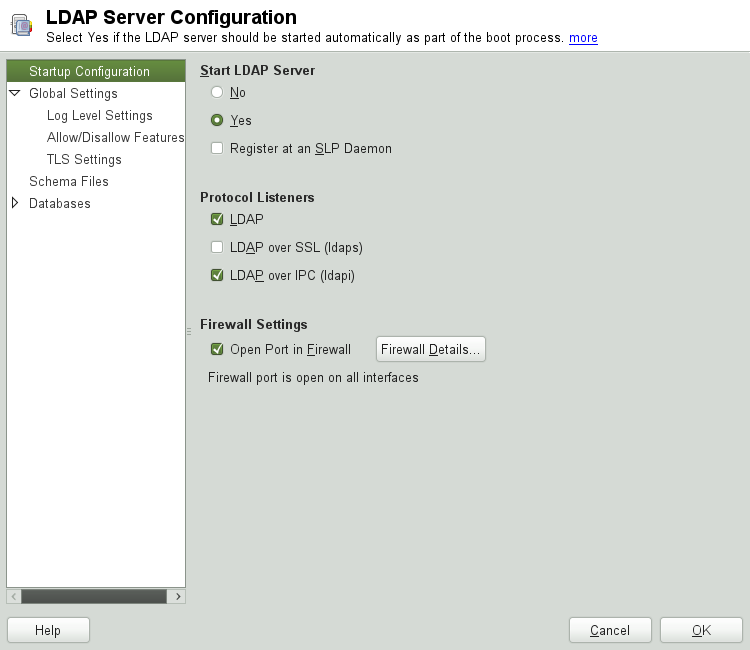
For changes or additional configuration start the LDAP server module again and in the left pane expand to make subentries visible—see Figure 4.4, “YaST LDAP Server Configuration”:
With , configure the degree of logging activity (verbosity) of the LDAP server. From the predefined list, select or deselect the logging options according to your needs. The more options are enabled, the larger your log files grow.
Configure which connection types the server should offer under . Choose from:
- LDAPv2 Bind Requests
This option enables connection requests (bind requests) from clients using the previous version of the protocol (LDAPv2).
- Anonymous Bind When Credentials Not Empty
Normally the LDAP server denies any authentication attempts with empty credentials (DN or password). Enabling this option, however, makes it possible to connect with a password and no DN to establish an anonymous connection.
- Unauthenticated Bind When DN Not Empty
Enabling this option makes it possible to connect without authentication (anonymously) using a DN but no password.
- Unauthenticated Update Options to Process
Enabling this option allows non-authenticated (anonymous) update operations. Access is restricted according to ACLs and other rules.
also lets you configure the server flags. Choose from:
- Disable Acceptance of Anonymous Bind Requests
The Server will no longer accept anonymous bind request. Note, that this does not generally prohibit anonymous directory access.
- Disable Simple Bind Authentication
Completely disable Simple Bind authentication.
- Disable Forcing Session to Anonymous Status upon StartTLS Operation Receipt
The server will no longer force an authenticated connection back to the anonymous state when receiving the StartTLS operation.
- Disallow the StartTLS Operation if Authenticated
The server will disallow the StartTLS operation on already authenticated connections.
To configure secure communication between client and server, proceed with :
Activate to enable TLS and SSL encryption of the client/server communication.
Either by specifying the exact path to its location or enable the . If the is not available because it has not been created during installation, go for first— for more information, see Section 16.2, “YaST Modules for CA Management”.
Add Schema files to be included in the server's configuration by selecting in the left part of the dialog. The default selection of schema files applies to the server providing a source of YaST user account data.
YaST allows to add traditional Schema files (usually with a name ending
in .schema) or LDIF files containing Schema
definitions in OpenLDAP's LDIF Schema format.
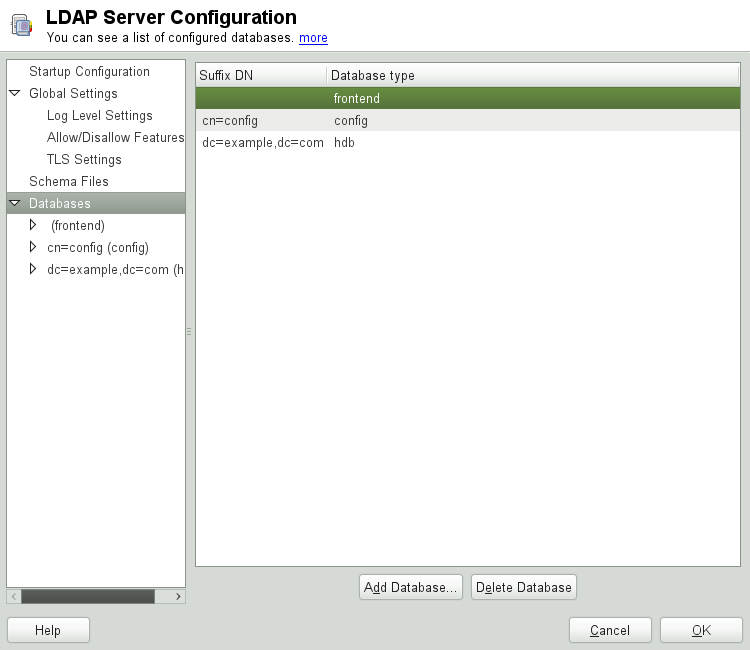
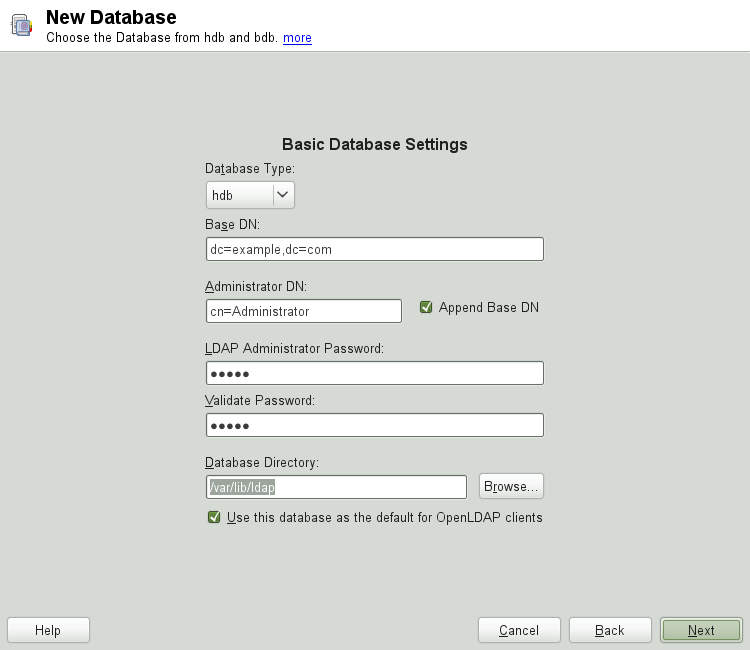
To configure the databases managed by your LDAP server, proceed as follows:
Select the item in the left part of the dialog.
Click to add a new database.
Enter the requested data:
Enter the base DN of your LDAP server.
Enter the DN of the administrator in charge of the server. If you check , only provide the
cnof the administrator and the system fills in the rest automatically.- LDAP Administrator Password
Enter the password for the database administrator.
- Use This Database as the Default for OpenLDAP Clients
For convenience, check this option if wanted.
In the next dialog configure replication settings.
In the next dialog, enable enforcement of password policies to provide extra security to your LDAP server:
Check to be able to specify a password policy.
Activate to have clear text passwords be hashed before they are written to the database whenever they are added or modified.
provides a relevant error message for bind requests to locked accounts.
Locked Accounts in Security Sensitive Environments Do not use the option if your environment is sensitive to security issues, because the “Locked Account” error message provides security-sensitive information that can be exploited by a potential attacker.
Enter the DN of the default policy object. To use a DN other than the one suggested by YaST, enter your choice. Otherwise, accept the default settings.
Complete the database configuration by clicking .
If you have not opted for password policies, your server is ready to run at this point. If you have chosen to enable password policies, proceed with the configuration of the password policy in detail. If you have chosen a password policy object that does not yet exist, YaST creates one:
Enter the LDAP server password. In the navigation tree below expand your database object and activate the item.
Make sure is activated. Then click .
Configure the password change policies:
Determine the number of passwords stored in the password history. Saved passwords may not be reused by the user.
Determine if users will be able to change their passwords and if they will need to change their passwords after a reset by the administrator. Require the old password for password changes (optional).
Determine whether and to what extent passwords should be subject to quality checking. Set the minimum password length that must be met before a password is valid. If you select , users are allowed to use encrypted passwords, even though the quality checks cannot be performed. If you opt for only those passwords that pass the quality tests are accepted as valid.
Configure the password time-limit policies:
Determine the minimum password time-limit (the time that needs to pass between two valid password changes) and the maximum password time-limit.
Determine the time between a password expiration warning and the actual password expiration.
Set the number of postponement uses of an expired password before the password expires permanently.
Configure the lockout policies:
Enable password locking.
Determine the number of bind failures that trigger a password lock.
Determine the duration of the password lock.
Determine the length of time that password failures are kept in the cache before they are purged.
Apply your password policy settings with .
To edit a previously created database, select its base DN in the tree to the left. In the right part of the window, YaST displays a dialog similar to the one used for the creation of a new database (with the main difference that the base DN entry is grayed out and cannot be changed).
After leaving the LDAP server configuration by selecting , you are ready to go with a basic working configuration for your LDAP server. To fine-tune this setup, make use of OpenLDAP's dynamic configuration backend.
The OpenLDAP's dynamic configuration backend stores the configuration in
an LDAP database. That database consists of a set of
.ldif files in
/etc/openldap/slapd.d. There is no need to access
these files directly. To access the settings you can either use the
YaST LDAP server module (the yast2-ldap-server
package) or an LDAP client such as ldapmodify or
ldapsearch. For more information on the dynamic
configuration of OpenLDAP, see the OpenLDAP Administration Guide.
4.4. Configuring an LDAP Client with YaST
YaST includes a module to set up LDAP-based user management. If you did not enable this feature during the installation, start the module by selecting +. YaST automatically enables any PAM and NSS-related changes as required by LDAP and installs the necessary files. Simply connect your client to the server and let YaST manage users over LDAP. This basic setup is described in Section 4.4.1, “Configuring Basic Settings”.
Use the YaST LDAP client to further configure the YaST group and user configuration modules. This includes manipulating the default settings for new users and groups and the number and nature of the attributes assigned to a user or group. LDAP user management allows you to assign far more and different attributes to users and groups than traditional user or group management solutions. This is described in Section 4.4.2, “Configuring the YaST Group and User Administration Modules”.
4.4.1. Configuring Basic Settings
The basic LDAP client configuration dialog (Figure 4.6, “YaST: LDAP Client Configuration”) opens during installation if you choose LDAP user management or when you select + in the YaST Control Center in the installed system.
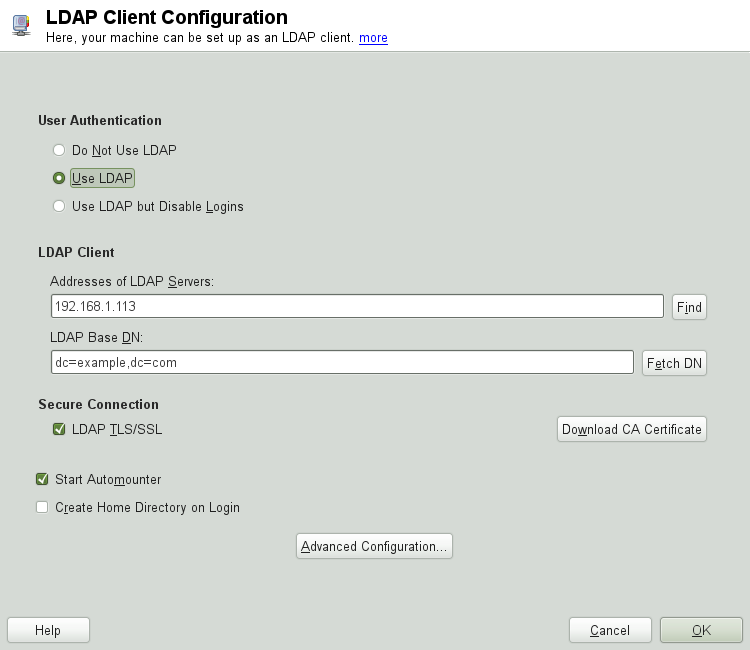
To authenticate users of your machine against an OpenLDAP server and to enable user management via OpenLDAP, proceed as follows:
Click to enable the use of LDAP. Select instead if you want to use LDAP for authentication, but do not want other users to log in to this client.
Enter the IP address of the LDAP server to use.
Enter the to select the search base on the LDAP server. To retrieve the base DN automatically, click . YaST then checks for any LDAP database on the server address specified above. Choose the appropriate base DN from the search results given by YaST.
If TLS or SSL-protected communication with the server is required, select . Click to download a certificate in PEM format from a URL.
Select to mount remote directories on your client, such as a remotely managed
/home.Select to have a user's home automatically created on the first user login.
Click to apply your settings.
To modify data on the server as administrator, click . The following dialog is split into two tabs. See Figure 4.7, “YaST: Advanced Configuration”.
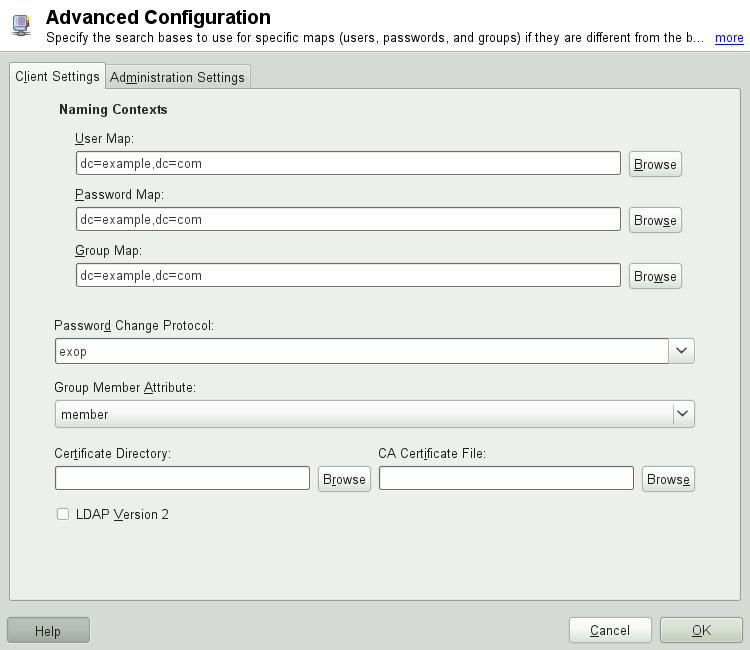
In the tab, adjust the following settings according to your needs:
If the search base for users, passwords, and groups differs from the global search base specified in the , enter these different naming contexts in , , and .
Specify the password change protocol. The standard method to use whenever a password is changed is
crypt, meaning that password hashes generated by crypt are used. For details on this and other options, refer to thepam_ldapman page.Specify the LDAP group to use with . The default value for this is
member.If a secure connection requires certificate checking, specify where your in PEM format is located. Or specify a directory with certificates.
If the LDAP server still uses LDAPv2, enable the use of this protocol version by selecting .
In , adjust the following settings:
Set the base for storing your user management data via .
Enter the appropriate value for . This DN must be identical with the
rootdnvalue specified in/etc/openldap/slapd.confto enable this particular user to manipulate data stored on the LDAP server. Enter the full DN (such ascn=Administrator,dc=example,dc=com) or activate to have the base DN added automatically when you entercn=Administrator.Check to create the basic configuration objects on the server to enable user management via LDAP.
If your client machine needs to act as a file server for home directories across your network, check .
Use the section to select, add, delete, or modify the password policy settings to use. The configuration of password policies with YaST is part of the LDAP server setup.
Click to leave the , then to apply your settings.
Use to edit entries on the LDAP server. Access to the configuration modules on the server is then granted according to the ACLs and ACIs stored on the server. Follow the procedures outlined in Section 4.4.2, “Configuring the YaST Group and User Administration Modules”.
4.4.2. Configuring the YaST Group and User Administration Modules
Use the YaST LDAP client to adapt the YaST modules for user and group administration and to extend them as needed. Define templates with default values for the individual attributes to simplify the data registration. The presets created here are stored as LDAP objects in the LDAP directory. The registration of user data is still done with the regular YaST modules for user and group management. The registered data is stored as LDAP objects on the server.
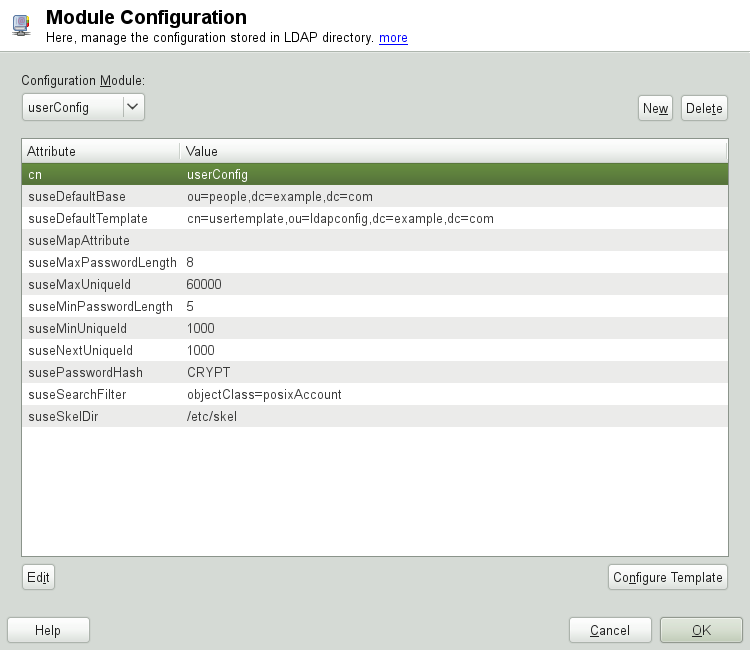
The dialog for module configuration (Figure 4.8, “YaST: Module Configuration”) allows the creation of new modules, selection and modification of existing configuration modules, and design and modification of templates for such modules.
To create a new configuration module, proceed as follows:
In the click , then open the tab. Click and enter the LDAP server credentials.
Click and select the type of module to create. For a user configuration module, select
suseUserConfigurationand for a group configuration choosesuseGroupConfiguration.Choose a name for the new template (e.g.,
userConfig). The content view shows a table listing all attributes allowed in this module and their assigned values.Accept the preset values or adjust the defaults to use in group and user configurations by selecting the relevant attribute, pressing , and entering the new value. Rename a module by changing the
cnattribute of the module. Clicking deletes the currently selected module.After you click , the new module is added to the selection menu.
The YaST modules for group and user administration embed templates with standard values. To edit a template associated with a configuration module, start the object template configuration (Figure 4.9, “YaST: Configuration of an Object Template”):
In the dialog, click .
Determine the values of the general attributes assigned to this template according to your needs or leave them empty. Empty attributes are deleted on the LDAP server.
Modify, delete, or add new default values for new objects (user or group configuration objects in the LDAP tree).
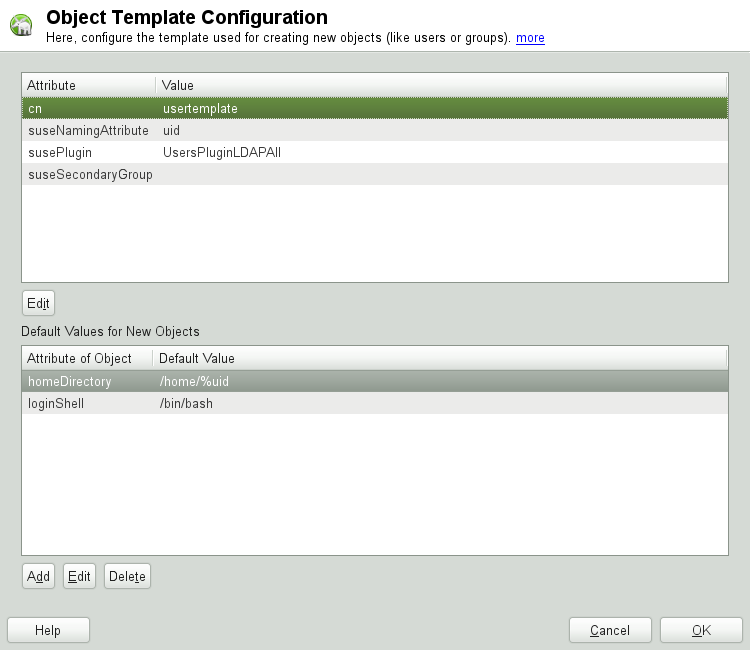
Connect the template to its module by setting the
susedefaulttemplate attribute value of the module to
the DN of the adapted template.
![[Tip]](admon/tip.png) | |
The default values for an attribute can be created from other
attributes by using a variable instead of an absolute value. For
example, when creating a new user, | |
Once all modules and templates are configured correctly and ready to run, new groups and users can be registered in the usual way with YaST.
4.5. Configuring LDAP Users and Groups in YaST
The actual registration of user and group data differs only slightly from the procedure when not using LDAP. The following instructions relate to the administration of users. The procedure for administering groups is analogous.
Access the YaST user administration with +.
Use to limit the view of users to the LDAP users and enter the password for Root DN.
Click to enter the user configuration. A dialog with four tabs opens:
Specify username, login, and password in the tab.
Check the tab for the group membership, login shell, and home directory of the new user. If necessary, change the default to values that better suit your needs. The default values (as well as those of the password settings) can be defined with the procedure described in Section 4.4.2, “Configuring the YaST Group and User Administration Modules”.
Modify or accept the default .
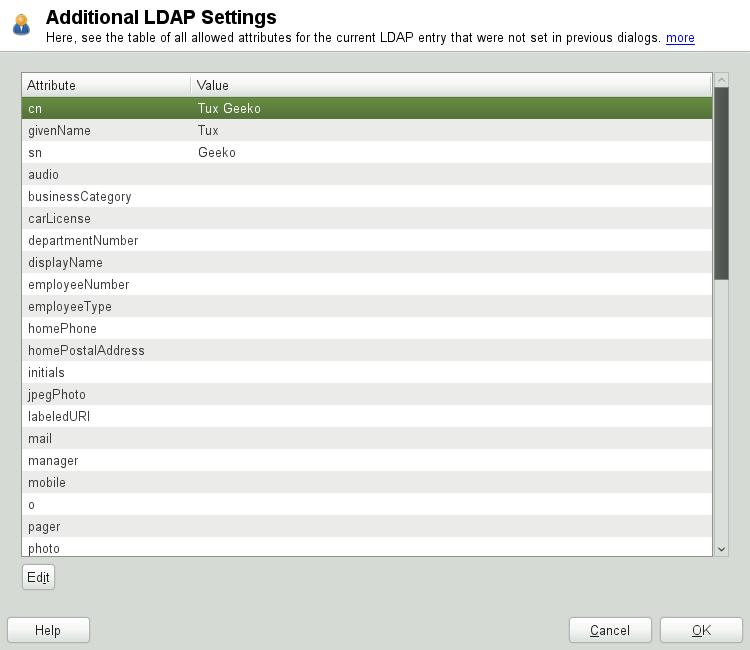
Enter the tab, select the LDAP plug-in, and click to configure additional LDAP attributes assigned to the new user (see Figure 4.10, “YaST: Additional LDAP Settings”).
Click to apply your settings and leave the user configuration.
The initial input form of user administration offers . This allows you to apply LDAP search filters to the set of available users. Alternatively open the module for configuring LDAP users and groups by selecting .
4.6. Browsing the LDAP Directory Tree
To conveniently browse the LDAP directory tree and all its entries, use the YaST LDAP Browser:
Log in as
root.Start ++.
Enter the address of the LDAP server, the Administrator DN, and the password for the Root DN of this server (if you need both to read and write the data stored on the server).
Alternatively, choose and do not provide the password to gain read access to the directory.
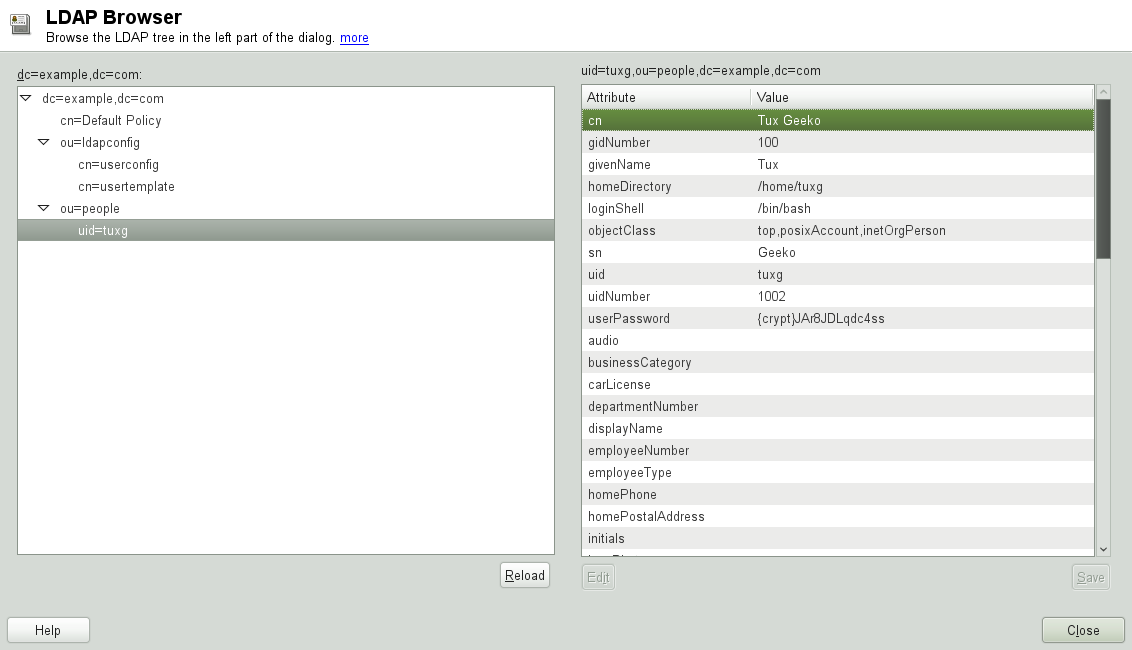
The tab displays the content of the LDAP directory to which your machine connected. Click to expand each item's submenu.
To view any entry in detail, select it in the view and open the tab.
All attributes and values associated with this entry are displayed.
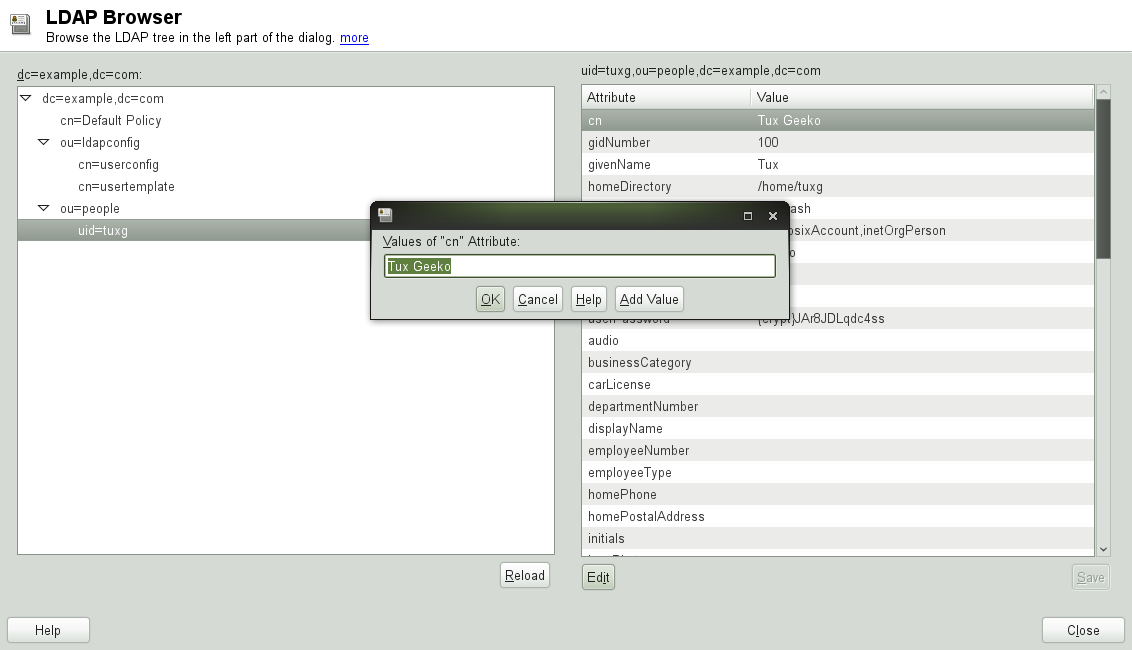
To change the value of any of these attributes, select the attribute, click , enter the new value, click , and provide the Root DN password when prompted.
Leave the LDAP browser with .
4.7. Manually Configuring an LDAP Server
YaST uses OpenLDAP's dynamic configuration database
(back-config) to store the LDAP server's
configuration. For details about the dynamic configuration backend please
see the slapd-config(5) man page or the OpenLDAP
Software 2.4 Administrator's Guide located at
/usr/share/doc/packages/openldap2/guide/admin/guide.html
on your system if the openldap2 package is
installed.
| Upgrading an Old OpenLDAP Installation |
|---|---|
YaST does not use | |
To conveniently access the configuration backend, you use SASL external
authentication. For example, the following ldapsearch
command executed as root can be used to show the
complete slapd configuration:
ldapsearch -Y external -H ldapi:/// -b cn=config
4.7.1. Starting and Stopping the Servers
Once the LDAP server is fully configured and all desired entries have
been made according to the pattern described in
Section 4.8, “Manually Administering LDAP Data”, start the LDAP server as
root by entering
rcldap start. To stop the server
manually, enter the command rcldap
stop. Query the status of the running LDAP
server with rcldap status.
Use the YaST runlevel editor, described in Section “Configuring System Services (Runlevel) with YaST” (Chapter 17, Booting and Configuring a Linux System, ↑Reference), to have the server started and stopped automatically on system bootup and shutdown. It is also possible to create the corresponding links to the start and stop scripts with the insserv command from a command prompt as described in Section “Init Scripts” (Chapter 17, Booting and Configuring a Linux System, ↑Reference).
4.8. Manually Administering LDAP Data
OpenLDAP offers a series of tools for the administration of data in the LDAP directory. The four most important tools for adding to, deleting from, searching through and modifying the data stock are explained in this section.
4.8.1. Inserting Data into an LDAP Directory
Once your LDAP server
is correctly configured (it features appropriate entries for
suffix, directory,
rootdn, rootpw and
index), proceed to entering records. OpenLDAP offers
the ldapadd command for this task. If possible, add
the objects to the database in bundles (for practical reasons). LDAP is
able to process the LDIF format (LDAP data interchange format) for this.
An LDIF file is a simple text file that can contain an arbitrary number
of attribute and value pairs.
The LDIF file for creating a rough framework for the example in
Figure 4.1, “Structure of an LDAP Directory” would look like the one in
Example 4.2, “An LDIF File”.
![[Important]](admon/important.png) | Encoding of LDIF Files |
|---|---|
LDAP works with UTF-8 (Unicode). Umlauts must be encoded correctly. Otherwise, avoid umlauts and other special characters or use iconv to convert the input to UTF-8. | |
Example 4.2. An LDIF File
# The Organization
dn: dc=example,dc=com
objectClass: dcObject
objectClass: organization
o: Example dc: example

# The organizational unit development (devel)
dn: ou=devel,dc=example,dc=com
objectClass: organizationalUnit
ou: devel

# The organizational unit documentation (doc)
dn: ou=doc,dc=example,dc=com
objectClass: organizationalUnit
ou: doc

# The organizational unit internal IT (it)
dn: ou=it,dc=example,dc=com
objectClass: organizationalUnit
ou: it
Save the file with the .ldif suffix then pass it to
the server with the following command:
ldapadd -x -Ddn_of_the_administrator-W -ffile.ldif
-x switches off the authentication with SASL in this
case. -D declares the user that calls the operation.
The valid DN of the administrator is entered here just like it has been
configured in slapd.conf. In the current example,
this is cn=Administrator,dc=example,dc=com.
-W circumvents entering the password on the command
line (in clear text) and activates a separate password prompt.
The -f option passes the filename. See the details of
running ldapadd in
Example 4.3, “ldapadd with example.ldif”.
Example 4.3. ldapadd with example.ldif
ldapadd -x -D cn=Administrator,dc=example,dc=com -W -f example.ldif

Enter LDAP password:
adding new entry "dc=example,dc=com"
adding new entry "ou=devel,dc=example,dc=com"
adding new entry "ou=doc,dc=example,dc=com"
adding new entry "ou=it,dc=example,dc=com"
The user data of individuals can be prepared in separate LDIF files.
Example 4.4, “LDIF Data for Tux” adds
Tux to the new LDAP directory.
Example 4.4. LDIF Data for Tux
# coworker Tux
dn: cn=Tux Linux,ou=devel,dc=example,dc=com
objectClass: inetOrgPerson
cn: Tux Linux
givenName: Tux
sn: Linux
mail: tux@example.com
uid: tux
telephoneNumber: +49 1234 567-8
An LDIF file can contain an arbitrary number of objects. It is possible to pass directory branches (entirely or in part) to the server in one go, as shown in the example of individual objects. If it is necessary to modify some data relatively often, a fine subdivision of single objects is recommended.
4.8.2. Modifying Data in the LDAP Directory
The tool ldapmodify is provided for modifying the
data stock. The easiest way to do this is to modify the corresponding
LDIF file and pass the modified file to the LDAP server. To change the
telephone number of colleague Tux from +49 1234 567-8
to +49 1234 567-10, edit the LDIF file like in
Example 4.5, “Modified LDIF File tux.ldif”.
Example 4.5. Modified LDIF File tux.ldif
# coworker Tux
dn: cn=Tux Linux,ou=devel,dc=example,dc=com
changetype: modify
replace: telephoneNumber
telephoneNumber: +49 1234 567-10
Import the modified file into the LDAP directory with the following command:
ldapmodify -x -D cn=Administrator,dc=example,dc=com -W -f tux.ldif
Alternatively, pass the attributes to change directly to ldapmodify as follows:
Start ldapmodify and enter your password:
ldapmodify -x -D cn=Administrator,dc=example,dc=com -W
Enter LDAP password:
Enter the changes while carefully complying with the syntax in the order presented below:
dn: cn=Tux Linux,ou=devel,dc=example,dc=com
changetype: modify
replace: telephoneNumber
telephoneNumber: +49 1234 567-10
For more information about ldapmodify and its syntax, see the ldapmodify man page.
4.8.3. Searching or Reading Data from an LDAP Directory
OpenLDAP provides, with ldapsearch, a command line tool for searching data within an LDAP directory and reading data from it. This is a simple query:
ldapsearch -x -b dc=example,dc=com "(objectClass=*)"
The -b option determines the search base (the section
of the tree within which the search should be performed). In the current
case, this is dc=example,dc=com. To perform a more
finely-grained search in specific subsections of the LDAP directory (for
example, only within the devel department), pass this
section to ldapsearch with -b.
-x requests activation of simple authentication.
(objectClass=*) declares that all objects contained
in the directory should be read. This command option can be used after
the creation of a new directory tree to verify that all entries have
been recorded correctly and the server responds as desired. For more
information about the use of ldapsearch, see the
ldapsearch(1) man page.
4.8.4. Deleting Data from an LDAP Directory
Delete unwanted entries with ldapdelete. The syntax
is similar to that of the other commands. To delete, for example, the
complete entry for Tux Linux, issue the following
command:
ldapdelete -x -D cn=Administrator,dc=example,dc=com -W cn=Tux \
Linux,ou=devel,dc=example,dc=com
4.9. For More Information
More complex subjects (like SASL configuration or establishment of a replicating LDAP server that distributes the workload among multiple slaves) were omitted from this chapter. Find detailed information about both subjects in the OpenLDAP 2.4 Administrator's Guide—see at OpenLDAP 2.4 Administrator's Guide.
The Web site of the OpenLDAP project offers exhaustive documentation for beginner and advanced LDAP users:
- OpenLDAP Faq-O-Matic
A detailed question and answer collection applying to the installation, configuration, and use of OpenLDAP. Find it at http://www.openldap.org/faq/data/cache/1.html.
- Quick Start Guide
Brief step-by-step instructions for installing your first LDAP server. Find it at http://www.openldap.org/doc/admin24/quickstart.html or on an installed system in Section 2 of
/usr/share/doc/packages/openldap2/guide/admin/guide.html.- OpenLDAP 2.4 Administrator's Guide
A detailed introduction to all important aspects of LDAP configuration, including access controls and encryption. See http://www.openldap.org/doc/admin24/ or, on an installed system,
/usr/share/doc/packages/openldap2/guide/admin/guide.html.- Understanding LDAP
A detailed general introduction to the basic principles of LDAP: http://www.redbooks.ibm.com/redbooks/pdfs/sg244986.pdf.
Printed literature about LDAP:
LDAP System Administration by Gerald Carter (ISBN 1-56592-491-6)
Understanding and Deploying LDAP Directory Services by Howes, Smith, and Good (ISBN 0-672-32316-8)
The ultimate reference material for the subject of LDAP are the corresponding RFCs (request for comments), 2251 to 2256.