| openSUSE-Dokumentation Chapter 22. Manipulating Graphics with The GIMP / 22.5. Editing Images | ||||
|---|---|---|---|---|
 | 22.4. Saving Images | 22.6. Printing Images |  | |
| openSUSE-Dokumentation Chapter 22. Manipulating Graphics with The GIMP / 22.5. Editing Images | ||||
|---|---|---|---|---|
| 22.4. Saving Images | 22.6. Printing Images | | |
The GIMP provides a number of tools for making changes to images. The functions described here are those most interesting for home users.
Once an image is scanned or a digital photograph is loaded from the camera, it is often necessary to modify the size for display on a Web page or for printing. Images can easily be made smaller either by scaling them down or by cutting off parts of them. Making an image larger is much more problematic. Because of the nature of raster graphics, quality is lost when an image is made larger. It is recommended to keep a copy of your original image before scaling or cropping.
Cropping an image works like cutting the edges off a piece of paper. Select the crop tool from the toolbox (it resembles a scalpel) or with ++. Click a starting corner and drag to outline the area to keep.
A small window opens with information about the starting point and the size of the selected area. Adjust these values by clicking and dragging a corner of the crop box or by adjusting the values in the window. adjusts the crop to fit the current selection (selections are explained in Section 22.5.2, “Selecting Parts of Images”). makes the crop smaller based on color changes in the image.
Press to abort the crop. Press to crop the image. The results of are identical to those of , described in Section 22.5.1.3, “Changing the Canvas Size”.
Select + to change the overall size of an image. Select the new size by entering it in or . To change the proportions of the image when scaling (this distorts the image), click the chain icon to the right of the fields to break the link between them. When those fields are linked, all values are changed proportionately when the value in one of the fields is changed. Adjust the resolution with and .
is an expert option that controls the scale method. When finished adjusting the size, press to scale the image. restores the original values. aborts the procedure.
Changing the canvas size is like putting a mat around an image. Even if the mat is smaller, the rest of the image is there, but you can only see part of it. If the mat is larger, you see the original image with extra space around it. To do this, select +.
In the dialog that opens, enter the new size. By default, the width and height maintain the same proportions as the current image. To change this, click the chain icon.
After adjusting the size, determine how the existing image should be positioned in comparison to the new size. Use the offset values or drag the box inside the frame at the bottom. When satisfied with the changes, click to change the canvas size. Click to restore the original values or to cancel the canvas resize.
It is often useful to perform an image operation on only part of an image. To do this, the part of the image with which to work must be selected. Areas can be selected using the select tools available in the toolbox, using the quick mask, or combining different options. Selections can also be modified with the items under . The selection is outlined with a dashed line, called marching ants.
The main select tools are rather easy to use. The paths tool, which can also be used for more than selecting, is more complicated so is not described here. In the tool options for the other select tools, use one of the icons in the row to determine whether the selection should replace, be added to, be subtracted from, or intersect with an existing selection.
This tool can be used to select rectangular or square areas. In the tool options, select among , , and to control the shape and size of the selection. To make a square selection in the free select mode, hold Shift while selecting a region.
Use this to select elliptical or circular areas. The same options are available as with rectangular selection. Holding Shift during selection produces a circle.
Draw a selection area freehand with this tool by dragging the mouse over the image with the left mouse button pressed. The end points will be connected with a straight line when you release the tool. The area inside is then selected.
This tools selects a continuous region based on color similarities. Set the maximum difference between colors in the tool options dialog in .
With this, select all the pixels in the image with the same or similar color as the clicked pixel. The maximum difference between colors can be set in the tool options dialog in .
Click a series of points in the image. As you click, the points are connected based on color differences. Click on the first point to close the area. Convert it to a regular selection by clicking inside it.
The quick mask is a way of selecting parts of an image using the paint tools. A good way to use it is to make a rough selection using the intelligent scissors or the lasso (freehand selection tool). Then activate the quick mask by pressing the small icon with the dashed box in the lower left corner.
The quick mask displays the selection using an overlay of red. Areas shaded with red are not selected. Areas appearing as they did before the mask was activated are selected. To modify the selection, use the paint tools. Painting with white selects the painted pixels. Painting with black deselects pixels. Shades of gray (colors are treated as shades of gray) are a partial selection. Partial selection allows smooth transitions between selected and unselected areas.
To use a different color for displaying the quick mask, right-click the quick mask button then select from the menu. Click the colored box in the dialog that opens to select a new color.
After using the paint tools to adjust the selection as desired, convert from the quick mask view back to the normal selection view by clicking the icon in the lower left corner of the image window (currently displaying a red box). The selection is again displayed with the marching ants.
Most image editing involves applying or removing color. By selecting a part of the image, limit where color can be applied or removed. When you select a tool and move the cursor onto an image, the cursor's appearance changes to reflect the chosen tool. With many tools, an icon of the current tool is shown along with the arrow. For paint tools, an outline of the current brush is shown, allowing you to see exactly where you will be painting in the image and how large an area will be painted.
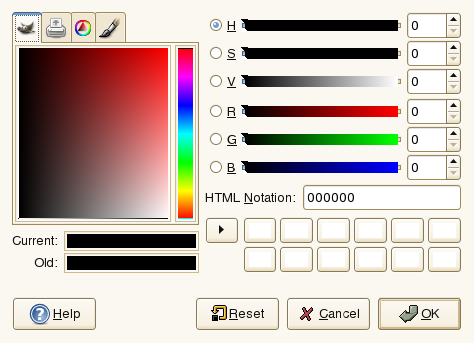
Paint tools use the foreground color. To select the color, first click the display box of the foreground color. A dialog with four tabs opens. These tabs provide different color selection methods. Only the first tab, shown in Figure 22.2, “The Basic Color Selector Dialog”, is described here. The new color is shown in . The previous color is shown in .
The easiest way to select a color is using the colored areas in the boxes to the left. In the narrow vertical bar, click a color similar to the desired color. The larger box to the left then shows available nuances. Click the desired color. It is then shown in . If that color is not what you want, try again.
The arrow button to the right of enables saving a number of possible colors. Click the arrow to copy the current color to the history. A color can then be selected by clicking it in the history. A color can also be selected by directly entering its hexadecimal color code in .
The color selector defaults to selecting a color by hue, which is usually easiest for a new user. To select by saturation, value, red, green, or blue, select the corresponding radio button to the right. The sliders and number fields can also be used to modify the currently selected color. Experiment a bit to find out what works best for you.
When the desired color is shown in , click . To restore the original values shown when the dialog was opened, click . To abort changing the color, click .
To select a color that already exists in your image, use the color picker tool, the icon for which resembles an eye dropper. With the tool options, set whether the foreground or background color should be selected. Then click a point in the image that shows the desired color. When the color is right, click to close the tool's dialog.
To paint and erase, use the tools from the toolbox. There are a number of options available to fine-tune each tool. Pressure sensitivity options apply only when a pressure-sensitive graphics tablet is used.
The pencil, brush, airbrush, and eraser work much like their real-life equivalents. The ink tool works like a calligraphy pen. Paint by clicking and dragging. The bucket fill is a method of coloring areas of an image. It fills based on color boundaries in the image. Adjusting the threshold modifies its sensitivity to color changes.
With the text tool, easily add text to an image. With the tool options, select the desired font, font size, color, justification, indent, and line spacing. Then click a starting point in the image. A small dialog opens in which to enter your text. Enter single or multiple lines of text then press .
The text tool creates text on a special layer. To work with the image after adding text, read Section 22.5.6, “Layers”. When the text layer is active, it is possible to modify the text by clicking in the image to reopen the entry dialog. Change the settings by modifying the tool options.
The clone tool is ideal for retouching images. It enables you to paint in an image using information from another part of the image. If desired, it can instead take information from a pattern.
When retouching, it is usually a good idea to use a small brush with soft edges. In this way, the modifications can blend better with the original image.
To select the source point in the image, press and hold Ctrl while clicking the desired source point. Then paint with the tool as usual. When you move the cursor while painting, the source point, marked by a cross, moves as well. If the is set to (the default setting), the source resets to the original when you release the left mouse button.
Images often need a little adjusting to get ideal print or display results. In many programs designed for inexperienced users, the brightness and contrast levels are modified. This can work and is also available in The GIMP, but better results can be obtained by adjusting the color levels.
To do this, select ++. A dialog opens for controlling the levels in the image. Good results can usually be obtained by clicking . To make manual adjustments to all channels, use the dropper tools in to pick areas in the image that should be black, neutral gray, and white.
To modify a channel individually, select the desired channel in . Then drag the black, white, and middle markers in the slider in . Alternatively, use the dropper tools to select points in the image that should serve as the white, black, and gray points for that channel.
If is checked, the image window shows a preview of how the image would look with the modifications applied. When the desired result is achieved, press to apply the changes. With , restore the original settings. aborts level adjustment.
Most modifications made in The GIMP can be undone. To view a history of modifications, use the undo dialog included in the default window layout or open one from the toolbox menu with ++.
The dialog shows a base image and a series of editing changes that can be undone. Use the buttons to undo and redo changes. In this way, you can work back to the base image. If you undo a modification then make a new one, the undone modification cannot be redone.
Changes can also be undone and redone with the menu. Alternatively, use the shortcuts Ctrl+Z and Ctrl+Y.
Layers are a very important aspect of The GIMP. By drawing parts of your image on separate layers, change, move, or delete those parts without damaging the rest of the image. To understand how layers work, imagine an image created from a stack of transparent sheets. Different parts of the image are drawn on different sheets. The stack can be rearranged, changing which parts are on top. Individual layers or groups of layers can shift position, moving sections of the image to other locations. New sheets can be added and others set aside.
Use the dialog to view the available layers of an image. The text tool automatically creates special text layers when used. The active layer is highlighted. The buttons at the bottom of the dialog offer a number of functions. More are available in the menu opened when a layer is right-clicked in the dialog. The two icon spaces before the image name are used for toggling image visibility (eye icon when visible) and for linking layers. Linked layers are marked with the chain icon and moved as a group.
Only layers with transparency (an alpha channel) can be placed above other layers in a stack. To add this to a layer, right-click and select it from the menu.
The GIMP has three image modes—RGB, Grayscale, and Indexed. RGB is a normal color mode and is the best mode for editing most images. Grayscale is used for black-and-white images. Indexed limits the colors in the image to a set number. It is mainly used for GIF images. If you need an indexed image, it is normally best to edit the image in RGB then convert to indexed right before saving. If you save to a format that requires an indexed image, The GIMP offers to index the image when saving.
The GIMP includes a wide range of filters and scripts for enhancing images, adding special effects to them or making artistic manipulations. They are available in and . Experimenting is the best way to find out what is available. in the toolbox includes a number of items for creating buttons, logos, and other things.