| openSUSE-Dokumentation Chapter 10. Encryption with Passwords and Encryption Keys / 10.3. Modifying Key Properties | ||||
|---|---|---|---|---|
 | 10.2. Generating a New Key Pair | 10.4. Importing Keys |  | |
| openSUSE-Dokumentation Chapter 10. Encryption with Passwords and Encryption Keys / 10.3. Modifying Key Properties | ||||
|---|---|---|---|---|
| 10.2. Generating a New Key Pair | 10.4. Importing Keys | | |
The descriptions in this section apply to all OpenPGP keys.
Click +++.
Double-click the PGP key you want to view or edit (or select the key, then click +).
Use the options on the tab to add a photo to the key or to change the passphrase associated with the key.
Photo IDs allow a key owner to embed one or more pictures of themselves in a key. These identities can be signed just like normal user IDs. A photo ID must be in JPEG format and should be no larger than 240x288 pixels.
If the chosen image does not meet the required file type or size, Passwords and Encryption Keys can resize and convert it on the fly from any image format supported by the GDK library.
Click the tab to add a user ID to a key.
See Section 10.3.1.1, “Adding a User ID” for more information.
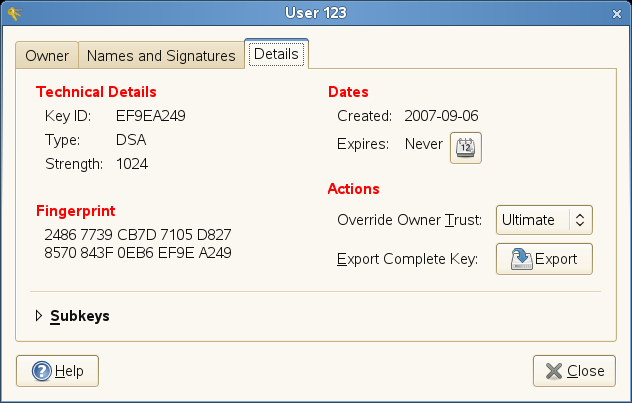
Click the tab, which contains the following properties:
Key ID: The Key ID is similar to the Fingerprint, but the Key ID contains only the last eight characters of the fingerprint. It is generally possible to identify a key with only the Key ID, but sometimes two keys might have the same Key ID.
Type: Specifies the encryption algorithm used to generate a key. DSA keys can only sign. ElGamal keys are used to encrypt.
Strength: Specifies the length, in bits, of the key. The longer the key, the more security it provides. However, a long key will not compensate for the use of a weak passphrase.
Fingerprint: A unique string of characters that exactly identifies a key.
Created: The date the key was created.
Expires: The date the key can no longer be used (a key can no longer be used to perform key operations after it has expired). Changing a key's expiration date to a point in the future re-enables it. A good general practice is to have a master key that never expires and multiple subkeys that do expire and are signed by the master key.
Location: The location where the private key has been stored.
Subkeys: See Section 10.3.1.2, “E diting OpenPGP Subkey Properties” for more information.
 |
Click .
User IDs allow multiple identities and e-mail addresses to be used with the same key. Adding a user ID is useful, for example, when you want to have an identity for your job and one for your friends. They take the following form:
Name (comment) <e-mail address>
Click +++.
Double-click the PGP key you want to view or edit (or select the key, then click +).
Click the tab, then click .
Specify a name in the field.
You must enter at least five characters in this field.
Specify an e-mail address in the field.
Your e-mail address is how most people will locate your key on a key server or other key provider. Make sure it is correct before continuing.
In the field, specify additional information that will display in the name of your new ID
This information can be searched for on key servers.
Click .
Each OpenPGP key has a single master key used to sign only. Subkeys are used to encrypt and to sign as well. In this way, if your sub key is compromised, you don't need to revoke your master key.
Click +++.
Double-click the PGP key you want to edit (or select the key, then click +).
Click the tab, then click .
Use the button to on the left of the dialog box to add, delete, expire, or revoke subkeys.
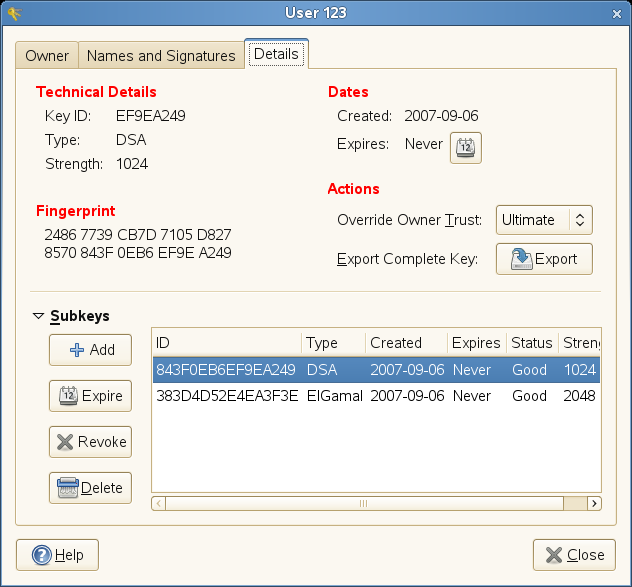 |
Each subkey has the following information:
ID: The identifier of the subkey.
Type: Specifies the encryption algorithm used to generate a subkey. DSA keys can only sign, ElGamal keys are used to encrypt, and RSA keys are used to sign or to encrypt.
Created: Specifies the date the key was created.
Expires: Specifies the date the key can no longer be used.
Status: Specifies the status of the key.
Strength: Specifies the length, in bits, of the key. The longer the key, the more security it provides. However, a long key will not compensate for the use of a weak passphrase.
Click .
The descriptions in this section apply to all SSH keys.
Click +++.
Double-click the Secure Shell key you want to view or edit (or select the key, then click +).
Use the options on the tab to change the name of the key or the passphrase associated with the key.
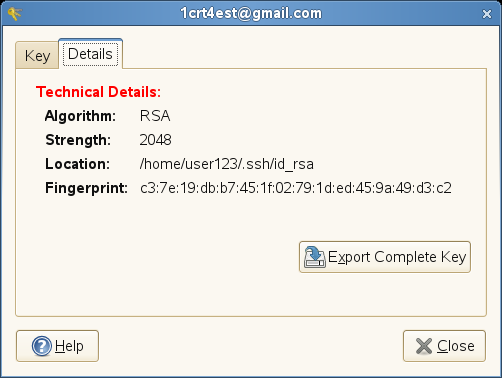
Click the tab, which contains the following properties:
Algorithm: Specifies the encryption algorithm used to generate a key.
Strength: Indicates the length in bits of a key. The longer the key, the more security it provides. However, a long key does not make up for the use of a weak passphrase.
Location: The location where the private key has been stored.
Fingerprint: A unique string of characters that exactly identifies a key.
 |
Click .
