| openSUSE-Dokumentation Part II. Communication and Collaboration / Chapter 14. Synchronizing Your Handheld Devices with GNOME Pilot | ||||
|---|---|---|---|---|
 | 13.7. For More Information | 14.2. The Pilot Applet |  | |
| openSUSE-Dokumentation Part II. Communication and Collaboration / Chapter 14. Synchronizing Your Handheld Devices with GNOME Pilot | ||||
|---|---|---|---|---|
| 13.7. For More Information | 14.2. The Pilot Applet | | |
GNOME Pilot lets you integrate your GNOME desktop with handheld computers. You can use it to set up and perform synchronization between PDAs and your GNOME desktop.
The gnome-pilot package, along with the optional
conduits in evolution-pilot, allows you to move
information between your handheld device and your GNOME desktop. You must
run the setup tool before synchronizing. The setup tool starts the GNOME
Pilot daemon, gpilotd. If it is not running, you
can start the daemon with the /usr/libexec/gpilotd
command. You can also use the GNOME Pilot applet to start the daemon.
To start the GNOME Pilot applet, click +++.
To start the GNOME Pilot configuration tool, click +++.
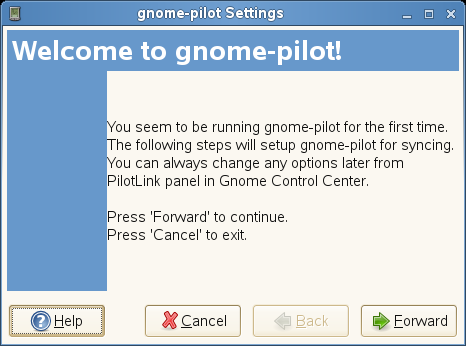
There are three tabs in the Pilot Settings tool: , , and . The first time you run the GNOME Pilot tools, you will be guided through the initial setup by an assistant.
The setup assistant guides you through getting your handheld device ready to synchronize with your desktop system.
Click +++, then click to start the GNOME Pilot Setup Assistant
 |
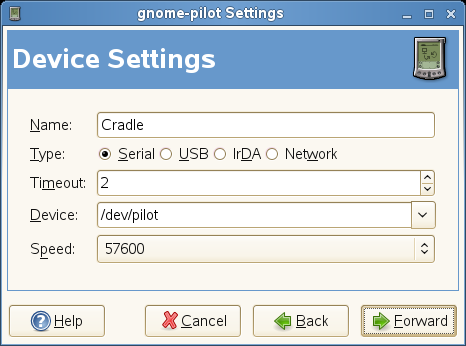
In the Device Settings dialog box, describe your handheld's cradle, then click .
See Section 14.1.3, “Adding or Editing an Entry On the Device Settings Tab” for more information about the information requested by this step.
 |
In the PDA Identification dialog box, identify your device, then click .
If you have previously used synchronization software with this PDA, it will already have a synchronization ID that your desktop can get from it. If you have not, you can set the username and ID on the PDA from your desktop.
 |
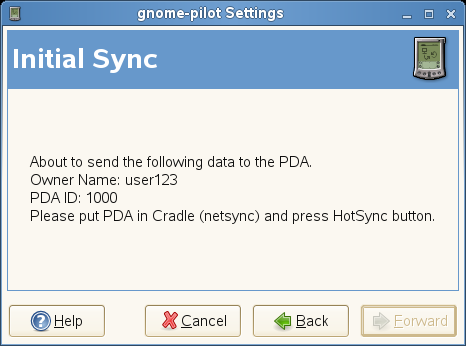
On the Initial Sync dialog box, click to contact your PDA device and get or set the name and other information.
 |
Choose a name to use when referring to the PDA, and a directory on your desktop system where you will store backups and other data.
The Pilots tab lists the handheld devices you have configured. If you have not used the Pilot Settings tool before, you will not have any items in this list, and the tool will open a new window to walk you through the process of creating one. To add a new pilot, click . To edit an existing pilot entry, select it and click .
When editing or creating an entry, you will be asked for five pieces of information:
User Name: This is the name used on your Pilot. If your pilot already has a name configured, you can get it from the pilot by clicking the button. You can also set it on the pilot by clicking the button.
ID: This is the user ID number from your pilot. You can get this value from the handheld by clicking the button. You can also set it on the handheld by clicking the button.
Pilot Name: This is the name by which your handheld will be identified. For example, you could call it MyPilot, or Palm5, or Roger.
Local Basedir: This is the directory where you will store information backed up from your handheld.
Sync Action: This is the action that will be performed when you press the HotSync button on your cradle. If you set this option to , then you can choose different actions depending on the type of data being handled. If you set it to anything else, all data will be handled the same way. For descriptions of the synchronization actions, see Section 14.1.4, “Conduit Settings”.
The Device Settings tab controls the way your desktop system looks at your handheld as hardware. To add an entry to the list, click . To edit a device, select it, then click .
For each entry, you can specify the following options:
Name: This is the name used to display the device in a list.
Type: Select the type of connection you have: Serial, USB, IrDA (infrared), or Network.
Timeout: Specifies the amount of time to try to connect to the system, in seconds. If there is no communication between the desktop and the handheld for this many seconds, the system will stop trying.
Device:
Your handheld is represented to the computer as a special file in the
/dev directory. The name of the file will vary
from system to system. In many cases, however, it will be
/dev/pilot. Other possible values are
/dev/ttyS0 or /dev/ttyS1
for serial cradles (under Windows, these are referred to as COM
ports), or /dev/usb/, for USB cradles.
You will need to make sure that your user account has read, write, and
execute permissions on this device. To add those permissions, become
root with the su command and enter the command
chmod a+wrx /dev/ttyS0.
Substitute the name of the device you are setting.
If you have not chosen the correct device, you will get an error message when you click .
Speed: Select a number from the drop-down menu. The higher the number, the faster you are asking the system to transfer information. Normally, you should not change this option, because it is set by default for the fastest value that your connection type can provide. If you experience problems at high speeds, reducing the transfer speed might help.
A Conduit is a specialized program that channels data between your computer and your handheld. The gnome-pilot package includes several, and you can also install additional conduits such as those for Evolution.
Each configured handheld might have its own set of conduits and conduit settings.
If a conduit is disabled, that type of data will be ignored when you HotSync. If a conduit is enabled, its data will be synchronized according to its settings. To enable or disable a conduit, select it and click the or button on the right side of the list of conduits.
To edit the settings, select a conduit and click the button. Each conduit will have at least two settings: an to perform whenever you synchronize, and a , performed only the next time you synchronize.
Not all conduits will have all of these actions. The list of possible actions includes the following:
Disabled: Do nothing.
Synchronize: Ensures that data is the same in both places, copying new data from the pilot to the desktop, and from the desktop to the computer.
Copy to pilot: Copies all data from the desktop to the pilot. New data added on the pilot will not be copied to the desktop.
Copy from pilot: Copy all data from the pilot to the desktop. New data added on the desktop will not be copied to the pilot.
Other settings might be available as well, including , which determines the order in which conduits will be used, and , which determines whether to copy private information as well as public, or just the public data.
