Contents
Abstract
Nowadays, the Internet connection is cheap and available almost everywhere. It is important that the connection is as secure as possible. Virtual Private Network (VPN), is a secure network within a second, insecure network such as the Internet or WLAN. It can be implemented in different ways and serves several purposes. In this chapter, we focus on VPNs to link branch offices via secure wide area networks (WANs).
This section introduces a brief overview of some scenarios which VPN offers, and some relevant terminology as well.
There are many solutions to set up and build of a VPN connection. This chapter focuses on the OpenVPN package. Compared to other VPN software, OpenVPN can be operated in two modes:
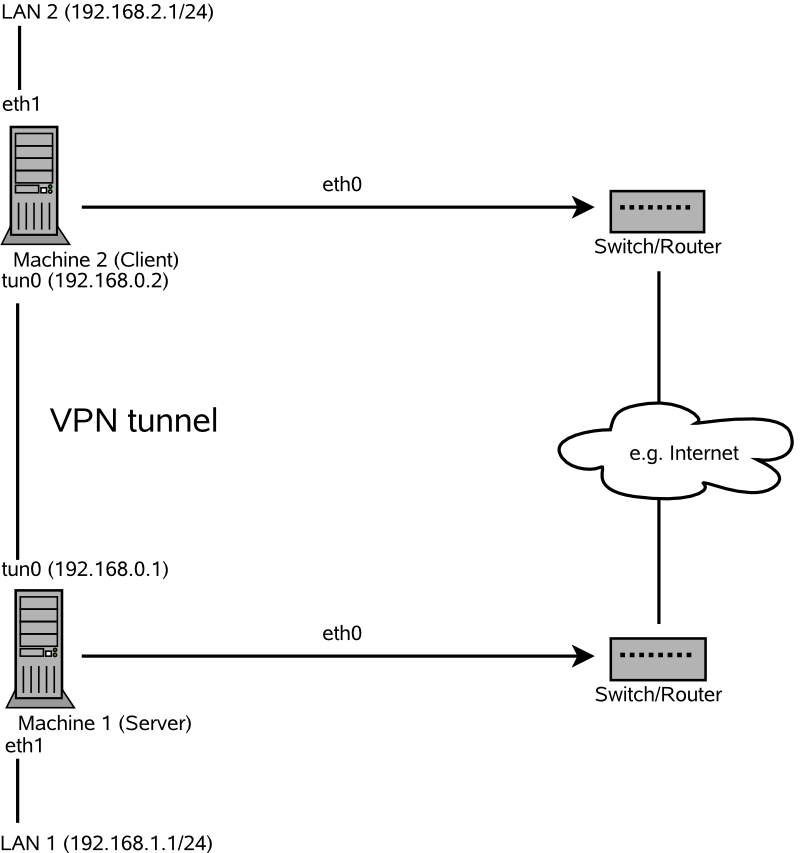
- Routed VPN
Routing is an easy solution to set up. It is more efficient and scales better than bridged VPN. Furthermore, it allows the user to tune MTU (Maximum Transfer Unit) to raise efficiency. However, in a heterogeneous environment NetBIOS broadcasts do not work if you do not have a Samba server on the gateway. If you need IPv6, each tun drivers on both ends must support this protocol explicitly.
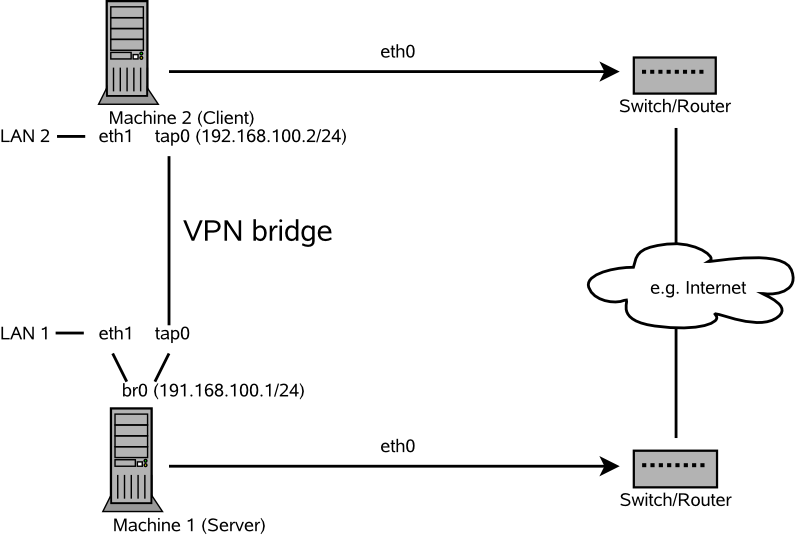
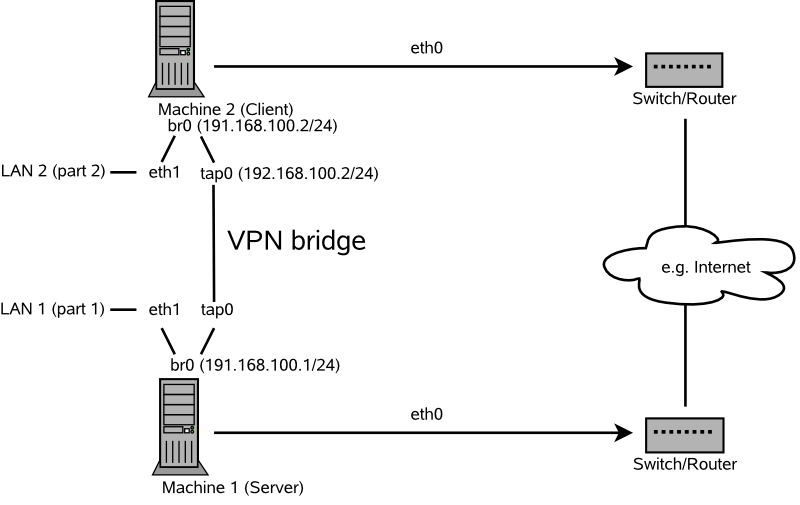
- Bridged VPN
Bridging is a more complex solution. It is recommended when you need to browse Windows file shares across the VPN without setting up a Samba or WINS server. Bridged VPN is also needed if you want to use non-IP protocols (such as IPX) or applications relying on network broadcasts. However, it is less efficient than routed VPN. Another disadvantage is that it does not scale well.
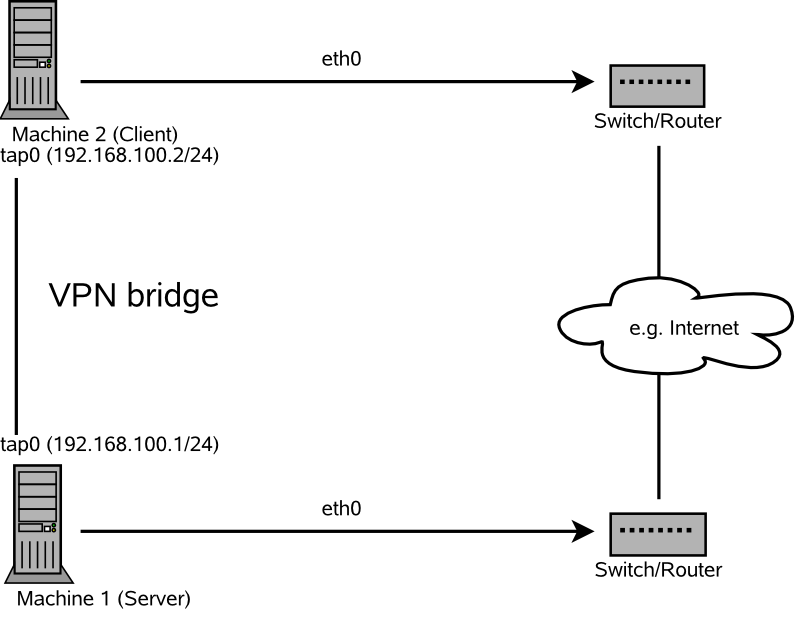
The major difference between bridging and routing is that a routed VPN cannot IP-broadcast while a bridged VPN can.
Whenever you setup a VPN connection your IP packets are transferred over your secured tunnel. The connection between the client's device and the server's device is called a tunnel. A tunnel can use a so-called tun or tap device. They are virtual network kernel drivers which implement the transmission of ethernet frames or ip frames/packets:
- tun device
A tun device simulates a point-to-point network (layer 3 packets in the OSI model such as Ethernet frames). A tun device is used with routing and works with IP frames.
- tap device
A tap device simulates an ethernet device (layer 2 packets in the OSI model such as IP packets). A tap device is used for creating a network bridge. It works with Ethernet frames.
The userspace program OpenVPN can attach itself to a tun or tap device
to receive packets sent by your OS. The program is also able to write
packets to the device. For more information, see
/usr/src/linux/Documentation/networking/tuntap.txt.
You must install the kernel-source package to read
this file.
The following example creates a point-to-point VPN tunnel. It
demonstrates how to create a VPN tunnel between one client and a server.
It is assumed that your VPN server will use private IP addresses like
and your client the IP
address . You can
modify these private IP addresses to your needs but make sure you select
addresses which do not conflict with other IP addresses.
![[Warning]](admon/warning.png) | Use It Only For Testing |
|---|---|
This scenario is only useful for testing and is considered as an example to get familiar with VPN. Do not use this as a real world scenario to connect as it can compromise your security and the safety of your IT infrastructure! | |
To configure a VPN server, proceed as follows:
Procedure 15.1. VPN Server Configuration
Install the package
openvpnon the machine that will later become your VPN server.Open a shell, become
rootand create the VPN secret key:openvpn --genkey --secret /etc/openvpn/secret.key
Copy the secret key to your client:
scp /etc/openvpn/secret.key root@:/etc/openvpn/
Create the file
/etc/openvpn/server.confwith the following content:dev tun ifconfig secret secret.key
If you use a firewall, start YaST and open UDP port 1194 (++.
Start the OpenVPN service as
root:rcopenvpn start
To configure the VPN client, do the following:
Procedure 15.2. VPN Client Configuration
Install the package
openvpnon your client VPN machine.Create
/etc/openvpn/client.confwith the following content:remote
IP_OF_SERVERdev tun ifconfig secret secret.keyReplace the placeholder
IP_OF_SERVERin the first line with either the domain name, or the public IP address of your server.If you use a firewall, start YaST and open UDP port 1194 as described in Step 5 of Procedure 15.1, “VPN Server Configuration”.
Start the OpenVPN service as
root:rcopenvpn start
After the OpenVPN is successfully started, test if the tun device is available with the following command:
ifconfig tun0
To verify the VPN connection, use ping on both client and server to see if you can reach each other. Ping server from client:
ping -I tun0
Ping client from server:
ping -I tun0
The example shown in Section 15.2 is useful for testing, but not for daily work. This section explains how to build a VPN server that allows more than one connection at the same time. This is done with a public key infrastructure (PKI). A PKI consists of a pair of public and private keys for the server and each client and a master certificate authority (CA), which is useed to sign every server and client certificate.
The general overview of this process involves the following steps explained in these sections:
Before a VPN connection gets established, the client must authenticate the server certificate. Conversely, the server must also authenticate the client certificate. This is called mutual authentication.
You can use two methods to create the respective certificates and keys:
Use the YaST CA module (see Chapter 16, Managing X.509 Certification), or
Use the scripts included with the
openvpnpackage.
The easy-rsa utilities use the openssl.cnf file
stored under
/usr/share/openvpn/easy-rsa/.
In most cases you can leave this file as it is.
VER
Procedure 15.3. Generate the Master CA And Key
Open a shell and become
root.Change the directory to
/usr/share/openvpn/easy-rsa/. Replace the placeholderVER/VERwith either1.0or2.0, the current versions.Copy the file
varsto/etc/openvpnand setexport EASY_RSAto/usr/share/openvpn/easy-rsa:export EASY_RSA="/usr/share/openvpn/easy-rsa"
In the
varsfile change theKEY_COUNTRY,KEY_PROVINCE,KEY_CITY,KEY_ORG, andKEY_EMAILvariables according to your needs.Initialize the PKI:
source /etc/openvpn/vars && ./clean-all && ./build-ca
Enter the data required by the build-ca script. Usually you can take the defaults that you have set in Step 4. Additionally set
Organizational Unit NameandCommon Namethat were not set previously.
Once done, the master certificate and key are saved as
/usr/share/openvpn/easy-rsa/.
VER/keys/ca.*
Procedure 15.4. Generate The Private Server Key
Change to the
/usr/share/openvpn/easy-rsa/directory.VER/Run the following script:
./build-key-server server
The argument (here:
server) is used for the private key filename.Accept the default parameters, but fill
serverfor theCommon Nameoption.Answer the next two questions (“Sign the certificate? [y/n]” and “1 out of 1 certificate requests certified, commit? [y/n]”) with
y(yes).
Once done, the private server key is saved as
/usr/share/openvpn/easy-rsa/.
VER/keys/server.*
Procedure 15.5. Generate Certificates and Keys for a Client
Change to the
/usr/share/openvpn/easy-rsa/directory. Replace the placeholderVER/VERwith either1.0or2.0.Create the key as in Step 2 of Procedure 15.4, “Generate The Private Server Key”:
./build-key client
Repeat the previous step for each client that is allowed to connect to the VPN server. Make sure you use a different name (other than “
client”) and an appropriateCommon Name, because this parameter has to be unique for each client.
Once done, the client certificate keys are saved as
/usr/share/openvpn/easy-rsa/keys/client.*
(depending on the name that you have given for the
build-key command).
Procedure 15.6. Final Configuration Steps
Make sure your current working directory is
/usr/share/openvpn/easy-rsa/.VER/Create the Diffie-Hellman parameter:
./build-dh
Create the
/etc/openvpn/ssldirectory.Copy the following files to
/etc/openvpn/ssl:cp keys/ca.{crt,key} keys/dh1024.pem keys/server.{crt,key} /etc/openvpn/sslCopy the client keys to the relevant client machine. You should have the files
client.crtandclient.keyin the/etc/openvpn/ssldirectory.
The configuration file is mostly a summary of
/usr/share/doc/packages/openvpn/sample-config-files/server.conf
without the comments and with some small changes concerning some paths.
Example 15.1. VPN Server Configuration File
# /etc/openvpn/server.conf port 1194proto udp
dev tun0
# Security
ca ssl/ca.crt cert ssl/server.crt key ssl/server.key dh ssl/dh1024.pem server 255.255.255.0
ifconfig-pool-persist /var/run/openvpn/ipp.txt
# Privleges
user nobody group nobody # Other configuration
keepalive 10 120 comp-lzo persist-key persist-tun status /var/log/openvpn-status.log log-append /var/log/openvpn.log verb 4
| The TCP/UDP port to which OpenVPN listens. You have to open up the port in the Firewall, see Chapter 14, Masquerading and Firewalls. The standard port for VPN is 1194, so in most cases you can leave that as it is. |
| The protocol, either UDP or TCP. |
| The tun or tap device, see Section 15.1.2, “Tun and Tap Devices” for the differences. |
|
The following lines contain the relative or absolute path to the root
server CA certificate ( |
|
Supplies a VPN subnet. The server can be reached by
|
| Records a mapping of clients and its virtual IP address in the given file. Useful when the server goes down and (after the restart) the clients get their previously assigned IP address. |
|
For security reasons it is a good idea to run the OpenVPN daemon with
reduced privileges. For this reason the group and user
|
|
Several other configurations, see comment in the original
configuration from
|
After this configuration, you can see log messages from your OpenVPN
server under /var/log/openvpn.log. When you have
started it for the first time, it should finish it with:
... Initialization Sequence Completed
If you do not see this message, check the log carefully. Usually OpenVPN gives you some hints what is wrong in your configuration file.
The configuration file is mostly a summary from
/usr/share/doc/packages/openvpn/sample-config-files/client.conf
without the comments and with some small changes concerning some paths.
Example 15.2. VPN Client Configuration File
# /etc/openvpn/client.conf clientIP_OR_HOSTNAME1194
| We must specify that this machine is a client. |
| The network device. Both clients and server must use the same device. |
| The protocol. Use the same settings as on the server. |
|
Replace the placeholder |
|
For security reasons it is a good idea to run the OpenVPN daemon with
reduced privileges. For this reason the group and user
|
| Contains the client files. For security reasons, it is better to have a separate file pair for each client. |
| Turns compression on. Use it only when the server has this parameter switched on as well. |
If you need to change nameservers before or during your VPN session, use netconfig.
Use the following procedure to change a nameserver:
Procedure 15.7. Changing Nameservers
Open a shell and log in as
root.Create the file
/etc/openvpn/client.upwith the following contents:/sbin/netconfig modify -i "${1}" -s openvpn <<EOT DNSSEARCH='${domain}' DNSSERVERS='${dns[*]}' EOTStart your VPN connection with rcopenvpn
start.Create the file
/etc/openvpn/client.downwith the following contents:/sbin/netconfig remove -i "${1}" -s openvpnRun netconfig and replace the line
DNSSERVERSwith your respective entry:netconfig modify -i tun0 -s openvpn <<EOT DNSSEARCH='mt-home.net' DNSSERVERS='192.168.1.116' EOT
To check, if the entry has been successfully inserted into
/etc/resolv.conf, execute:grep -v ^# /etc/resolv.conf search mt-home.net mat-home.net nameserver ... nameserver ... nameserver 192.168.1.116
To remove the DNS entry, execute:
netconfig remove -i tun0 -s openvpn
Find another example in
/usr/share/doc/packages/openvpn/contrib/pull-resolv-conf/.
If you need to specify a ranking list of fallback services, use the
NETCONFIG_DNS_RANKING variable in
/etc/sysconfig/network/config. The default value is
auto which resolves to:
+strongswan +openswan +racoon +openvpn -avahi
Preferred service names have the + prefix, fallback
services the - prefix.
The following sections describe the setup of OpenVPN connections with GNOME and KDE desktop tools.
To setup an OpenVPN connection in KDE4 that can be easily turned on or off, proceed as follows:
Make sure you have installed the
NetworkManager-openvpn-kde4package with all dependencies resolved.Right-click on a widget of your panel and select +.
Select .
Right-click on the icon and choose .
Add a new VPN connection with +. A new window opens.
Choose the between or depending on what you have setup with your OpenVPN server.
Insert the necessary files into the respective text fields. From our example configuration these are:
/etc/openvpn/ssl/ca.crt/etc/openvpn/ssl/client1.crt/etc/openvpn/ssl/client1.keyThe user
The password for the user
If you have not used the KDE Wallet System, you are asked if you want to configure it. Follow the steps in the wizard. After you have finished this step, you are reverted back to the dialog.
Finish with .
Enable the connection with your Network manager applet.
To setup a OpenVPN connection in GNOME that can be easily turned on or off, proceed as follows:
Make sure you have installed the
NetworkManager-openvpn-gnomepackage with all dependencies resolved.Start the Network Connection Editor with Alt+F2 and insert nm-connection-editor into the text field. A new window appears.
Select the tab and click .
Choose the VPN connection type, in this case .
Choose the type. Select between or depending on the setup of your OpenVPN server.
Insert the necessary files into the respective text fields. According to the example configuration, these are:
The user (only available when you have selected )
The password for the user (only available when you have selected )
/etc/openvpn/ssl/client1.crt/etc/openvpn/ssl/ca.crt/etc/openvpn/ssl/client1.keyFinish with and .
Enable the connection with your Network Manager applet.
For more information about VPN, visit:
http://www.openvpn.net: Homepage of VPN
/usr/share/doc/packages/openvpn/sample-config-files/: Examples of configuration files for different scenarios