Contents
- 1.1. OpenOffice.org Modules
- 1.2. What's New in OpenOffice.org 3.1.1?
- 1.3. Novell Edition of OpenOffice.org
- 1.4. Compatibility with Other Office Applications
- 1.5. Starting OpenOffice.org
- 1.6. Saving OpenOffice.org Files with a Password
- 1.7. Customizing OpenOffice.org
- 1.8. Changing the Global Settings
- 1.9. Using Templates
- 1.10. For More Information
Abstract
OpenOffice.org is an open-source office suite that provides tools for all types of office tasks such as writing texts, working with spreadsheets, or creating graphics and presentations. With OpenOffice.org, you can use the same data across different computing platforms. You can also open and edit files in other formats, including Microsoft Office, then save them back to this format, if needed. This chapter contains information that applies to all of the OpenOffice.org modules and gives an overview of the features specific to the Novell edition of OpenOffice.org that is shipped with openSUSE®.
 |
OpenOffice.org consists of several application modules (subprograms), which are designed to interact with each other. They are listed in Table 1.1. A full description of each module is available in the online help, described in Section 1.10, “For More Information”.
Table 1.1. The OpenOffice.org Application Modules
|
Module |
Purpose |
|---|---|
|
Writer |
Word processor application module |
|
Calc |
Spreadsheet application module |
|
Impress |
Presentation application module |
|
Base |
Database application module |
|
Draw |
Application module for drawing vector graphics |
|
Math |
Application module for generating mathematical formulas |
The following chapters cover individual OpenOffice.org modules:
- Chapter 2, OpenOffice.org Writer
Introduces OpenOffice.org Writer.
- Chapter 3, OpenOffice.org Calc
Introduces OpenOffice.org Calc.
- Chapter 4, Further OpenOffice.org Modules
Introduces OpenOffice.org Impress, Base, Draw, and Math.
For a list of new core features available with OpenOffice.org 3.1.1, refer to http://development.openoffice.org/releases/3.1.1.html.
openSUSE® includes the Novell edition of OpenOffice.org. The Novell edition includes several enhancements that are not yet included in the standard edition:
- Excel VBA Macro Interoperability:
OpenOffice.org Novell edition eases the migration of many macros from Microsoft Excel. Although not all macros can be successfully migrated, this interoperability offers more than the standard edition, which does not support migration of macros.
- Data Pilots:
Data Pilots are interoperable with Microsoft Office PivotTables*. OpenOffice.org Novell edition substantially improves the Data Pilot feature, making it possible to edit pilots after creation.
- Enhanced Fonts:
Licensed fonts from Agfa* Monotype* which are metrically identical and visually compatible with some of the key Microsoft fonts. This allows OpenOffice.org Novell edition to match fonts when opening documents originally composed in Microsoft Office, and very closely match pagination and page formatting.
- EMF+Support:
The ability to render EMF+ formatted graphics.
- SVG Support:
The ability to import scalable vector graphics.
- Import File Formats:
Microsoft Works, WordPerfect* text and graphics, T602 files, Office Open XML, and more.
- GroupWise® Integration:
OpenOffice.org Novell edition includes improved integration with ODMA (Open Document Management Architecture) services, for example for GroupWise. If you have the GroupWise client installed on the machine, OpenOffice.org Novell edition will offer to open documents from GroupWise, or save documents in GroupWise.
You can also use the standard edition of OpenOffice.org rather than the Novell edition. If you install the latest version of OpenOffice.org, all of your Novell edition files remain compatible. However, the standard edition does not contain the enhancements made in the Novell edition.
OpenOffice.org can work with documents, spreadsheets, presentations, and databases in many other formats, including Microsoft Office. They can be easily opened like other files and saved back to the original format. Though some work has already been invested in interoperability, occasionally there are still formatting issues. If you have problems with your documents, consider opening them in the original application and resaving them in an open format such as RTF for text documents. In case of migration problems with spreadsheets however, it is advisable to re-save them as Excel files and use this as intermediate format (with CSV format you would lose all cell formatting and CVS sometimes leads to incorrect cell type detection for spreadsheets).
![[Tip]](admon/tip.png) | OpenOffice.org Migration Guide |
|---|---|
For useful information about migrating from other office suites to OpenOffice.org, refer to the OpenOffice.org Migration Guide at http://documentation.openoffice.org/manuals/oooauthors2/0600MG-MigrationGuide.pdf. | |
OpenOffice.org can read, edit, and save documents in a number of formats. It is not necessary to convert files from those formats to the OpenOffice.org format to use those files. However, if you want to convert the files, you can do so. To convert a number of documents, such as when first switching to OpenOffice.org, do the following:
Select ++.
Choose the file format from which to convert.
There are several StarOffice and Microsoft Office formats available.
Click .
Specify where OpenOffice.org should look for templates and documents to convert and in which directory the converted files should be placed.
Documents retrieved from a Windows partition are usually in a subdirectory of
/windows.Make sure that all other settings are correct, then click .
Review the summary of the actions to perform, then start the conversion by clicking . When everything is done, close the Wizard by clicking .
The amount of time needed for the conversion depends on the number of files and their complexity. For most documents, conversion does not take very long.
OpenOffice.org is available for a number of operating systems. This makes it an excellent tool when a group of users frequently need to share files and do not use the same system on their computers.
When sharing documents with others, you have several options.
- If the recipient needs to be able to edit the file
Save the document in the format the other user needs. For example, to save as a Microsoft Word file, click +, then select the Microsoft Word file type for the version of Word the other user needs.
- If the recipient only needs to read the document
Export the document to a PDF file with +. PDF files can be read on any platform using a PDF viewer.
- If you want to share a document for editing
Agree on a common exchange format that works for everyone. TXT and RTF formats, although limited in formatting, might be a good option for text documents.
- If you want to e-mail a document as a PDF
Click ++. Your default e-mail program opens with the file attached.
- If you want to e-mail a document to a Microsoft Word user
Click ++. Your default e-mail program opens with the file attached.
- Send a document as the body of an e-mail
Click ++. Your default e-mail program opens with the contents of the document as the e-mail body.
To start the OpenOffice.org suite, press Alt+F2 and enter ooffice. The OpenOffice.org window opens.
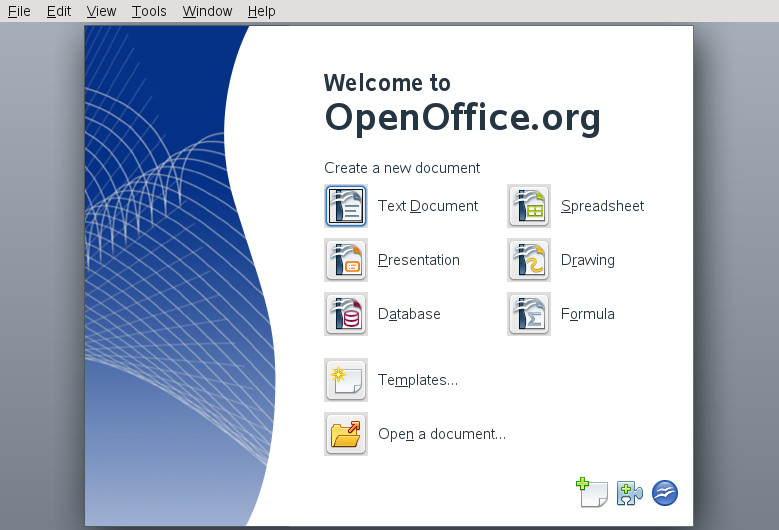 |
In the selection dialog, choose the module you want to open or which file type you want to create. If any OpenOffice.org application is open, you can start any of the other applications by clicking ++.
You can also start individual OpenOffice.org modules from your main menu or by pressing Alt+F2 and entering the command for the respective module. For example, enter oowriter to start OpenOffice.org Writer, or oocalc to start Calculator, or ooimpress to start Impress.
You can save files, no matter in which OpenOffice.org format, with a password. Note that this offers limited protection only. For stronger protection, use encryption methods as described in Chapter Encrypting Partitions and Files (↑Security Guide). To save a file with a password, select + or +. In the dialog that opens, activate the check box and click . After you have typed and confirmed your password, your file will be saved. The next time a user opens the file, he will be prompted for the password.
To change the password, either overwrite the same file by selecting + or select + and click to access the password dialog.
You can customize OpenOffice.org to best suit your needs and working style. Toolbars, menus, and keyboard shortcuts can all be reconfigured to help you more quickly access the features you use the most. You can also assign macros to application events if you want specific actions to occur when those events take place. For example, if you always work with a specific spreadsheet, you can create a macro that opens the spreadsheet and assign the macro to the Start Application event.
This section contains simple, generic instructions for customizing your environment. The changes you make are effective immediately, so you can see if the changes are what you wanted and go back and modify them if they are not. See the OpenOffice.org help files for detailed instructions.
To access the customization dialog in any open OpenOffice.org module, select +.

Procedure 1.1. Customizing Toolbars
In the customization dialog, click the tab.
From the drop-down list, select the toolbar you want to customize.
Select the check boxes next to the commands you want to appear on the toolbar, and deselect the check boxes next to the commands you do not want to appear. A short description for each command is shown at the bottom of the dialog.
With , select whether to save your customized toolbar in the current OpenOffice.org module or in the current document. If you decide to save it in the OpenOffice.org module, the customized toolbar is used whenever you open that module. If you decide to save it together with the current document, the customized toolbar is used whenever you open that document.
Repeat to customize additional toolbars.
Click .
If you want to switch back to the original settings again, open the customization dialog, click the drop-down list and select . Click and to proceed.
Procedure 1.2. Showing or Hiding Buttons in the Toolbar
Click the arrow icon at the right edge of the toolbar you want to change.
Click to display a list of buttons.
Select the buttons in the list to enable (check) or disable (uncheck) them.
Procedure 1.3. Customizing Menus
You can add or delete items from current menus, reorganize menus, and even create new menus.
Click ++.
Select the menu you want to change, or click to create a new menu.
Click for more information about the options in the dialog.
Modify, add, or delete menu items as desired.
Click .
Procedure 1.4. Customizing Keyboard Shortcuts
You can reassign currently assigned keyboard shortcuts and assign new shortcuts to frequently used functions.
Click ++.
Select the keys you want to assign to a shortcut.
Select a and an appropriate .
Click to assign the function to the key or to remove an existing assignment.
![[Note]](admon/note.png)
Further Information Click for more information about the options in the dialog.
Click .
Procedure 1.5. Customizing Events
OpenOffice.org also provides ways to assign macros to events such as application startup or the saving of a document. The assigned macro runs automatically whenever the selected event occurs.
Click ++.
Select the event you want to change.
Click for more information about the options in the dialog box.
Assign or remove macros for the selected event.
Click .
Global settings can be changed in any OpenOffice.org application by clicking + on the menu bar. This opens the window shown in the figure below. A tree structure is used to display categories of settings.
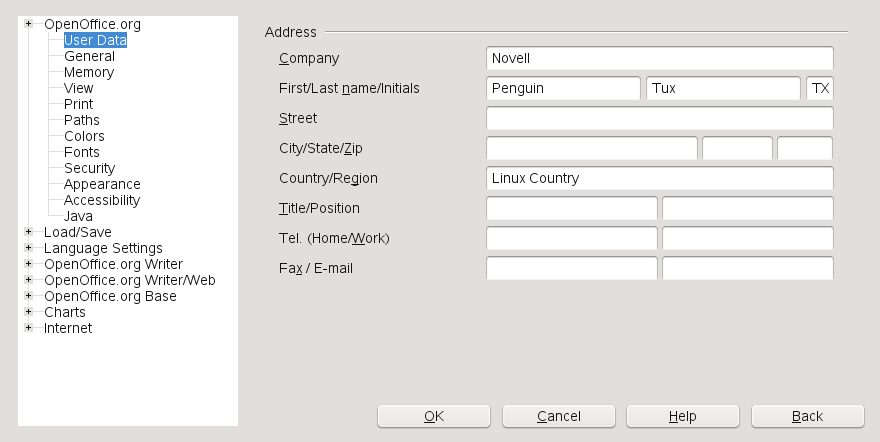
The settings categories that appear depend on the module you are working in. For example, if you are in Writer, the OpenOffice.org Writer category appears in the list, but the OpenOffice.org Calc category does not. The OpenOffice.org Base category appears in both Calc and Writer. The Application column in the table shows where each setting category is available.
The following table lists the settings categories along with a brief description of each category:
Table 1.2. Global Setting Categories
|
Settings Category |
Description |
Application |
|---|---|---|
|
|
Various basic settings, including your user data (such as your address and e-mail), important paths, and settings for printers and external programs. |
All |
|
|
Includes the settings related to the opening and saving of several file types. There is a dialog for general settings and several special dialogs to define how external formats should be handled. |
All |
|
|
Covers the various settings related to languages and writing aids, such as your locale and spell checker settings. This is also the place to enable support for Asian languages. |
All |
|
|
Configures the global word processing options, such as the basic fonts and layout that Writer should use. |
Writer |
|
|
Changes the settings related to the HTML authoring features of OpenOffice.org. |
Writer |
|
|
Changes the settings for Calc, such as those related to sorting lists and grids. |
Calc |
|
|
Changes the settings that should apply to all presentations. For example, you can specify the measurement unit for the grid used to arrange elements. |
Impress |
|
|
Includes the settings related to the vector drawing module, such as the drawing scale, grid properties, and some print options. |
Draw |
|
|
Provides a single dialog to set special print options for formulas. |
Math |
|
|
Provides dialogs to set and edit connections and registered databases. |
Base |
|
|
Defines the default colors used for newly created charts. |
All |
|
|
Includes the dialogs to configure any proxies and to change settings related to search engines. |
All |
![[Important]](admon/important.png) | Settings Apply Globally |
|---|---|
All settings listed in the table are applied globally for the specified applications. They are used as defaults for every new document you create. | |
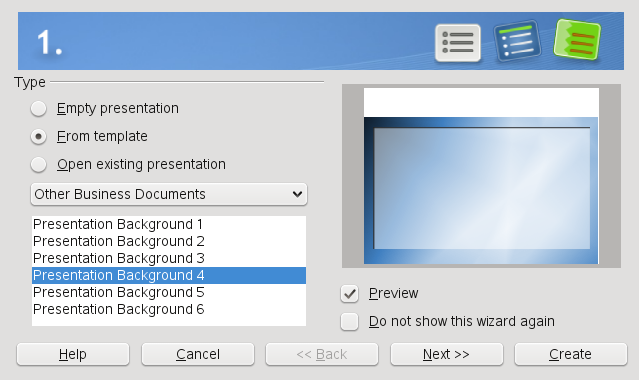
A template is a document containing only the styles (and content) that you want to appear in every document of that type. When a document is created or opened with the template, the styles are automatically applied to that document. Templates greatly enhance the use of OpenOffice.org by simplifying formatting tasks for a variety of different types of documents. For example, in a word processor, you might write letters, memos, and reports, all of which look different and require different styles. Or for spreadsheets, you might want to use different cell styles or headings for certain types of spreadsheets. If you use templates for each of your document types, the styles you need for each document are always readily available.
OpenOffice.org comes with a set of predefined templates, and you can find additional templates on the Internet. For details, see Section 1.10, “For More Information”. If you want to create your own templates, this requires some up-front planning. You need to determine how you want the document to look so you can create the styles you need in that template.
A detailed explanation of templates is beyond the scope of this section. Procedure 1.6, “Creating OpenOffice.org Templates” only shows how to generate a template from an existing document.
Procedure 1.6. Creating OpenOffice.org Templates
For text documents, spreadsheets, presentations, and drawings, you can easily create a template from an existing document as follows:
Start OpenOffice.org and open or create a document that contains the styles and content that you want to re-use for other documents of that type.
Click ++.
Specify a name for the template.
In the box, click the category you want to place the template in. The category is the folder where the template is stored.
Click .
| Converting Former Microsoft Word Templates |
|---|---|
You can convert Microsoft Word templates like you would any other Word document. See Section 1.4.1, “Converting Documents to the OpenOffice.org Format” for information. | |
OpenOffice.org contains extensive online help. In addition, a large community of users and developers support it. The following lists shows some of the places where you can go for additional information.
- OpenOffice.org Online Help Menu
Extensive help on performing any task in OpenOffice.org.
- http://support.openoffice.org/index.html
Official OpenOffice.org support page. provides manuals, tutorials, user and developer forums, users@openoffice.org mailing list, Frequently Asked Questions, and much more
- http://documentation.openoffice.org/manuals/oooauthors2/0600MG-MigrationGuide.pdf
OpenOffice.org Migration Guide. Provides information about migrating to OpenOffice.org from other office suites, including Microsoft Office.
- http://www.taming-openoffice-org.com/
Taming OpenOffice.org: Books, news, tips and tricks.
- http://www.pitonyak.org/oo.php
Extensive information about creating and using macros.
- http://documentation.openoffice.org/Samples_Templates/User/template_2_x/index.html
The OpenOffice.org documentation Web site provides templates for Writer, Calc, Impress, and Draw. Including thesis templates, Curriculum Vitae or templates for CD cases, fax cover sheets, and much more.
- http://www.worldlabel.com/Pages/openoffice-template.htm
Various templates for creating labels with OpenOffice.org.
- http://documentation.openoffice.org/HOW_TO/index.html
Detailed HOWTOs for various OpenOffice.org tasks, including how to create and use templates.