Contents
- 17.1. About DigiKam
- 17.2. Configuring Your Camera
- 17.3. Downloading Pictures from the Camera
- 17.4. Managing Albums
- 17.5. Managing Tags
- 17.6. Creating Powerful Search Filters
- 17.7. Exporting Image Collections
- 17.8. Managing Geolocation
- 17.9. Viewing and Editing Images
- 17.10. Useful Tools
- 17.11. Batch Processing
- 17.12. Troubleshooting
- 17.13. For More Information
Abstract
Managing digital photographs in Linux is very straightforward. KDE's digiKam downloads your images directly from your camera. It helps you organize and manipulate your images to get the best possible results. The application includes several useful plug-ins that can convert your images to various different formats. Image improvement plug-ins also include red eye reduction, speck removal and hot pixel removal. Various filter and effect plug-ins help create little works of art from your digital images.
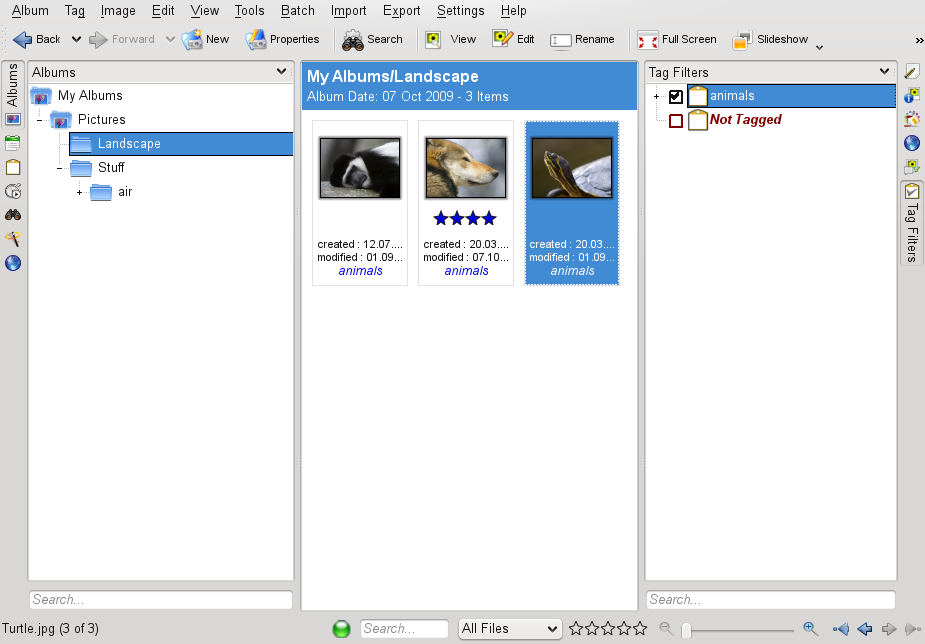
Start digiKam from the main menu or by pressing Alt+F2 and entering digikam. digiKam will ask you to choose a location to store your images and albums. On start-up, digiKam shows a window with two main areas: a list of your albums to the left and the images in the current album to the right. See Figure 17.1, “The Main Window of digiKam”. The far right edge of the window has a number of tabs attached which can be used to display important information about your images, or to manipulate certain image-related data:
Use this tab to access properties assigned to your images, such as file properties (permissions, ownership, modification date, etc.), image properties (dimensions, file format, etc.), and photograph properties (basic model, exposure and aperture information).
Use this tab to access the various kinds of metadata associated with your images, such as EXIF and GPS.
Use this tab to access color management-related data and to analyze the histograms associated with your images.
Use this tab to search for the location stored in the picture.
Use this tab to assign comments, tags or ratings to your images.
Use to filter the amount of images displayed in the main view, using tagging information. For details about tagging in digiKam, refer to Section 17.5, “Managing Tags”.

To download images from your digital camera, simply connect the camera to the USB port of your computer using the USB cable provided by the camera manufacturer. Depending on your camera model, you may need to switch your camera to a special data transfer mode. Consult the camera's manual about this.
There are four possibilities for accessing the pictures on the camera:
USB Mass Devices. If your camera can be switched to a USB mass storage device, select this option. After you connect the camera to the USB port of your computer and turn the camera on, the new USB device is automatically detected and mounted. KDE lets you select the action to take in the event of any such device being mounted. You can choose to start digiKam or any other image viewing or processing application whenever a device of this type is mounted.
PTP (Picture Transfer Protocol, also Known as PictBridge). If your camera can be switched to PTP, select this option. Normally your camera is not automatically mounted in PTP mode, but can be accessed through digiKam.
Special Drivers and Gphoto2. If your camera supports neither USB mass storage nor PTP, try the special drivers provided by gphoto2, see Section 17.12, “Troubleshooting”
Card Readers. Nowadays cameras can use different non-volatile memory cards. For example, SD memory cards, compact flash (CF), memory sticks, to name a few. Some new computers have a card reader on board with different slots, to support all these formats. If you do not want to deal with cables, protocols, or drivers, select this option, as it simplifies a lot. Normally, card readers are detected as removeable devices and are automatically mounted in KDE.
To set up a camera in digiKam, select ++. First, try to detect the camera automatically with . If this fails, browse the list of supported cameras for your model with . If your camera model is not included in the list, try an older model or use USB/IEEE mass storage camera and confirm with .
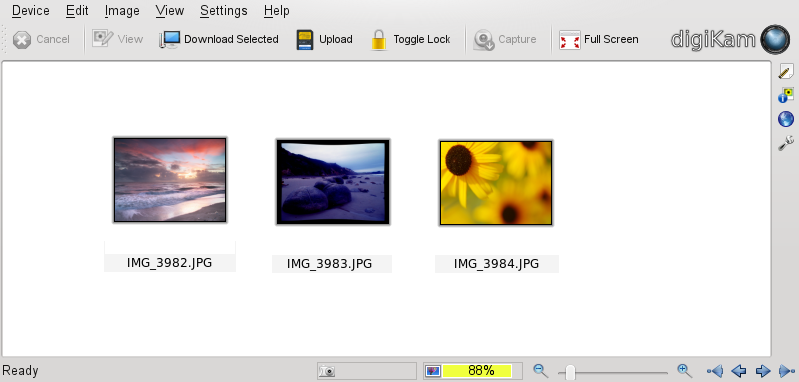
To download images from a camera that has been properly configured, attach the camera to your computer and select the camera from the menu. digiKam opens a window and begins to download thumbnails and display them as in Figure 17.2, “Downloading Pictures from a Camera”. Right-click an image to open a pop-up menu with the options to the image, to , or the image. Select the tab to the right of the download window to rename the image files using . Review the EXIF data associated with the selected image using the tab.
![[Tip]](admon/tip.png) | Renaming Images |
|---|---|
Mass renaming of your images comes in handy if your camera's filenames are not meaningful enough for your purpose. Provide a unique prefix, add an optional date, and let digiKam provide a sequence number. | |
Select all images to download from the camera by pressing the left mouse button or by clicking individual images with Ctrl pressed, or by using one of the select modes provided by the menu at the bottom of the download window. Click and select the destination from the list, or create a new album with (which automatically suggests a filename with the current date). Confirm with to start the download process.
| Downloading Images from the Storage Medium |
|---|---|
To save your camera's battery power, you can also attach a USB hub to your computer (providing an appropriate slot for your storage medium) and download the files from there. Once the USB hub is connected to your computer, the KDE media handler dialog opens and offers to download the images from the medium you attached. | |
By default, digiKam creates a folder called to hold all root albums, called collections. Collections can store albums, while albums store sub albums and images. The first collection was created on first start with the First-run Wizard dialogue.
The albums can be sorted by directory layout, by collection name set in the album properties, or by the date that the albums were first created (this date can also be changed in the properties of each album).
To create a new album, use one of these methods:
Upload new images from the camera and create the target album during the download.
Create a new album by selecting a collection folder first and then + from the main menu or via right-click.
Import an existing folder of images from your hard disk (select +).
Right-click a collection folder and select .
To create a new collection, go to +, menu and choose .
Once you have chosen to create a new album, provide some basic administrative information about the new album, such as an album title. Optionally, choose a category, insert some comments, and select an album date. Categories are a way of organizing your albums by a common label. This label is used when you select ++. The comment is shown in the banner at the top of the main window. The album date is used when you select ++.
digiKam uses the first photograph in the album as the preview icon in the list. To select a different one, right-click the respective photograph and select from the context menu.
Managing a high number of different images across various albums can be very difficult. To manage your images by custom categories and across albums, digiKam provides the system. Tags categorize images, and more than one tag can be assigned to an image.
For example, assume that you took several pictures of animals and distributed them across various albums. Now you are looking for an easy way to generate an overview of all pictures ever taken of animals. Using digiKam's tags, proceed as follows for this scenario:
Select + in the upper menu bar and enter a name for the new tag, in this case
animals.The dialog box allows you to create hierarchical tags, too. For example, to have a
beartag which is underneath aanimalstag, insertanimals/bearinto the text field. Provide an optional icon and leave this dialog with .Go to each album and tag all images showing some animals by right-clicking the image and selecting ++. To tag more then one picture at once, use the Ctrl key.
If you need to process a huge number of images, an easier way to do the tagging would be using the tab from the tab bar at the right edge of the main window. This interface allows you to assign tags to this image, enter an optional descriptive comment, and rate this image. When you are done with the first image, stay in this dialog, click the right arrow button, and click when finished to apply your settings. Do it with all your images of this album. Proceed similarly with all other albums and images.
To retrieve all images in your entire collection that carry a certain tag
(in this case animals), proceed as follows:
Open the tab in the left tab bar.
Unfold the item.
Select the tag.
As a result, all images in your entire collection carrying this tag are displayed.
The in the far right edge of the main window limits the number of images displayed for the current album to those marked by the tag or tags selected here.
Any image collection soon becomes unmanageable if you do not find a means to easily search for the images you need and find them. To help you organize your collection, digiKam offers you two search options:
- Simple Search
A basic search. Select + and enter a text string that might be associated with your image (image or tag name or comment) and hit . You can save this search for future use, and edit other existing searches listed under on the left edge of your digiKam window.
- Advanced Search
Complex search filter. Select +, provides a wide spectrum of search criteriums, which are:
- File, Album, Tags
Search for names of albums, tags or the filenames of pictures.
- Picture Properties
Search for image properties like date, rating, file size, color depth and a lot more.
- Caption, Comment, Title
Search for comments, author and IPTC information.
- Photograph Information
Search for photograph information like focal length, sensitivity and so on..
With the button it is possible to combine several search criteria. .
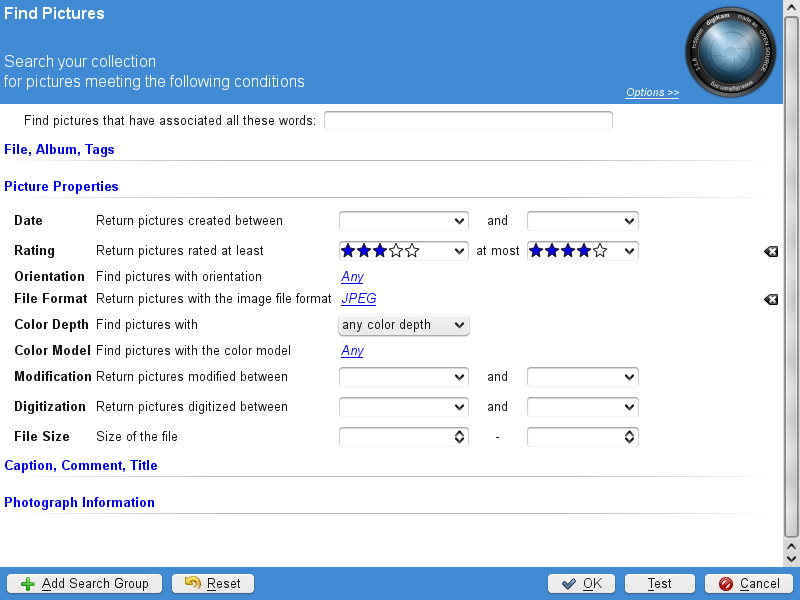
The following example illustrates how to create an using rating or tag information to search for images:
Select + from the main menu.
Select criterion. Now select from 2 to 5 stars.
Select the button. Another search board appears. It is possible to combine search parameters with or and the four options. Click on .
Select the criterion and choose a tag from the tags list.
Select the criterion. Choose JPEG as file format and press the button. The results of your search are displayed in the digiKam window.
To save the search for future use, click on tab on the left side. Specify a name for this search and by clicking the save button. Leave the dialog with another click on the tab.
digiKam provides several export options that help archive and publish your personal image collections. It offers archiving to iPod, HTML export, and export to a remote gallery.
digiKam comes with some customized export functions for the most known online archives and the general export function +. To create an HTML export of your image collection, proceed as follows:
Select +.
Determine which part of your collection should be archived by selecting albums or tags in and click .
Use dialog to set the appearance of your HTML gallery and click .
Specify size, compression and file type for the thumbnails used for gallery navigation in and click .
Determine the location of the gallery on disk with and click .
To export your collection to an external image gallery on the Internet, proceed as follows:
Get an account for an external Web site to host your gallery.
Select + and provide the URL, username, and password for the external site when asked. digiKam establishes a connection to the site specified and opens a new window called .
Determine the location of your new album in the gallery.
Click and provide the information requested by digiKam.
Upload the images to the new album with .
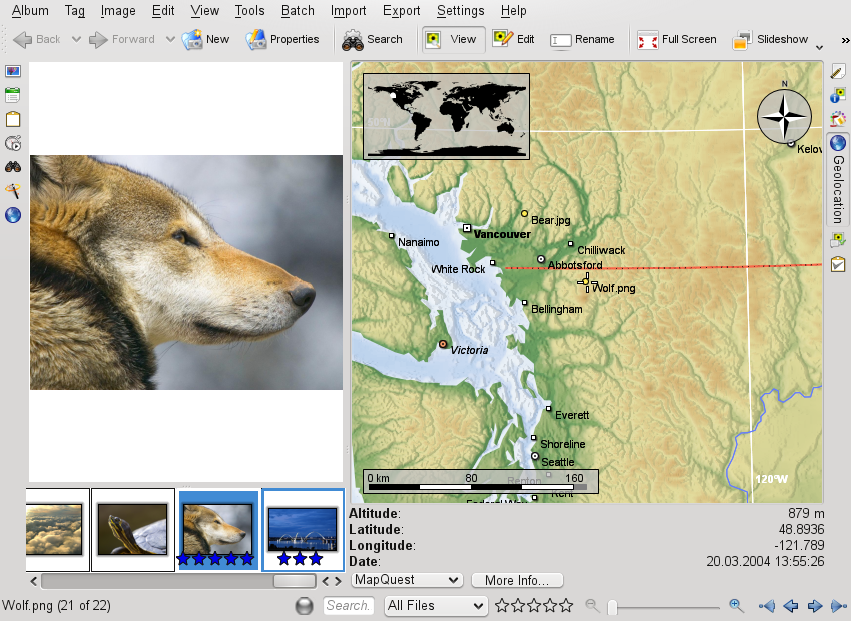
Some cameras store GPS (Global Positioning System) coordinates within the photographs when they take a picture. With this information digiKam is able to illustrate and search photographs by their location and display them on a globe. To make use of Geolocation, proceed as follows:
- Search the Map
Click on the tab on the left side. Press Shift ctrl and the left mouse button to choose an area on the map. Use the mouse wheel to zoom in and out. Every image matching the coordinates of the area will be displayed inside the main window.
- Show Geolocation
Click on the tab on the right side to open the globe. Select one or more pictures with the left mouse button. Every picture containing GPS information will be displayed on the map. To zoom in/out use the mouse wheel.
- Adding Geolocation
Choose a picture in the main window and select ++. Choose the location on the map or enter the coordinates manually and press . The coordinates are now stored in the image’s EXIF tags. To edit several pictures at once press the Ctrl key while choosing the desired pictures.
digiKam comes with a comprehensive image viewing and editing suite
consisting of various plug-ins. To enter digiKam's viewing or editing
mode, right-click an image thumbnail and select
or from the context menu. To use the plug-ins,
install the digikamimageplugins
package.
To view one or more images you have the following options:
To view a single image, browse to your album or collection and click on your image to display it. Another click brings you back to the previous view.
To start a slide show with all images, use ++.
To start a slide show with selected images only, hold down the Ctrl key, select your images, and choose ++.
To edit a selected image, use from the main menu. This opens a window which contains some of the most frequently used basic editing options:
Use the back/forward buttons to browse your album without having to go back to the full album view.
Use the undo/redo menus to selectively undo or redo certain operations.
Use the zooming options to zoom in or out, or to fit the image view to the window size you are using. Use the looking glass icon to selectively zoom into a particular area of the image.
Flip the image clockwise or counter-clockwise.
Activate a slide show or full screen view of the selected image.
The editing mode contains more useful features. Use the menu to superimpose various kinds of graphics and text effects onto your images without having to bother about filters and their fine-tuning:
Select the type of texture you want to apply to your image and determine how prominent this texture should be (). digiKam applies the texture and saves the changes to the original copy of your image.
Select the type of border. Depending on the type of border you have selected, choose one or two colors to be used for the border and set the width of the border around your image. digiKam creates the border and saves the changes to the original copy of your image.
Enter the text you want to superimpose on the image. Choose font, font style and size. Select the text justification and decide whether the text should be rotated (and to what degree). Add an optional border and semi-transparency. digiKam adds your text layer to the original image.
Just as you can superimpose any text on your image, you can also apply ready-made templates to create funny greeting cards, posters and the like.
The menu allows you to manage all kinds of different color-related settings. Its capabilities range from simple auto correction mechanisms to full-blown color management via color profiles:
- Auto Color Correction
If aiming for a straightforward color and exposure correction of your image, try this option. Choose from various preset modes and apply the one that matches best. Use the histograms to determine whether the result matches your needs.
- Brightness/Contrast/Gamma
This tool offers a simple way of fixing over or underexposed images.
- Hue/Saturation/Lightness
This tool helps you to optimize images that have been taken under very bright lighting conditions and appear somewhat washed out. Bring color saturation back to these images by manipulating the hue and saturation sliders. Depending on the level of color, you might also want to adjust the lightness to prevent the image from registering too dark. Of course, you can also use this tool to achieve the opposite effect if you need to brighten up an image that has been taken at low light conditions and contains far too much color saturation.
- Color Balance
Depending on the lighting conditions under which an image was taken or the quality of an image scan, the colors may appear somehow out of balance. Using the color balance tool, you can try to shift the balance towards another end of the color spectrum.
- Invert
Invert the color values.
- Black & White
Transform your color image into black and white. Use the , , , and to tweak the end product. The tab offers you to emulate the effects various black and white films. To emulate color filters used with the camera lens, use the tab. Note that you can only apply one filter at a time. Using the tab you can have your black and white image tinted in a particular way (sepia, for example).
- Depth
Determine the color depth (in bits). Transform 8-bit into 16-bit images and vice versa.
- Color Management
Color management via ICC color profiles helps you maintain color fidelity across multiple output devices (camera, display, printer).
- Levels Adjust
Use this option to control multiple levels and to check the resulting image in just one tool. It lets you save the chosen level settings and thus enables you to apply the same corrections to multiple images, if needed. This comes in handy if you know that your camera tends to use the same faulty color settings all the time, and you would like to be able to correct them with just a single click.
- Color Effects
This tool offers a selection of color effects like edge finding, solarizing, etc.
- White Balance
Every source of light registers differently on your digital camera's chip. Depending on the light source, the color temperature tends to register either warmer (towards the red end of the spectrum) or cooler (towards the blue end of the spectrum) than standard daylight. Most cameras ship with preset white balance schemes that try to compensate these effects. If the resulting images registers faulty, use the white balance adjustment provided by digiKam. Either manipulate the color temperature directly by using the Kelvin slider, or choose one of the preset white balance schemes.
- Curves Adjust
This tool allows you to basically perform any operation available through the and the tools, but in one tool and using free-function mapping. Therefore this tool is more powerful and flexible than the other two, but it may take some time to get used to.
- Channel Mixer
The channel mixer tool provides an alternative way of converting colored images to black and white. Using the option and the channel sliders, you can selectively determine how much each of the color channels contributes to the overall image. The channel mixer option is much more flexible than the standard conversion to black and white, because you can manage each color channel separately.
Use the menu to address a number of common defects related to digital imagery:
- ,
Tweak the sharpness of your image or smooth it.
Reduce or eliminate red eyes caused by use of a flash.
“Heal” defective areas of your image.
Remove artifacts, such as those caused by dust on your lens or sensor. Compensate for pixel noise caused by high ISO settings of your digital camera and reduce noise and artifacts in low quality scans.
Detect and erase problem pixels of your image caused by defective pixels of your camera's sensor.
- +
Compensate for barrel and pincushion distortion of your images caused by the use of strong wide-angle or telephoto lenses.
- +
Compensates circular shades (vignettes) at the edges or in the center of your image that were caused by the use of strong wide-angle or telephoto lenses.
- +
Compensates circular shades (vignettes) at the edges or in the center of your image that were caused by the use of strong wide-angle or telephoto lenses.
Provides an all-inclusive treatment to images exhibiting various digital defects, such as noise and scratches.
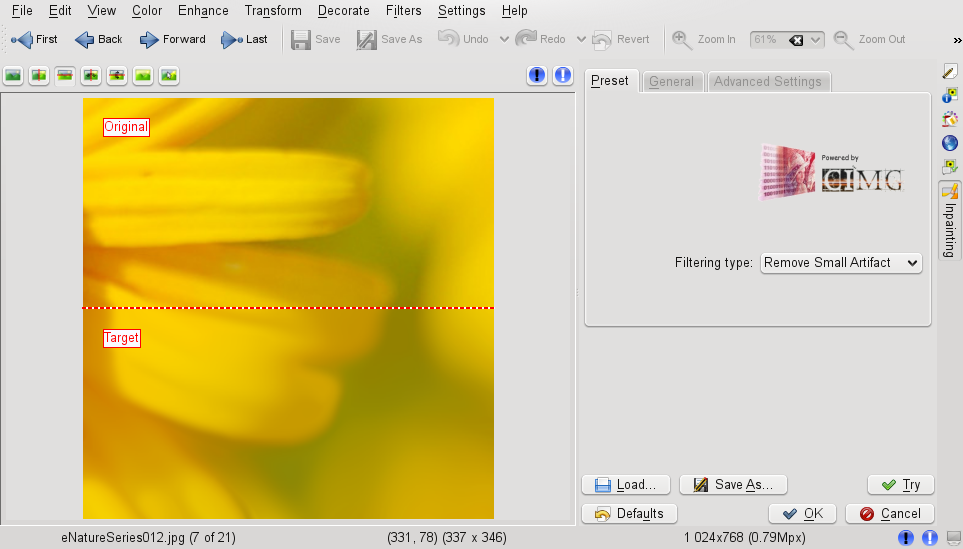
To observe the functionality of the options, look at , for example. Assume some dust or scratch on your lens ruined an image. To remove this kind of blemish, proceed as follows:
Open your image.
Use the mouse cursor to select the area to which to apply the fix.
Select + or press Ctrl+E.
Determine the method to use to remove the blemish:
If you opted against using any of the preset filters (in the tab), open the and tabs and adjust the settings to your needs.
Click to apply your settings and modify the image accordingly.
Creating and Reusing Your Own Filter Settings If you need to use the same set of settings more than once (for example, if a scratch on the lens ruined an entire series of images), create your set of filter settings. Save them for later use by clicking and saving them to a text file. For subsequent images, open the dialog, click , then select the text file and apply the filter settings with .
To scale or rotate an image, use the menu:
- Rotate, Flip, Free Rotation
Rotate your image to a certain degree. rotates by multiples of 90 degrees. With , specify any angle you want.
- Crop, Aspect Ratio Crop
Crop your image. cuts to any rectangular selection on top of your image. crops the image following various sophisticated design principles.
Adjust the perspective of an image. For example, if you notice some odd angles in shots containing vertical or horizontal lines, use this tool to correct them. Grab any of the four handles to the corners of your image and move them as needed. Use the tool to remove the resulting black edges of your image, and to trim it down.
Shift one part of your image to one direction and the other to the opposite direction, either horizontally or vertically. Specify the angles for vertical and horizontal shear and use to trim the resulting image.
Scale your image. offers a simple interface allowing you to manipulate your image size by pixel or percentage. Select whether to keep the aspect ratio. If you select , you can fine-tune the algorithms used on your resized image and improve the quality of the end product. Note that this option might be considerably slower than a simple resize operation.
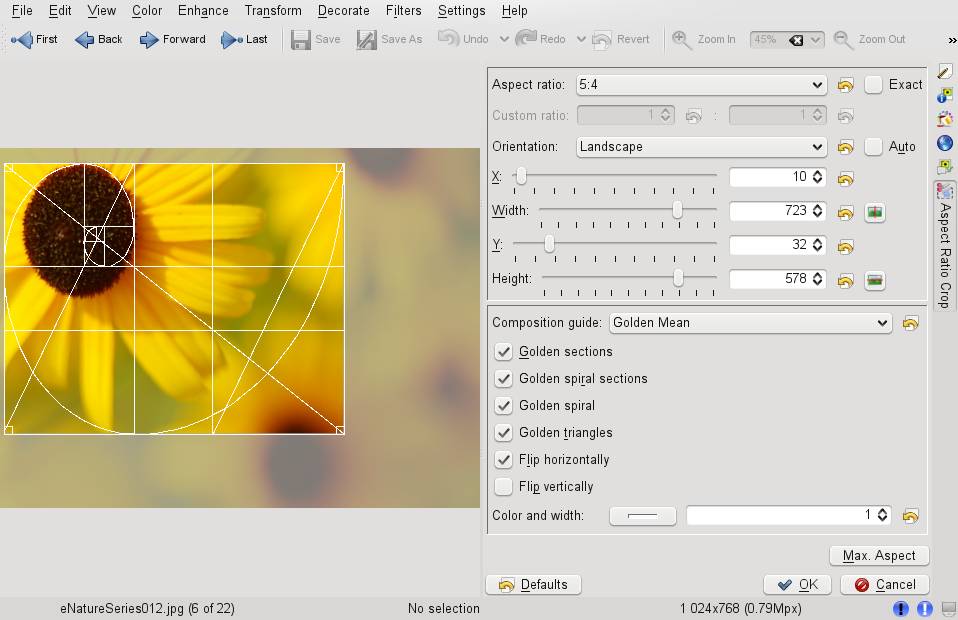
Assuming you have an image that is otherwise perfect, but you are not entirely satisfied with the composition yet or need to crop your image to match a certain paper format for reproduction. Use and proceed as follows:
Open your image.
Select +.
Determine the orientation and aspect ratio to use:
Specify a free crop of the image using the , , and , sliders.
Select a custom ration of width versus height instead of using one of the preset values.
These ratios match most of the common paper sizes used to print photographs. Pick the one that suits your purpose best.
A ratio (1:1.618) that is traditionally used by artists and architects to create harmonious results.
Use the button to set the crop area to the maximum possible size of the specified ratio.
After determining the size of your crop selection, optionally apply compositional rules to it. The helps to create a crop selection that results in a visually pleasing image. Dotted lines are displayed that guide you to a better composition of your image.
For More Information For a comprehensive description of the options, refer to http://docs.kde.org/kde3/en/extragear-graphics/digikam/image-editor.html
If the position of your crop does not follow the compositional rule to your satisfaction, move it.
Click to apply your crop selection and trim your image.
You can select from a variety of basic effects and filters to apply to your images, giving them a more artistic or over-the-top look:
Apply raindrop effects to your image. Determine the size and number of the drops and specify the degree of distortion caused by the drops ().
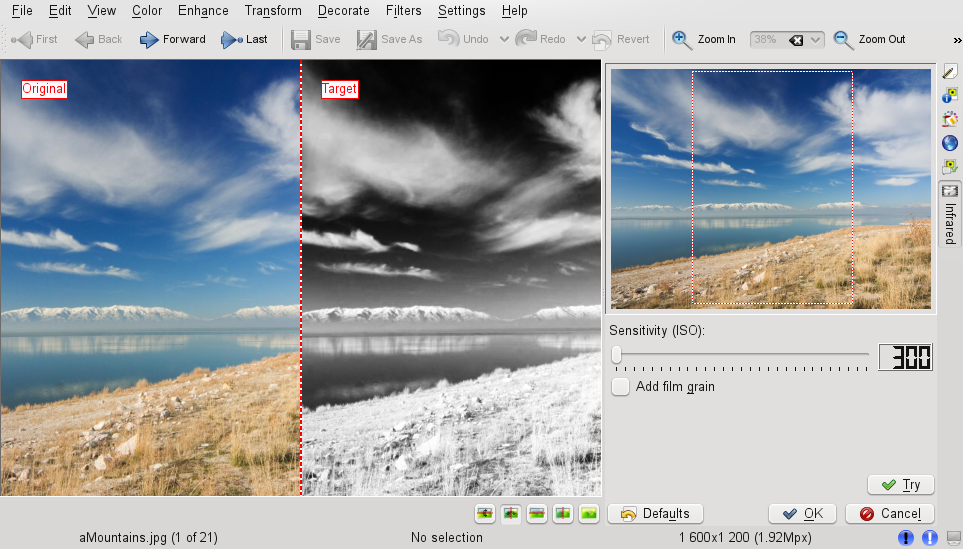
Simulate the use of infrared film to achieve a slightly surreal effect. The result is strikingly different from the original image. Add additional film grain and tweak the sensitivity (ISO) to achieve a more artistic feel.
Simulate an oil painting. Determine the brush size and the degree of smoothing to apply to your image.
Pretend your image had been embossed to a sheet of paper. Choose an appropriate depth.
Apply various strange distortion effects, such as fish eyes, to your image. Determine type, level, and repetition.
Add film grain to your image to give it a rough look.
Blur your image to simulate the image being out of focus or to mimic any kind of movement that was not there when you took the image.
Transform your image into a black and white charcoal drawing. Choose an appropriate pencil size and determine the degree of smoothing to apply to the image.
digiKam offers several little helpers for organizing your image collection and for processing your images. Find them in the menu. Some highlights:
If you suspect that your collection contains a number of duplicates, use this option to find and delete them. First, determine which album or tag to include in the scope of your search. Click to initiate the search. If your collection contains any duplicates, you get a split screen showing both images and can select one of them for deletion.
Create a simple calendar using a standard layout by selecting the images to use and by selecting paper size and fonts.
If you need to perform certain actions on a large number of files at once, use batch processing. Add borders, edit colors, apply various effects and filters, rename and resize images, recompress them, or perform a RAW conversion.
To find out whether your camera's RAW format is supported by the digiKam converter plug-in, check +. Use + to convert images from one format to another, for example from jpg to png.
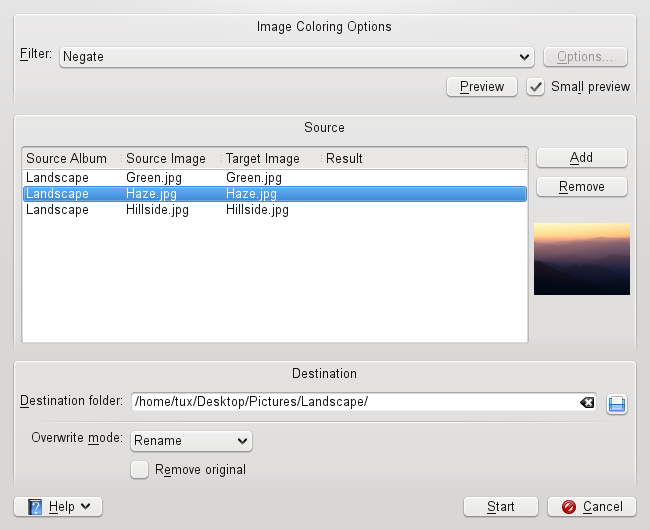
An example of batch processing of images could involve applying a solarizing effect to a number of images. To queue images for batch processing and perform the actual processing, proceed as follows:
Select + or right-click the album's name and select +.
Set the effect to and click to determine the degree of the effect to be applied and display an optional preview.
Decide whether to rename or overwrite the original images, or even have them removed after the transformation has taken place.
Set the target folder to hold the resulting images. If you do not want the new images to be written to the original folder, select and add a new folder or subfolder. Select the new folder with your mouse pointer.
Accept or modify the list of images queued for the transformation.
Click to initiate the transformation.
digiKam informs you about the progress and the success of the transformation.
Although openSUSE and digiKam support a broad range of cameras, you might occasionally hit one of the following problems when using your digital camera with openSUSE:
- Downloading Images from Your Camera Fails
If downloading your images fails no matter which protocol you have chosen (PTP or USB), try using the command line instead of digiKam. The gphoto2
--Pcommand initializes the camera and downloads the images if gphoto2 supports this camera.- Your Camera is not Officially Supported by digiKam
Try gphoto2
--list-camerasand the information at http://www.gphoto.org/ to obtain more information about the status of your camera's support by Linux.If the camera is not listed there, remove the storage medium from the camera and use a card reader device (either an external or internal one). As soon as the medium is detected, it is mounted automatically and you can import the images to your digiKam collection with + or +.
For more information about using digital cameras with Linux, refer to the following Web sites:
http://www.digikam.org>—The official homepage of digiKam
http://www.digikam.org/drupal/docs—The official digiKam Handbook
http://www.gphoto.org—Information about gPhoto2
http://www.gphoto.org/proj/libgphoto2/support.php—A comprehensive list of supported cameras