A Novell® AppArmor profile represents the security policy for an individual program instance or process. It applies to an executable program, but if a portion of the program needs different access permissions than other portions, the program can “change hats” to use a different security context, distinctive from the access of the main program. This is known as a hat or subprofile.
ChangeHat enables programs to change to or from a hat within a Novell AppArmor profile. It enables you to define security at a finer level than the process. This feature requires that each application be made “ChangeHat aware”, meaning that it is modified to make a request to the Novell AppArmor module to switch security domains at arbitrary times during the application execution. Two examples for ChangeHat-aware applications are the Apache Web server and Tomcat.
A profile can have an arbitrary number of subprofiles, but there are only
two levels: a subprofile cannot have further sub-subprofiles. A subprofile
is written as a separate profile and named as the containing profile
followed by the subprofile name, separated by a ^.
Subprofiles must be stored in the same file as the parent profile.
Note that the security of hats is considerably weaker than that of full profiles. That is to say, if attackers can find just the right kind of bug in a program, they may be able to escape from a hat into the containing profile. This is because the security of hats is determined by a secret key handled by the containing process, and the code running in the hat must not have access to the key. Thus change_hat is most useful in conjunction with application servers, where a language interpreter (such as PERL, PHP, or Java) is isolating pieces of code such that they do not have direct access to the memory of the containing process.
The rest of this chapter describes using change_hat in conjunction with Apache, to contain web server components run using mod_perl and mod_php. Similar approaches can be used with any application server by providing an application module similar to the mod_apparmor described next in Section 24.2.2, “Location and Directory Directives”.
![[Note]](admon/note.png) | For More Information |
|---|---|
For more information, see the change_hat man page. | |
Novell AppArmor provides a mod_apparmor
module (package
apache2-mod_apparmor) for
the Apache program. This module makes the Apache Web server
ChangeHat aware. Install it along with Apache.
When Apache is ChangeHat aware, it checks for the following customized Novell AppArmor security profiles in the order given for every URI request that it receives.
URI-specific hat. For example,
^phpsysinfo/templates/classic/images/bar_left.gifDEFAULT_URIHANDLING_UNTRUSTED_INPUT
| Apache Configuration |
|---|---|
If you install
a2enmod apparmor | |
As with most of the Novell AppArmor tools, you can use two methods for managing ChangeHat, YaST or the command line interface. Managing ChangeHat-aware applications from the command line is much more flexible, but the process is also more complicated. Both methods allow you to manage the hats for your application and populate them with profile entries.
The following steps are a demonstration that adds hats to an Apache profile using YaST. In the , the Novell AppArmor profiling utilities prompt you to create new hats for distinct URI requests. Choosing to create a new hat allows you to create individual profiles for each URI. You can create very tight rules for each request.
If the URI that is processed does not represent significant processing or otherwise does not represent a significant security risk, safely select to process this URI in the default hat, which is the default security profile.
This example creates a new hat for the URI
phpsysinfo and its subsequent accesses. Using the
profiling utilities, delegate what to add to this new hat. The resulting
hat becomes a tight-security container that encompasses all the
processing on the server that occurs when the
phpsysinfo URI is passed to the Apache Web server.
The URI runs the application phpsysinfo (refer to
http://phpsysinfo.sourceforge.net for more
information). The
phpsysinfo package is
assumed to be installed in
/srv/www/htdocs/phpsysinfo in a clean (new)
installation of
openSUSE
and AppArmor.
Once
phpsysinfois installed, you are ready to add hats to the Apache profile. From the Novell AppArmor GUI, select .In , enter httpd2-prefork.
Click .

Restart Apache by entering rcapache2 restart in a terminal window.
Restart any program you are profiling at this point.
Open
http://localhost/phpsysinfo/in a Web browser window. The browser window should display network usage and system information.Data Caching To ensure that this request is processed by the server and you do not review cached data in your browser, refresh the page. To do this, click the browser button to make sure that Apache processes the request for the
phpsysinfoURI.Click . Novell AppArmor launches the aa-logprof tool, which scans the information learned in the previous step. It begins to prompt you with profile questions.
aa-logprof first prompts with or because it noticed that the
phpsysinfoURI was accessed. Select .Click .
Choosing in the previous step creates a new hat in the profile and specifies that the results of subsequent questions about the script's actions are added to the newly created hat rather than the default hat for this application.
In the next screen, Novell AppArmor displays an external program that the script executed. You can specify that the program should run confined by the phpsysinfo hat (choose ), confined by a separate profile (choose ), or that it should run unconfined or without any security profile (choose ). For the case of the option, a new profile is created for the program if one does not already exist.
Security Considerations Selecting can create a significant security hole and should be done with caution.
Select for the
/bin/bashpath. This adds/bin/bash(accessed by Apache) to the phpsysinfo hat profile with the necessary permissions.Click .
The remaining questions prompt you to generate new hats and add entries to your profile and its hats. The process of adding entries to profiles is covered in detail in the Section 22.1, “Adding a Profile Using the Wizard”.
When all profiling questions are answered, click to save your changes and exit the wizard.
The following is an example phpsysinfo hat.
Example 24.1. Example phpsysinfo Hat
/usr/sbin/httpd2-prefork {
  ...
  ^phpsysinfo {
    #include <abstractions/bash>
    #include <abstractions/nameservice>

    /bin/basename                        ixr,
    /bin/bash                            ixr,
    /bin/df                              ixr,
    /bin/grep                            ixr,
    /bin/mount                           Ux,
    /bin/sed                             ixr,
    /dev/bus/usb/                        r,
    /dev/bus/usb/**                      r,
    /dev/null                            w,
    /dev/tty                             rw,
    /dev/urandom                         r,
    /etc/SuSE-release                    r,
    /etc/ld.so.cache                     r,
    /etc/lsb-release                     r,
    /etc/lsb-release.d/                  r,
    /lib/ld-2.6.1.so                     ixr,
    /proc/**                             r,
    /sbin/lspci                          ixr,
    /srv/www/htdocs/phpsysinfo/**        r,
    /sys/bus/pci/**                      r,
    /sys/bus/scsi/devices/               r,
    /sys/devices/**                      r,
    /usr/bin/cut                         ixr,
    /usr/bin/getopt                      ixr,
    /usr/bin/head                        ixr,
    /usr/bin/lsb_release                 ixr,
    /usr/bin/lsscsi                      ixr,
    /usr/bin/tr                          ixr,
    /usr/bin/who                         ixr,
    /usr/lib/lib*so*                     mr,
    /usr/lib/locale/**                   r,
    /usr/sbin/lsusb                      ixr,
    /usr/share/locale/**                 r,
    /usr/share/pci.ids                   r,
    /usr/share/usb.ids                   r,
    /var/log/apache2/access_log          w,
    /var/run/utmp                        kr,
   }
} | Hat and Parent Profile Relationship |
|---|---|
The profile | |
When you use the dialog (for instructions, refer to Section 22.3, “Editing Profiles”) or when you add a new profile using (for instructions, refer to Section 22.2, “Manually Adding a Profile”), you are given the option of adding hats (subprofiles) to your Novell AppArmor profiles. Add a ChangeHat subprofile from the window as in the following.
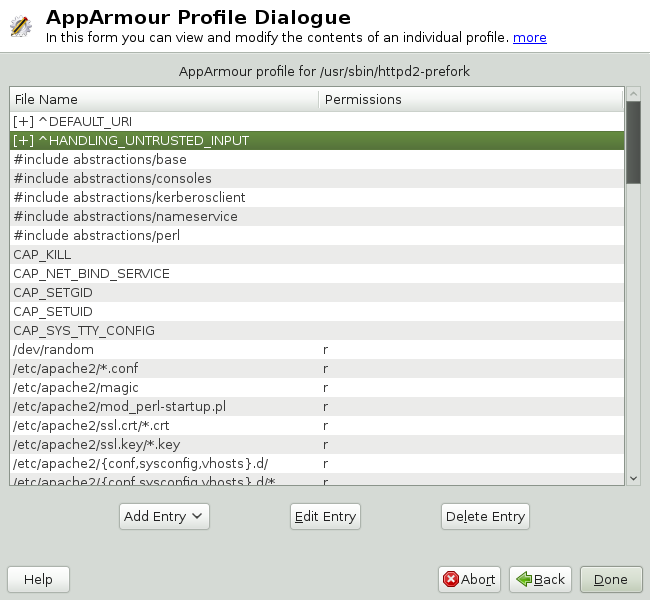 |
From the window, click then select . The dialog box opens:
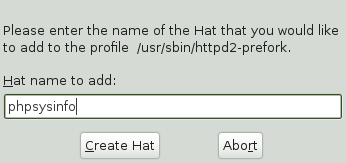
Enter the name of the hat to add to the Novell AppArmor profile. The name is the URI that, when accessed, receives the permissions set in the hat.
Click . You are returned to the screen.
After adding the new hat, click .
| For More Information |
|---|---|
For an example of an Novell AppArmor profile, refer to Example 24.1, “Example phpsysinfo Hat”. | |
Apache is configured by placing directives in plain text configuration
files. The main configuration file is usually
httpd.conf. When you compile Apache, you can
indicate the location of this file. Directives can be placed in any of
these configuration files to alter the way Apache behaves. When you make
changes to the main configuration files, you need to start or restart
Apache, so the changes are recognized.
Virtual host directives control whether requests that contain trailing pathname information following an actual filename (or that refer to a nonexistent file in an existing directory) are accepted or rejected. For Apache documentation on virtual host directives, refer to http://httpd.apache.org/docs/2.2/mod/core.html#virtualhost.
The ChangeHat-specific configuration keyword is
AADefaultHatName. It is used similarly to
AAHatName, for example, AADefaultHatName
My_Funky_Default_Hat.
The configuration option is actually based on a server directive, which enables you to use the keyword outside of other options, setting it for the default server. Virtual hosts are considered internally within Apache to be separate “servers,” so you can set a default hat name for the default server as well as one for each virtual host, if desired.
When a request comes in, the following steps reflect the sequence in
which mod_apparmor attempts to apply hats.
A location or directory hat as specified by the
AAHatNamekeywordA hat named by the entire URI path
A default server hat as specified by the
AADefaultHatNamekeywordDEFAULT_URI(if none of those exist, it goes back to the “parent” Apache hat)
Location and directory directives specify hat names in the program configuration file so the program calls the hat regarding its security. For Apache, you can find documentation about the location and directory directives at http://httpd.apache.org/docs/2.2/sections.html.
The location directive example below specifies that, for a given
location, mod_apparmor should use a specific hat:
<Location /foo/> AAHatName MY_HAT_NAME </Location>
This tries to use MY_HAT_NAME for any URI beginning
with /foo/ (/foo/,
/foo/bar,
/foo/cgi/path/blah_blah/blah, etc.).
The directory directive works similarly to the location directive, except it refers to a path in the file system as in the following example:
<Directory "/srv/www/www.immunix.com/docs">
  # Note lack of trailing slash
  AAHatName immunix.com
</Directory>
Example: The program phpsysinfo is used to illustrate a location directive in the following example. The tarball can be downloaded from http://phpsysinfo.sourceforge.net.
After downloading the tarball, install it into
/srv/www/htdocs/phpsysinfo.Create
/etc/apache2/conf.d/phpsysinfo.confand add the following text to it:<Location "/phpsysinfo"> AAHatName phpsysinfo </Location>
The following hat should then work for phpsysinfo:
/usr/sbin/httpd2-prefork {
  ...
  ^phpsysinfo {
    #include <abstractions/bash>
    #include <abstractions/nameservice>

    /bin/basename                        ixr,
    /bin/bash                            ixr,
    /bin/df                              ixr,
    /bin/grep                            ixr,
    /bin/mount                           Ux,
    /bin/sed                             ixr,
    /dev/bus/usb/                        r,
    /dev/bus/usb/**                      r,
    /dev/null                            w,
    /dev/tty                             rw,
    /dev/urandom                         r,
    /etc/SuSE-release                    r,
    /etc/ld.so.cache                     r,
    /etc/lsb-release                     r,
    /etc/lsb-release.d/                  r,
    /lib/ld-2.6.1.so                     ixr,
    /proc/**                             r,
    /sbin/lspci                          ixr,
    /srv/www/htdocs/phpsysinfo/**        r,
    /sys/bus/pci/**                      r,
    /sys/bus/scsi/devices/               r,
    /sys/devices/**                      r,
    /usr/bin/cut                         ixr,
    /usr/bin/getopt                      ixr,
    /usr/bin/head                        ixr,
    /usr/bin/lsb_release                 ixr,
    /usr/bin/lsscsi                      ixr,
    /usr/bin/tr                          ixr,
    /usr/bin/who                         ixr,
    /usr/lib/lib*so*                     mr,
    /usr/lib/locale/**                   r,
    /usr/sbin/lsusb                      ixr,
    /usr/share/locale/**                 r,
    /usr/share/pci.ids                   r,
    /usr/share/usb.ids                   r,
    /var/log/apache2/access_log          w,
    /var/run/utmp                        kr,
   }
}
Reload Novell AppArmor profiles by entering rcapparmor restart at a terminal window as
root.Restart Apache by entering rcapache2 restart at a terminal window as
root.Enter
http://hostname/phpsysinfo/into a browser to receive the system information that phpsysinfo delivers.Locate configuration errors by going to
/var/log/audit/audit.logor running dmesg and looking for any rejections in the output.