| openSUSE-Dokumentation Chapter 23. Managing Your Digital Image Collection / 23.7. Viewing and Editing Images | ||||
|---|---|---|---|---|
 | 23.6. Exporting Image Collections | 23.8. Useful Tools |  | |
| openSUSE-Dokumentation Chapter 23. Managing Your Digital Image Collection / 23.7. Viewing and Editing Images | ||||
|---|---|---|---|---|
| 23.6. Exporting Image Collections | 23.8. Useful Tools | | |
digiKam comes with a comprehensive image viewing and editing suite
consisting of various plug-ins. To enter digiKam's viewing or editing
mode, right-click an image thumbnail and select
or from the context menu. To use the plug-ins,
you need to install the
digikamimageplugins
package.
To view one or more images you have the following options:
To view a single image, browse to your album or collection and click on your image to display it. Another click brings you back to the previous view.
To start a slide show with all images, use ++.
To start a slide show with selected images only, hold down the Ctrl key, select your images, and choose ++.
To edit a selected image, use from the main menu. It opens a window which contains some of the most frequently used basic editing options:
Use the back/forward buttons to browse your album without having to go back to the full album view.
Use the undo/redo menus to selectively undo or redo certain operations.
Use the zooming options to zoom in or out or to fit the image view to the window size you are using. Use the looking glass icon to selectively zoom into a particular area of the image.
Flip the image clockwise or counter-clockwise.
Activate a slide show or full screen view of the selected image.
The editing mode contains more useful features. Use the menu to superimpose various kinds of graphics and text effects on your images without having to bother about filters and their fine-tuning:
Select the type of texture you want to apply to your image and determine how prominent this texture should be (). digiKam applies the texture and saves the changes to the original copy of your image.
Select the type of border. Depending on the type of border you have selected, choose one or two colors to be used for the border and set the width of the border around your image. digiKam creates the border and saves the changes to the original copy of your image.
Enter the text you want to superimpose on the image, choose font, font style and size. Select the text justification and decide whether the text should be rotated and to what degree. Add an optional border and semi-transparency. digiKam adds your text layer to the original image.
Just as you can superimpose any text on your image, you can also apply ready-made templates to create funny greeting cards, posters and the like.
The menu allows you to manage all kinds of different color-related settings. Its capabilities range from simple auto correction mechanisms to full-blown color management via color profiles:
If aiming for a straightforward color and exposure correction of your image, try this option. Choose from various preset modes and apply the one that matches best. Use the histograms to determine whether the result matches your needs.
This tool offers a simple way of fixing over or underexposed images.
This tool helps you to optimize images that have been taken under very bright lighting conditions and appear somewhat washed out. Bring color saturation back to these images by manipulating the hue and saturation sliders. Depending on the level of color, you might also want to adjust the lightness to prevent the image from registering too dark. Of course, you can also use this tool to achieve the opposite effect if you need to brighten up an image that has been taken at low light conditions and contains far too much color saturation.
Depending on the lighting conditions under which an image was taken or the quality of an image scan, the colors may appear somehow out of balance. Using the color balance tool, you can try to shift the balance towards another end of the color spectrum.
Invert the color values.
Transform your color image into a black and white one. Use the , , , and to tweak the end product. The tab offers you to emulate the effects various black and white films. To emulate color filters used with the camera lens, use the tab. Note that you can only apply one filter at a time. Using the tab you can have your black and white image tinted in a particular way (sepia, for example).
Determine the color depth (in bit). Transform 8-bit into 16-bit images and vice versa.
Color management via ICC color profiles helps you maintain color fidelity across multiple output devices (camera, display, printer).
Use this option to control multiple levels and to check the resulting image in just one tool. It lets you save the level settings you chose and thus enables you to apply the same corrections to multiple images if needed. This comes in handy if you know that your camera tends to use the same faulty color settings all the time and you would like to be able to correct them with just a single click.
This tool offers a selection of color effects like edge finding, solarizing, etc.
Every source of light registers differently on your digital camera's chip. Depending on the light source, the color temperature tends to register either warmer (towards the red end of the spectrum) or cooler (towards the blue end of the spectrum) than standard daylight. Most cameras ship with preset white balance schemes that try to compensate these effects. If the resulting images registers faulty, use the white balance adjustment provided by digiKam. Either manipulate the color temperature directly by using the Kelvin slider or choose one of the preset white balance schemes.
This tool allows you to basically perform any operation available through the and the tools, but in one tool and using free-function mapping. Therefore this tool is more powerful and flexible than the other two, but it may take some time to get used to its handling.
The channel mixer tool provides an alternative way of converting colored images to black and white. Using the option and the channel sliders, you can selectively determine how much each of the color channels contributes to the overall image. The channel mixer option is much more flexible than the standard conversion to black and white, because you can manage each color channel separately.
Use the menu to address a number of common defects related to digital imagery:
Tweak the sharpness of your image or smooth it.
Reduce or eliminate red eyes caused by use of a flash.
“Heal” defective areas of your image.
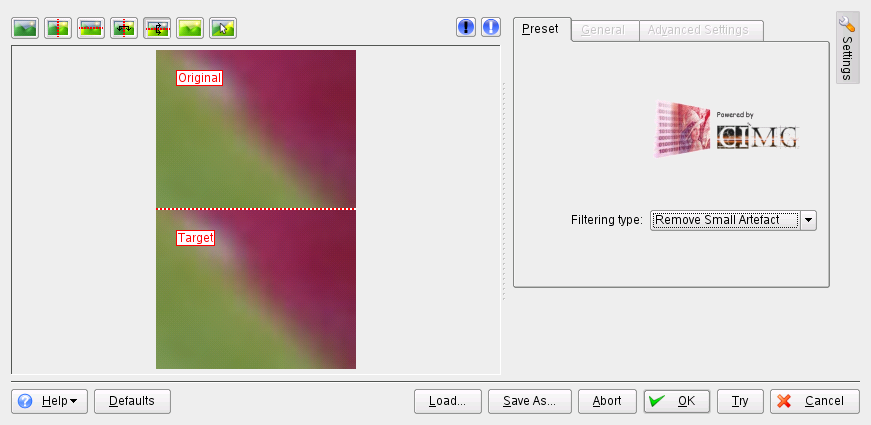
Remove artifacts, such as those caused by dust on your lens or sensor. Compensate for pixel noise caused by high ISO settings of your digital camera and reduce noise and artifacts in low quality scans.
Detect and erase problem pixels of your image caused by defective pixels of your camera's sensor.
Compensate for barrel and pincushion distortion of your images caused by the use of strong wide-angle or telephoto lenses.
Provides an all-inclusive treatment to images suffering from all sorts of digital defects, such as noise and scratches.
Compensates circular shades (vignettes) at the edges or in the center of your image that were caused by the use of strong wide-angle or telephoto lenses.
To observe the functionality of the options, look at , for example. Assume some dust or scratch on your lens ruined an image. To remove this kind of artifact, proceed as follows:
Open your image.
Use the mouse cursor to select the area to which to apply the fix.
Select + or press Ctrl+E.
Determine the method to use to remove the artifact:
If you opted against using any of the preset filters (in the tab), open the and tabs and adjust the settings to your needs.
Click to apply your settings and modify the image accordingly.
![[Tip]](admon/tip.png) | Creating and Reusing Your Own Filter Settings |
|---|---|
If you need to use the same set of settings more than once, for example, if a scratch on the lens ruined an entire series of images, create your set of filter settings. Save them for later use by clicking and saving them to a text file. For subsequent images, open the dialog, click , then select the text file and apply the filter settings with . | |
To scale or rotate an image, use the menu:
Rotate your image to a certain degree. rotates by multiples of 90 degrees. With , specify any angle you want.
Crop your image. cuts to any rectangular selection on top of your image. crops the image following various sophisticated design principles.
Adjust the perspective of an image. For example, if you notice some odd angles in shots containing vertical or horizontal lines, use this tool to set them right. Grab any of the four handles to the corners of your image and move them as much as needed. Use the tool to remove the resulting black edges of your image and to trim it down.
Shift one part of your image to one direction and the other to the opposite direction, either horizontally or vertically. Specify the angles for vertical and horizontal shear and use to trim the resulting image.
Scale your image. offers a simple interface allowing you to manipulate your image size by pixel or percentage. Select whether to keep the aspect ratio. If you select , you can fine-tune the algorithms used to on your resized image and improve the quality of the end product. Note that this option might be considerably slower than a simple resize operation.
Assuming you have an image that is otherwise perfect, but you are not entirely satisfied with the composition yet or need to crop your image to match a certain paper format for reproduction. In this case, use and proceed as follows:
Open your image.
Select +.
Determine the orientation and aspect ratio to use:
Specify a free crop of the image using the , , and , sliders.
Select a custom ration of width versus height instead of using one of the preset values.
These ratios match most of the common paper sizes used to print photographs. Pick the one that suits your purpose best.
A ratio (1:1.618) that is traditionally used by artists and architects to create harmonious results.
Use the button to set the crop area to the maximum possible size of the ratio specified.
After determining the size of your crop selection, optionally apply compositional rules to it. The helps to create a crop selection that results in a visually pleasing image. Dotted lines are displayed that guide you to a better composition of your image.
| For More Information |
|---|---|
For a comprehensive description of the options, refer to http://docs.kde.org/stable/en/extragear-graphics/digikam/using-kapp-imageeditor.html. | |
If the position of your crop does not follow the compositional rule to your satisfaction, move it.
Click to apply your crop selection and trim your image.
You can select from a variety of basic effects and filters to apply to your images to give them a more artistic or over-the-top look:
Apply raindrop effects to your image. Determine the size and number of the drops and finally specify the degree of distortion caused by the drops ().
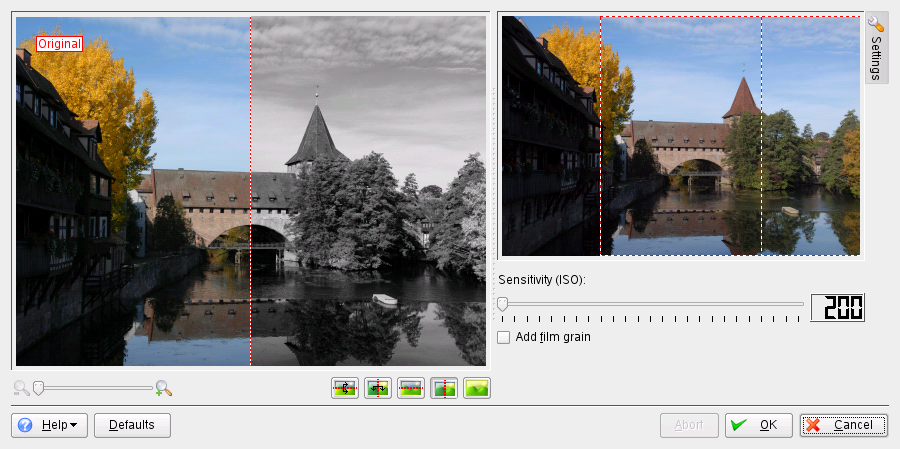
Simulate the use of infrared film to achieve a slightly surreal effect. The result is strikingly different from the original image. Add additional film grain and tweak the sensitivity (ISO) to achieve a more artistic feel.
Simulate an oil painting. Determine the brush size and the degree of smoothing to apply to your image.
Pretend your image had been embossed to a sheet of paper. Choose an appropriate depth.
Apply various strange distortion effects, such as fish eyes, to your image. Determine type, level, and repetition.
Add film grain to your image to give it a rough look.
Blur your image to simulate the image being out of focus or to mimic any kind of movement that was not there when you took the image.
Transform your image into a black and white charcoal drawing. Choose an appropriate pencil size and determine the degree of smoothing to apply to the image.